TryHackMe – Linux Fundamentals Part 1 – Complete Walkthrough

This room covers some essential Linux basics. We learn what Linux is, how to spin up a Linux virtual machine (VM) in THM, and a number of essential commands and operators. By going through this room, you’ll learn how to navigate the Linux file structure, search for files, read the contents of a file, and search inside a file’s contents.
This TryHackMe Room is the first in a three-part introductory series on Linux.
This room can be found at: https://tryhackme.com/room/linuxfundamentalspart1
About this walkthrough
In this walkthrough (like all of my walkthroughs), I will not only cover what you need to get through the room, but I will also dive into the topics covered by the room itself. My hope is that having an additional source of information and perspective will help support learning and retention of the same topics covered in the room. Sometimes I will also cover a topic that isn’t covered in the TryHackMe room because I feel that it may be a useful supplement at that point in the lesson. Feel free to use this room as a supplement rather than a walkthrough.
I also try to prevent spoilers by making finding the solutions a manual action, similar to how you might watch a video of a walkthrough (i.e. the answers are given, but they still require an intentional act to obtain). My recommendation is always to work as hard as you can through every problem and only use the solutions as a last resort.
I personally love TryHackMe and appreciate everything that they do to make the field of cybersecurity more accessible and fun.
- TryHackMe – Linux Fundamentals Part 1 – Complete Walkthrough
- Task 1 – Introduction
- Task 2 – A Bit of Background on Linux
- Task 3 – Interacting With Your First Linux Machine
- Task 4 – Running Your First Few Commands
- Task 5- Interacting With the Filesystem!
- Task 6 – Searching for Files
- Task 7 – An Introduction to Shell Operators
- Task 8 – Conclusions & Summaries
- Task 9 – Linux Fundamentals Pt. 2
Walkthrough
Task 1 – Introduction
Most people are familiar with operating systems like Windows and MacOS. Like these, Linux is an operating system. You may be unaware that Linux is actually very common. A prominent example is Android OS, which uses the Linux kernel. Linux is also used in cars, servers, supercomputers, and many other applications.
Question 1
Let’s get started!
Walkthrough:
This question is a freebie.
Answer:
(Highlight below to find the answer):
No answer needed
Task 2 – A Bit of Background on Linux
We’ve seen that even though Linux isn’t very at common for home use, it is popular for many other applications.
Even though we often speak of Linux as being a single operating system, Linux is actually a family of operating systems that are all based on the Linux kernel.
There are many variants of Linux because it’s open source. That means that anyone can use, change, or distribute the software for free. Different versions of Linux are often created to solve specific problems or meet specific demands.
Question 1
Research: What year was the first release of a Linux operating system?
Walkthrough:
This is a research question, so I won’t give you the answer here. It’s very easy to find out. Just google it.
Task 3 – Interacting With Your First Linux Machine
One of the best things about TryHackMe is the ability to spin up a virtual machine in your browser. A virtual machine is an emulation of an actual computer, and allows us to do basically anything that we could do with a dedicated computer. Virtual machines allow us to work with different operating systems and make use of tools that we don’t normally have access to on our computer’s operating system.
This means that you don’t need a dedicated machine in order to learn a different OS.
To complete this task, you’ll need to click the green ‘Start Machine’ button at the top of this Task (Task 3).
Have a little patience: it will take some time for the machine to begin initializing and a few minutes for it to be ready.
Once the machine is active, you’ll see a card at the top of the room that tells you how much time you have left as well as the IP address of the machine.
There are actually two deployable machines in this room: the THM AttackBox, which can be deployed from a blue button at the very top of the room, and the linuxfundpt1 machine, which is deployed from the top of Task 3.
For this Room, we will be using the linuxfundpt1 machine, which will bring you right into a command prompt (rather than the AttackBox which will open a GUI).
In later lessons we’ll actually start up two machines at once: one will be the attacker and the other the defender.
Question 1
I’ve deployed my first Linux machine!
Walkthrough:
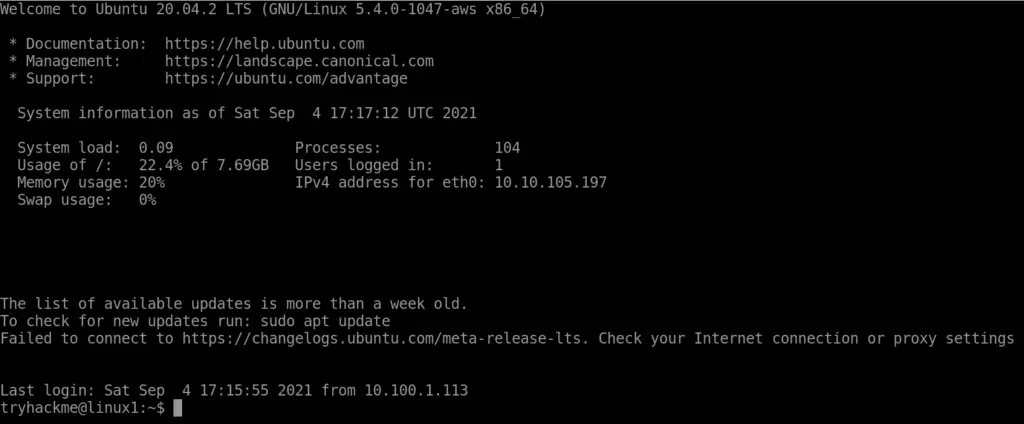
Make sure your have the right machine deployed. Your screen should look like this:
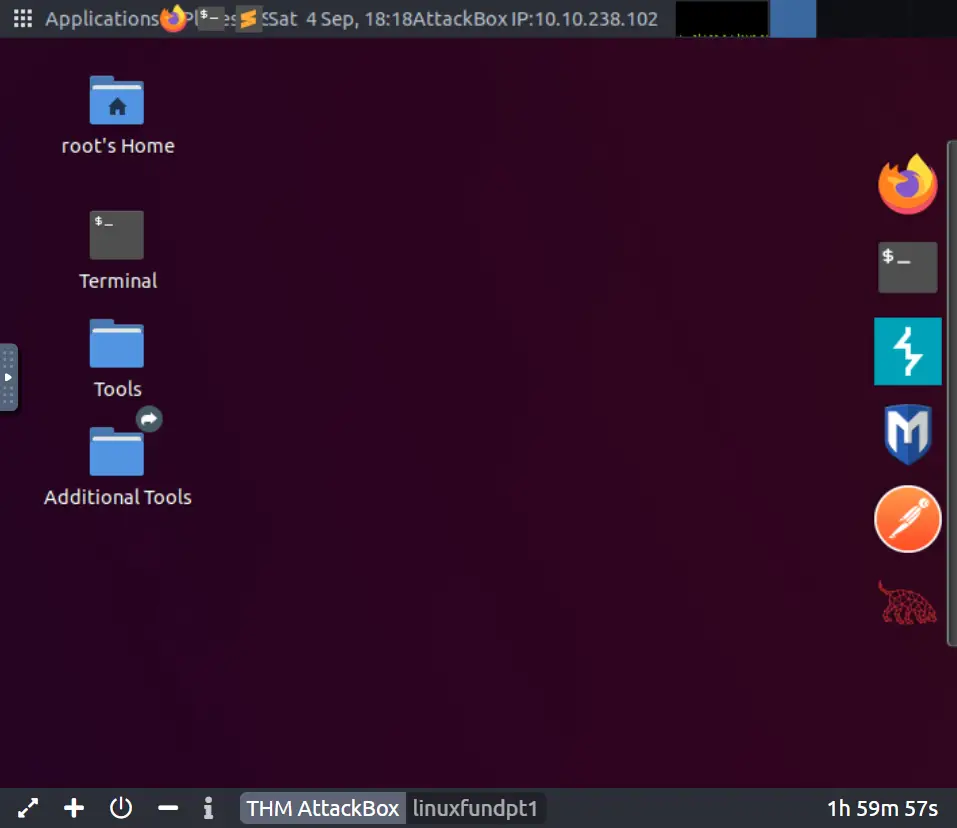
If you accidentally started the AttackBox, you will see this instead:
At the bottom of the screen, you’ll see tabs corresponding to the machine. In the above example we have activated both machines, so we can use the corresponding tab to access the machine we want.
Answer:
(Highlight below to find the answer):
No answer needed
Task 4 – Running Your First Few Commands
While most flavors of Linux have a graphical user interface (GUI), the command line is really where a lot of the action is. Command lines might seem intimidating, but they allow us to perform functions that would actually be more difficult or time consuming than using a GUI.
Windows is actually a great example of the power of the command line; since the GUI tends to change with every new version of Windows, you’d need to know exactly how to navigate through the different menus to achieve your objective. Commands, however, rarely change, so if you know the command you need to use, you can generally execute a task much faster via the command line than you can if you need to navigate through a lot of windows.
In the last task, we spun up a virtual machine (VM) called linuxfundpt1. This VM features a command line interface which is also called a terminal.
In this task, we learn two simple but important commands: echo and whoami.
echo – will return any text that we provide. For example, the command ‘echo hello!’ will return ‘hello!’. This might seem trivial, but it’s used in a lot of code to provide information back to the user – like progress updates.
whoami – will tell us what user we are currently logged in as.
Question 1
If we wanted to output the text “TryHackMe“, what would our command be?
Walkthrough:
Can you guess which of the two commands we’ll be using?
If you guessed echo, you’d be right. So how can we use echo to return the text ‘TryHackMe’?
Check the example above if you’re unsure. Before you try to answer (or cheat using the answer below), experiment and have fun!
Answer:
(Highlight below to find the answer):
echo TryHackMe
Question 2
What is the username of who you’re logged in as on your deployed Linux machine?
Walkthrough:
For this question, we’ll need to use the whoami command, which should return the answer. Just type ‘whoami’ into the command line interface (CLI).
Answer:
(Highlight below to find the answer):
tryhackme
Task 5- Interacting With the Filesystem!
You’re probably very familiar with navigating the filesystem on Windows or MacOS using the GUI to navigate a series of windows. We can create files or folders and organize the system at will.
These types of functions are important in Linux as well, and we can get familiar enough with the command line to make it just as easy as it is in a GUI.
In this Task, we’ll learn four new, super-important commands: ls, cd, cat, and pwd.
ls – lists the contents of the current directory. Tip: you can list the contents of any directory by using ‘ls /directory/’.
cd – changes the current directory. Tip: you can navigate back ‘up’ through the filesystem using ‘cd ..’ or back to the home directory using ‘cd ~’.
cat – outputs the contents of a file.
pwd – prints the current (working) directory.
Question 1
On the Linux machine that you deploy, how many folders are there?
Walkthrough:
If you’ve been experimenting with navigating through the filesystem, use the command ‘cd ~’ to get back to the home directory.
Type in the ‘ls’ command. You should see a number of folders, which are highlighted in blue.
Answer:
(Highlight below to find the answer):
4
Question 2
Which directory contains a file?
Walkthrough:
There are four directories, as we saw in the last question. We could navigate into each directory using ‘cd <directory>’ and then use ‘ls’ to search each one, but this takes more work than necessary.
Instead, we can use the ls command from the home directory to search each folder.
To search folder1, just type ‘ls folder1’.
For each subsequent folder, you can just use the ‘up’ arrow on your keyboard and the previous command will show up in the terminal. Now all you need to do is change ‘folder1’ to ‘folder2’. You should quickly be able to identify the directory containing a file with this technique. We’re looking for a file named ‘note.txt’.
Answer:
(Highlight below to find the answer):
folder4
Question 3
What is the contents of this file?
Walkthrough:
We’ll need to use the ‘cat’ command to answer this question. This can be done by either navigating into the directory using ‘cd <directory>’ and executing ‘cat <filename>’ or from the home directory using ‘cat <directory>/<filename>’.
Answer:
(Highlight below to find the answer):
Hello World!
Question 4
Use the cd command to navigate to this file and find out the new current working directory. What is the path?
Walkthrough:
First, use ‘cd <directory>’ to navigate into the directory containing the ‘note.txt’ file.
Next, review the four commands to identify the one that will tell us the current working directory.
This command is super important! It allows us to check that we are in the directory we want to be in, at any given time.
From inside the directory, use this three letter command to print the working directory.
Answer:
(Highlight below to find the answer):
/home/tryhackme/folder4
Task 6 – Searching for Files
This Task introduces two new commands: find and grep.
Using find
find – allows us to search for files or directories that match specific search criteria. Two common options are -type and -name. For -type, we can use d for directories or f for files, for example:
find -type d
find -type f
We can combine this with the -name option to search for files or directories that have a given character combination in their name. This is commonly done using asterisks to signify wildcards, for example:
find -type f -name *myfile*
Will search for files with ‘myfile’ somewhere in the name. The -name option can be used to find files of a certain type, i.e.:
find -name *.txt
Which will search for all .txt files.
We can also specify directories to search; to search everything in the file structure, we can tell find to search the whole root directory using:
find / -type f -name *myfile*
Will search the entire filesystem for files with ‘myfile’ somewhere in their name.
Using grep
While the ‘find’ command allows us to search for files, ‘grep’ allows us to search the contents of files.
This can be really useful when trying to search a large file.
With grep, we need to pass it the argument we are searching for as well as the file that we want it to search.
For example if we want to search a file called mycatfile.txt for the term ‘kitten’, we would use:
grep “kitten” mycatfile.txt
Question 1
Use grep on “access.log” to find the flag that has a prefix of “THM”. What is the flag?
Walkthrough:
Try to guess the solution before going further.
Use the following command in the terminal:
grep “THM” access.log
We will see a bunch of content but the flag we are looking for has the format ‘THM{FLAG}’.
Answer:
(Highlight below to find the answer):
THM{ACCESS}
Task 7 – An Introduction to Shell Operators
So far, we have covered a number of important Linux commands.
In addition to commands, Linux also supports a number of operators that allow us to do more with the commands. Operators are identified by a symbol rather than a letter-based command.
We’ll cover four different operators in this task: &, &&, >, and >>.
The & Operator
The & operator is a useful command that allows us to run commands in the background. Sometimes, we want to complete a task that will take a while but we don’t want our terminal to stay frozen while the command is being executed. This is where the & operator comes in.
One example is copying a large file; by using the & operator, we can continue to use our terminal while the file is being copied in the background.
The && Operator
This operator will allow us to execute multiple commands using a single line of code. You can use this to string together any number of commands, not just two.
Note that the commands are executed sequentially, beginning with the first and ending with the last.
As a simple example, we can navigate to the home directory using ‘cd ~’.
From there, let’s navigate back to folder4, list the contents of folder 4, and output the contents of note.txt using a single line on the terminal:
cd folder4 && ls && cat note.txt
This will change our working directory and output:
note.txt
Hello World!
The > Operator
This operator allows us to redirect the output of a command.
This is actually incredibly useful when performing a variety of scans for pentesting, as it allows us to output a scan to a file that we can refer back to or search using the grep command.
Let’s see a simple example. Navigate back to the home directory using ‘cd ~’ and use the find command to identify .txt files. Instead of outputting to the command line, we’ll use the > operator to output to a file ‘my_txt_files’ that will be created on the spot:
find -name *.txt > my_txt_files
This example is trivial because there will only be one entry, but what if we had a lot of entries? By having our command output in the form of a file, it makes it much more searchable and readable- especially as we’ll learn new commands (other than ‘cat’) that make reading files much easier on Linux.
Note that the > operator re-writes the file that we output to, deleting the current contents in the process.
The > operator can also be used in combination with the echo command in order to create a new file with whatever content we want, e.g.:
echo mynewcontent > mynewfile
If we were to cat ‘mynewfile’, we would see that the contents of mynewfile is just ‘mynewcontent’.
The >> Operator
This operator is just like the > operator except it adds the output to the end of a file rather than re-writing the whole file. This is useful because we don’t always want to make a new file or re-write an existing one.
Question 1
If we wanted to run a command in the background, what operator would we want to use?
Walkthrough:
This is the first command that we learned in this Task.
Answer:
(Highlight below to find the answer):
&
Question 2
If I wanted to replace the contents of a file named “passwords” with the word “password123”, what would my command be?
Walkthrough:
For this command, we will use the > operator in combination with the echo command to rewrite the file named ‘passwords’.
The format is:
echo <new password> > <file>
Answer:
(Highlight below to find the answer):
echo password123 > passwords
Question 3
Now if I wanted to add “tryhackme” to this file named “passwords” but also keep “passwords123”, what would my command be
Walkthrough:
Remember, the > operator will overwrite any file contents while the >> operator will simply add the new content to the end of the file.
We’ll need the use the >> operator in much the same way as we used the > operator in the last question.
Answer:
(Highlight below to find the answer):
echo tryhackme >> passwords
Question 4
Now use the deployed Linux machine to put these into practice
Walkthrough:
Have fun experimenting with Linux commands and operators!
Answer:
(Highlight below to find the answer):
No answer needed
Task 8 – Conclusions & Summaries
We’ve covered an overview of Linux and the command line interface (CLI), and have learned a bunch of new commands and operators. They may seem basic, but they are absolutely essential for mastery of Linux, and we will see them over and over again.
The commands we’ve learned in this Room are: echo, whoami, ls, cd, cat, and pwd.
And the operators are: &, &&, >, and >>.
Question 1
I’ll have a play around!
Walkthrough:
Experiment with the different commands and operators in the command line.
Answer:
(Highlight below to find the answer):
No answer needed
Task 9 – Linux Fundamentals Pt. 2
This Room is the first in a series of 3.
The journey continues with Linux Fundamentals Pt. 2.
Question 1
Terminate the machine deployed in this room from task 3.
Walkthrough:
The machine can be terminated using the button with the power logo at the bottom of the screen.

Answer:
(Highlight below to find the answer):
No answer needed
Question 2
Join Linux Fundamentals Pt. 2!
Walkthrough:
Join the next room to continue your Linux journey.
Answer:
(Highlight below to find the answer):
No answer needed
Conclusion
This room provides a great introduction to Linux and some important commands and operators, all of which are common and which you’ll see repeatedly.
Some of the material covered here might seem difficult (particularly the operators), but the key is to keep experimenting and having fun. These skills are relatively easy to learn with practice and THM makes it as fun and easy as possible by allowing us to launch a VM right in the Room.
Overall, I loved this room. A huge thanks to tryhackme and cmnatic for putting this room together!