TryHackMe – Nmap – Notes and Walkthrough
This page contains a walkthrough and notes for the nmap room at TryHackMe.
This room tackles a tool that is totally ubiquitous in penetration testing and hacking in general: nmap.
The term nmap is short for ‘network mapper’. Not only can we use it to scan every port (both TCP and UDP) on a computer, we can also use it to scan an entire network to try and identify all possible targets.
Nmap also features many tools and options that can be used to do things like: perform service and OS detection, scan for vulnerabilities, and evade firewalls.
In my opinion, the best part about nmap is that it is so easy to use and, frankly, can be a lot of fun. When you’re just getting started doing CTFs or learning about cybersecurity, nmap gives you the sensation of actually hacking something.
Probably the best overall resource to help learn nmap is the official website, which contains a ton of helpful information. You can also use the man page from the CLI.
About This Walkthrough:
In this walkthrough I try to provide a unique perspective into the topics covered by the room. Sometimes I will also review a topic that isn’t covered in the TryHackMe room because I feel it may be a useful supplement.
I try to prevent spoilers by making finding the solutions a manual action, similar to how you might watch a video of a walkthrough; they can be found in the walkthrough but require an intentional action to obtain. Always try to work as hard as you can through every problem and only use the solutions as a last resort.
- Task 2 – Introduction
- Task 3 – Nmap Switches
- Task 4 – Scan Types – Overview
- Task 5 – TCP Connect Scans
- Task 6 – SYN Scans
- Task 7 – UDP Scans
- Task 8 – NULL, FIN, and Xmas
- Task 9 – ICMP Network Scanning
- Task 10 – NSE Scripts – Overview
- Task 11 – NSE Scripts – Working with the NSE
- Task 12 – NSE Scripts – Searching for Scripts
- Task 13 – Firewall Evasion
- Task 14 – Practical
Walkthrough
Task 2 – Introduction
nmap is one of those tools that is absolutely ubiquitous in hacking. That’s because it does an excellent job of port and network scanning, with many options that simplify the lives of penetration testers.
The most basic use of nmap is to scan the TCP ports on a target computer. It will try to report back on any services running.
But nmap doesn’t stop there. It also allows us to do things like perform vulnerability scans, enumerate service version information, and much more.
In short, nmap (or a script that uses nmap) is often the first step in enumerating targets.
Question 1
What networking constructs are used to direct traffic to the right application on a server?
This “construct” is really just a number that is an essential part of TCP and is one of the most important aspects of networking. This number is often paired with an IP address to fully define an instance of an application and allow traffic to flow correctly to/from that instance.
For example, you may have multiple instances of a web browser open (multiple tabs); how do servers know which tab to send information to? There has to be a way of differentiating between them, as well as the many other network-based applications running on the computer.
The simple solution that was deployed was to simply have the computer choose a random, 16-bit number for each application instance. This provides up to 65,536 possible points of connection and also increases security as the number chosen is random and therefore unpredictable.
Answer: (Highlight below):
Ports
Question 2
How many of these are available on any network-enabled computer?
A port number is 16 bits long, so there are 216 = 65536 ports available. However, port zero (0) is reserved and can’t be used.
Answer:
(Highlight below to see answer):
65535
Question 3
[Research] How many of these are considered “well-known”? (These are the “standard” numbers mentioned in the task)
Port numbers from 0 to 1024 are designated to be ‘well-known’ ports.
Answer:
(Highlight below to see answer):
1024
Task 3 – Nmap Switches
Question 1
What is the first switch listed in the help menu for a ‘Syn Scan’ (more on this later!)?
Navigate to the help menu using ‘nmap –help’. Scroll down until you see ‘TCP SYN’ (under ‘scan techniques’):

Answer:
(Highlight below to see answer):
-sS
Question 2
Which switch would you use for a “UDP scan”?
You’ll find this flag just below the TCP SYN scan option we just found:

Answer:
(Highlight below to see answer):
-sU
Question 3
If you wanted to detect which operating system the target is running on, which switch would you use?
Scroll down the help page to the section called ‘OS detection’:

Answer:
(Highlight below to see answer):
-O
Question 4
Nmap provides a switch to detect the version of the services running on the target. What is this switch?
This switch falls under ‘service/version detection’:

Answer:
(Highlight below to see answer):
-sV
Question 5
The default output provided by nmap often does not provide enough information for a pentester. How would you increase the verbosity?
There are a couple of useful options for changing the verbosity. You can find these under ‘output’:

Answer:
(Highlight below to see answer):
-v
Question 6
Verbosity level one is good, but verbosity level two is better! How would you set the verbosity level to two?
(Note: it’s highly advisable to always use at least this option)
Walkthrough:
Take a look at the options again. This one’s twice as verbose:
Answer:
(Highlight below to see answer):
-vv
Question 7
We should always save the output of our scans — this means that we only need to run the scan once (reducing network traffic and thus chance of detection), and gives us a reference to use when writing reports for clients. What switch would you use to save the nmap results in three major formats?
This option is also under ‘output’:

Answer:
(Highlight below to see answer):
-oA
Question 8
What switch would you use to save the nmap results in a “normal” format?
Right above the last option:

Answer:
(Highlight below to see answer):
-oN
Question 9
A very useful output format: how would you save results in a “grepable” format?

Answer:
(Highlight below to see answer):
-oG
Question 10
Sometimes the results we’re getting just aren’t enough. If we don’t care about how loud we are, we can enable “aggressive” mode. This is a shorthand switch that activates service detection, operating system detection, a traceroute and common script scanning. How would you activate this setting?
This one is a bit trickier because the help menu doesn’t tell us that it is called ‘aggressive’. I use this one all the time; you can find it under ‘misc’:

Answer:
(Highlight below to see answer):
-A
Question 11
Nmap offers five levels of “timing” template. These are essentially used to increase the speed your scan runs at. Be careful though: higher speeds are noisier, and can incur errors! How would you set the timing template to level 5?
Answer:
(Highlight below to see answer):
-T5
Question 12
We can also choose which port(s) to scan. How would you tell nmap to only scan port 80?
Answer:
(Highlight below to see answer):
-p 80
Question 13
How would you tell nmap to scan ports 1000-1500?
Answer:
(Highlight below to see answer):
-p 1000-1500
Question 14
A very useful option that should not be ignored: How would you tell nmap to scan all ports?
Answer:
(Highlight below to see answer):
-p-
Question 15
How would you activate a script from the nmap scripting library (lots more on this later!)?
Answer:
(Highlight below to see answer):
–script
Question 16
How would you activate all of the scripts in the “vuln” category?
Answer:
(Highlight below to see answer):
–script=vuln
Task 4 – Scan Types – Overview
The three basic scan types are TCP, TCP SYN, and UDP. The default scan is TCP SYN.
TCP performs a scan of TCP ports, attempting to complete a three-way handshake with every port. TCP SYN (called a ‘half open’ scan) only performs half of a three-way handshake on TCP ports and is the default nmap scan type.
UDP scans UDP ports instead of TCP ports. UDP vulnerabilities are less common, but performing some UDP scanning is an essential part of a complete penetration test (or assessment of a CTF box).
There are also other types of scans that are designed for firewall evasion such as null, fin, and xmas scans. These are covered later on in this room.
Task 5 – TCP Connect Scans
The TCP Connect Scan is the default scan when a TCP SYN scan cannot be performed. We will learn about the SYN scan in the next task. But there are times when the SYN scan cannot be used, such as when a user does not have authorization to send raw packets (this generally requires sudo privileges) or when scanning an IPv6 network.
TCP Connect attempts to perform a full three-way handshake on each port. This is less stealthy than the SYN scan but is sometimes necessary.
To perform a TCP Connect scan, you use the ‘-sT’ flag:
nmap -sT <IP>
Question 1
Which RFC defines the appropriate behaviour for the TCP protocol?
This is given in the text; here is a link to the RFC.
Answer (Highlight Below):
RFC 793
Question 2
If a port is closed, which flag should the server send back to indicate this?
Answer:
(Highlight below to see answer):
RST
Task 6 – SYN Scans
SYN scans are the default for good reason: they provide the same functionality as full TCP Connect scans, but they are also stealthier. They are often referred to as stealthy or half-open scans.
During a typical three-way handshake: (1) the client sends a SYN packet to the server, (2) the server responds with a SYN/ACK packet, and (3) the client responds with an ACK packet.
This is what occurs during a TCP Connect scan when the scan finds an open port.
During a SYN scan, however, the client (nmap) doesn’t send the final ACK packet; instead it sends a RST packet, preventing the three-way handshake from being completed. This action can prevent the scan from being detected or logged, and is therefore considered stealthier.
However this action requires modulating raw packets, and Linux requires root privileges to do this.
Question 1
There are two other names for a SYN scan, what are they?
SYN scans are considered to be stealthy, as well as half-open because they only perform the first half of a full TCP 3-way handshake. Like a TCP Connect scan, a SYN scan will send a SYN packet to each port. If the target responds with a SYN/ACK packet, then we know that the port is open.
This is where the SYN scan and TCP Connect scans diverge. A TCP Connect scan will complete the three-way handshake by sending an ACK packet but a SYNs scan will instead respond with a SYN packet.
Since many applications only log a completed connection, this makes the SYN scan more stealthy. It’s also faster than a TCP Connect scan because it doesn’t need to complete and then terminate a connection.
Answer:
(Highlight below to see answer):
Half-Open, Stealth
Question 2
Can Nmap use a SYN scan without Sudo permissions (Y/N)?
The primary downside of a SYN scan is that it requires superuser, or root, permissions.
The Kali-based AttackBox on THM logs us in as the root user but in general this is bad practice; it’s much safer to stay logged in as a lower privilege user and then upgrade permissions using the sudo command when required.
This means that when we’re practicing on the AttackBox, we won’t need to use sudo but we generally will if we’re using our own machine.
Answer:
(Highlight below to see answer):
N
Task 7 – UDP Scans
UDP, or User Datagram Protocol, is a transport-layer protocol – like TCP.
These two protocols – TCP and UDP – are used to essentially allow two modes of communication: one that is connection-based (TCP) and one that is connection-less (UDP). UDP is faster but less reliable than TCP. It’s great when a lot of data needs to be transmitted quickly but the loss of some data can be tolerated – such as when streaming a video.
Just as we can use nmap to scan TCP ports, we can also scan UDP ports. There are the same number of TCP and UDP ports because both are designated using a 16-bit field (so there are 216 = 65536 total ports for each TCP and UDP).
Question 1
If a UDP port doesn’t respond to an Nmap scan, what will it be marked as?
When a UDP scan is performed, nmap will typically send raw UDP packets. If a UDP port is closed, it should respond with an ICMP (ping) packet that the port is unreachable. However if the UDP port is open, there should be no response.
This means that while a closed port can be determined due to receiving a response, an open port can’t be distinguished from a filtered port – one that is firewalled. The port could either be open, or it could be closed but sitting behind a firewall.
Answer:
(Highlight below to see answer):
open|filtered
Question 2
When a UDP port is closed, by convention the target should send back a “port unreachable” message. Which protocol would it use to do so?
The same protocol used by the ping command.
Answer:
(Highlight below to see answer):
ICMP
Task 8 – NULL, FIN, and Xmas
There are many different types of scans that can be performed, and this section gets into some of the (slightly) more advanced types – NULL, FIN, and Xmas. These are all TCP (i.e. not UDP) scans.
In order to understand these scans, we have to review the different flags that can be set in a TCP packet. These include the SYN, ACK, RST, FIN, PSH, and URG flags.
Remember that a flag is just a single bit that is set to either 0 or 1 in the TCP header. We can see the flags within the header below (highlighted in yellow):
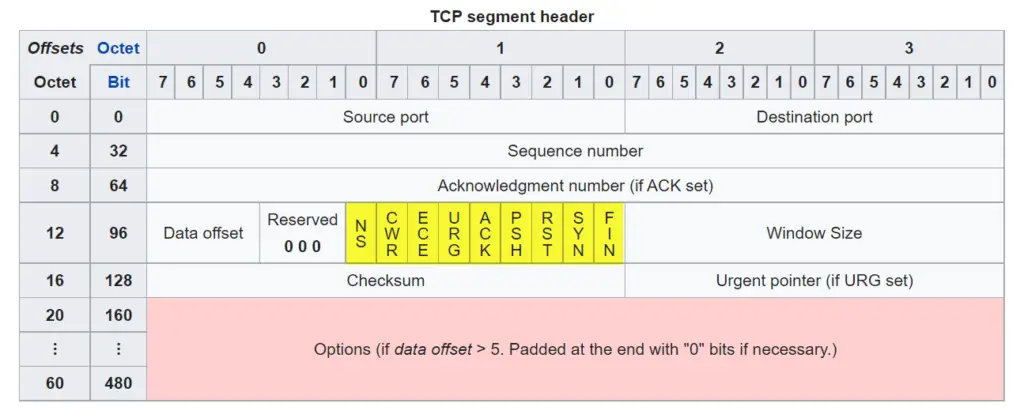
If we have the ability to manipulate a TCP header (this requires sudo privileges), then we can change these flags to set any number of them or none at all.
This is where advanced scans come in – by setting different flags, we can change the way that the target responds. This can sometimes enable us to get around firewalls and gain more information about the target.
NULL scans have no flags set at all.
FIN scans have only the FIN flag set.
Xmas scans set the PSH, URG, and FIN flags.
Question 1
Which of the three shown scan types uses the URG flag?
Take a look at the short list above.
Answer:
(Highlight below to see answer):
xmas
Question 2
Why are NULL, FIN and Xmas scans generally used?
The primary reason these scans are used is to evade firewalls.
Answer:
(Highlight below to see answer):
Firewall Evasion
Question 3
Which common OS may respond to a NULL, FIN or Xmas scan with a RST for every port?
Many systems respond to ‘malformed’ TCP packets with an RST packet. These include Windows and many CISCO devices.
Answer:
(Highlight below to see answer):
Microsoft Windows
Task 9 – ICMP Network Scanning
Up to this point, we’ve talked about port scanning. But nmap can do even more than scan a single computer; it can actually scan an entire network.
The most common way to do this is by using an ICMP, or ping, scan – also called a ping sweep. This scan sends a ping to every IP address in the range that we designate.
Question 1
How would you perform a ping sweep on the 172.16.x.x network (Netmask: 255.255.0.0) using Nmap? (CIDR notation)
There are a few pieces of information that we need to answer this question. First, we will need to use the ‘-sn’ switch. This disables port scanning so that nmap doesn’t attempt to scan the top 1000 ports on every IP address, which saves us a ton of time.
Here’s the man page entry for the ‘-sn’ switch:

Next, we need to specify an IP range for nmap to scan. This can be done in two different ways:
(1) We can use a hyphen to designate the range, i.e. 172.16.0-255.0-255
Note that we are scanning all potential targets from 172.16.0.0 all the way through 172.16.255.255. That’s one target for every bit across the last two octets of an IPv4 address, or 216 = 65,536 total targets.
(2) We can use CIDR notation to designate the range, i.e. 172.16.0.0/16
Explaining subnetting and CIDR notation is beyond the scope of this walkthrough. In essence what we are telling nmap to do is to scan the /16 subnet that begins at the IP address 172.16.0.0. A /16 subnet means that the network mask consists of 16 bits that are set to 1, which corresponds to the first two octets of an IPv4 address:
Binary: 11111111.11111111.00000000.00000000 = Decimal: 255.255.0.0
So the scan will look at all possible IP addresses from 172.16.0.0 all the way through 172.16.255.255.
To answer the question, we need to use the CIDR notation rather than the hyphen notation.
Answer:
(Highlight below to see answer):
nmap -sn 172.16.0.0/16
Task 10 – NSE Scripts – Overview
The usefulness of nmap isn’t limited to performing different types of port or ICMP scanning. Nmap features a huge amount of scripts that can accomplish many different tasks including vulnerability scans and credential brute forcing. It does this using the ‘nmap scripting engine’, or NSE.
Not only can these scripts be run individually, we can also run many scripts with a single scan using a category like ‘safe’, ‘vuln’, or ‘brute’. These can be executed using the ‘–script=<category>’ option.
Currently, the nmap script categories are: auth, broadcast, brute, default, discovery, dos, exploit, external, fuzzer, intrusive, malware, safe, version, and vuln.
Question 1
What language are NSE scripts written in?
NSE scripts are written in the Lua programming language. You can learn more about Lua here.
Answer:
(Highlight below to see answer):
Lua
Question 2
Which category of scripts would be a very bad idea to run in a production environment?
One of the most important criteria when deciding whether or not to run a script is intrusiveness. According to nmap’s documentation:
Some scripts are very intrusive because they use significant resources on the remote system, are likely to crash the system or service, or are likely to be perceived as an attack by the remote administrators.
Nmap then categorizes scripts as either safe or intrusive depending on the risk of negatively impacting the system. So, for example, an intrusive scan will run scripts that perform brute forcing as well as many others (in other words, the intrusive category is inclusive of the brute category). Not all scripts are either safe or intrusive – the exception are those in the version category.
Answer:
(Highlight below to see answer):
intrusive
Task 11 – NSE Scripts – Working with the NSE
Running scripts with NSE is super easy.
To run a single script:
nmap script=<script name>
Run multiple scripts:
nmap script=<script1>,<script2>,<script3>
Run an entire category of scripts:
nmap script=<category>
Question 1
What optional argument can the ftp-anon.nse script take?
Different scripts have different options, and there will be times when we need more information about a script. We can get help using the following syntax:
nmap –script-help <script>
To answer this question, we can therefore use the following command:
nmap –script-help ftp-anon.nse
If you run this command, you will get a link to a link to the script’s help page at nmap.org. I found the following on the help page:

Answer:
(Highlight below to see answer):
maxlist
Task 12 – NSE Scripts – Searching for Scripts
Scripts are stored in the filesystem and can be searched directly (via the GUI or CLI), or we can use the /usr/share/nmap/scripts/script.db file.
Question 1
Search for “smb” scripts in the /usr/share/nmap/scripts/ directory using either of the demonstrated methods.
What is the filename of the script which determines the underlying OS of the SMB server?
I prefer to search the /usr/share/nmap/scripts/script.db file because it’s fast and gives me category information about scripts.
Using the grep command to search for the string “smb”:
grep smb /usr/share/nmap/scripts/script.db
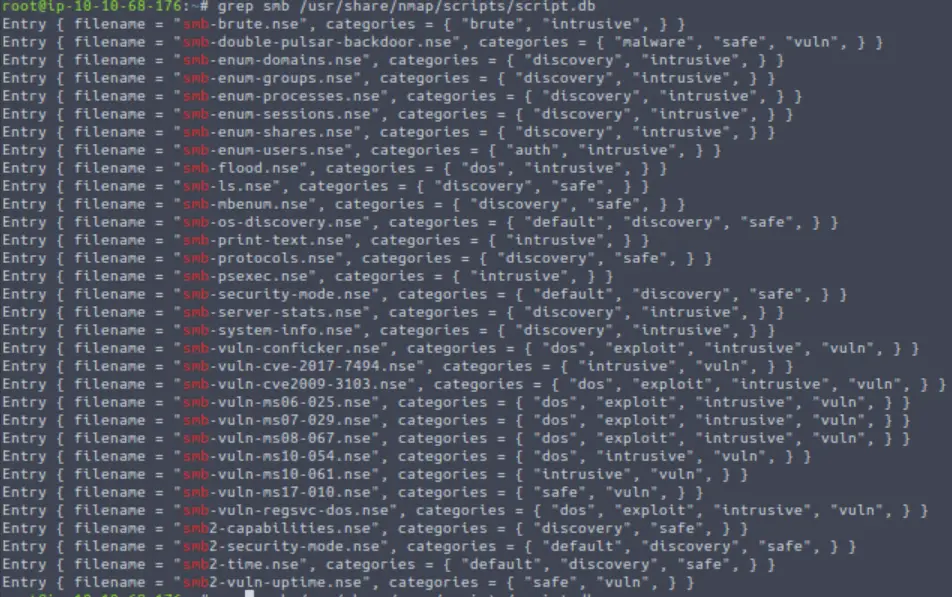
We get a lot of entries. We’re looking for the entry pertaining to the operating system, which would logically correspond to a file name starting with ‘smb-os’. This narrows our search down to one.
Answer:
(Highlight below to see answer):
smb-os-discovery.nse
Question 2
Read through this script. What does it depend on?
I like to use the nano editor to quickly read files in the terminal. Using the nano command:
nano /usr/share/nmap/scripts/smb-os-discovery.nse
Looking through the script, we can find the following entry. We’re looking for dependencies:

Answer:
(Highlight below to see answer):
smb-brute
Task 13 – Firewall Evasion
Windows machines block ping (ICMP) packets by default and nmap uses ping to determine if a host is alive or not. If it believes that the host is dead because the ping scan was blocked then it will not continue scanning that target.
When scanning a range of targets to see which are up, this means that nmap might miss the Windows machines.
To get around this, we can tell nmap not to perform ping scanning by using the ‘-Pn’ flag:
nmap -Pn <IP>
This will take a lot longer to scan a network but will be more likely to recognize Windows hosts.
Question 1
Which simple (and frequently relied upon) protocol is often blocked, requiring the use of the -Pn switch?
This is the name of the protocol used by ping.
ICMP
Question 2
[Research] Which Nmap switch allows you to append an arbitrary length of random data to the end of packets?
This could require some digging, but I prefer to let the computer do the work. We have a few keywords that we could try grepping the man page for, like ‘append’, ‘random’, and ‘data’. If we grep for any of these individually we get a number of results, and it doesn’t take long to identify the one that does what we’re looking for.
But if we want to make things easier, we can also try stacking grep commands. For example,
man nmap | grep -i ‘append’ | grep -i ‘random’
What this is doing is piping the output from the man command (the nmap man page) into grep, where we are searching first for the word ‘append’. The ‘-i’ flag tells grep to ignore case so that it will return both ‘append’ and ‘Append’.
Then it takes the output of the first grep command and pipes it again into grep, filtering out everything that doesn’t also contain the string ‘random’. Essentially, this is performing an AND search for the strings ‘append’ and ‘random’.
There are also ways to do this a bit more easily depending on the grep version but this should work for all versions.
The output of our command is a single option:

–data-length
Task 14 – Practical
We finally get to dig deep and do some scanning on a real target. To do so, you’ll need to deploy the target machine that can be started using the green ‘Start Machine’ button at the top of Task 1. You’ll need another machine to attack the target; I prefer to generally use the TryHackMe AttackBox, which can be started using the blue ‘Start AttackBox’ button at the very top of the page.
Question 1
Does the target (10.10.206.8)respond to ICMP (ping) requests (Y/N)?
Run the ping command using the target IP address. For example, given an IP address of 10.10.10.10 we would use:
ping 10.10.10.10

The ping command will be hung up, and we won’t receive a response in return. We can use ‘ctrl+c’ to end the ping command, and you should see something like the following:

Under ‘ping statistics’, we are given the number of packets transmitted (this will increase the longer you allow ping to run), the number received back from the target, the percentage of packet loss, and the scan time.
We can see that we received zero replies and had a 100% packet loss. This means that the target either isn’t up or is blocking ICMP (ping) packets. Remember that Windows machines are configured to block ICMP by default.
Answer:
(Highlight below to see answer):
N
Question 2
Perform an Xmas scan on the first 999 ports of the target — how many ports are shown to be open or filtered?
Run an Xmas scan (-sX) using the options to designate port numbers 1 through 999 (-p1-999) and the highest level of verbosity (-vv):
nmap -sX -p1-999 -vv <IP>
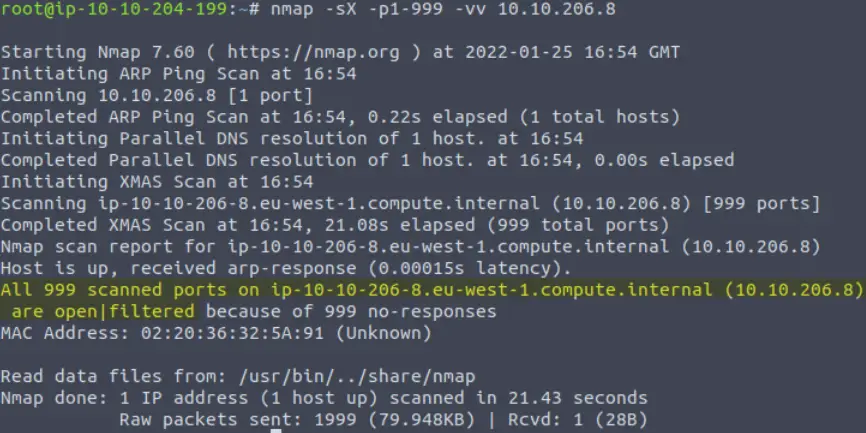
Answer:
(Highlight below to see answer):
999
Question 3
There is a reason given for this — what is it? Note: The answer will be in your scan results. Think carefully about which switches to use — and read the hint before asking for help!
All 999 ports have been labeled as open|filtered, which means that they are either open or are being filtered by a firewall. As a general rule, we will probably never see a machine with all ports running. This gives us a good indication that the issue is in fact a firewall that is blocking our Xmas TCP packets.
Why does nmap think this is the case? The answer is given by nmap, thanks to our verbosity (-vv) flag:
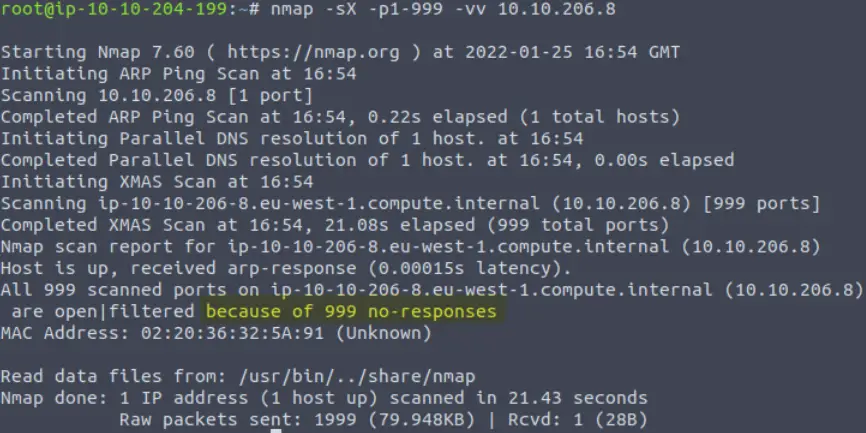
Answer:
(Highlight below to see answer):
No Response
Question 4
Perform a TCP SYN scan on the first 5000 ports of the target — how many ports are shown to be open?
The TCP SYN scan is a bit stealthier than the TCP Connect scan because it sends an RST (reset) packet in response to SYN/ACK packet during the three-way handshake.
This scan is default if you have root privileges on the system running nmap. If you don’t have root privileges (or the ability to elevate privileges using the sudo command), you won’t be able to run this scan.
While logged in as root (or using sudo), we can use the -p1-5000 option to scan the first 5000 ports on the target machine. You can also use the -T4 option to speed up the scan and should obtain the same result:
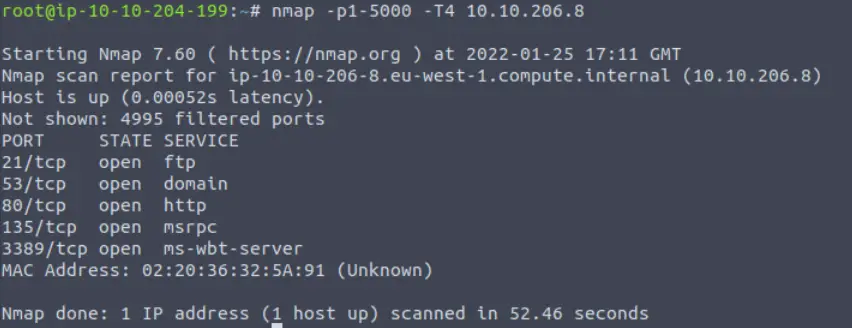
Count the number of open ports to answer the question.
Answer:
(Highlight below to see answer):
5
Question 5
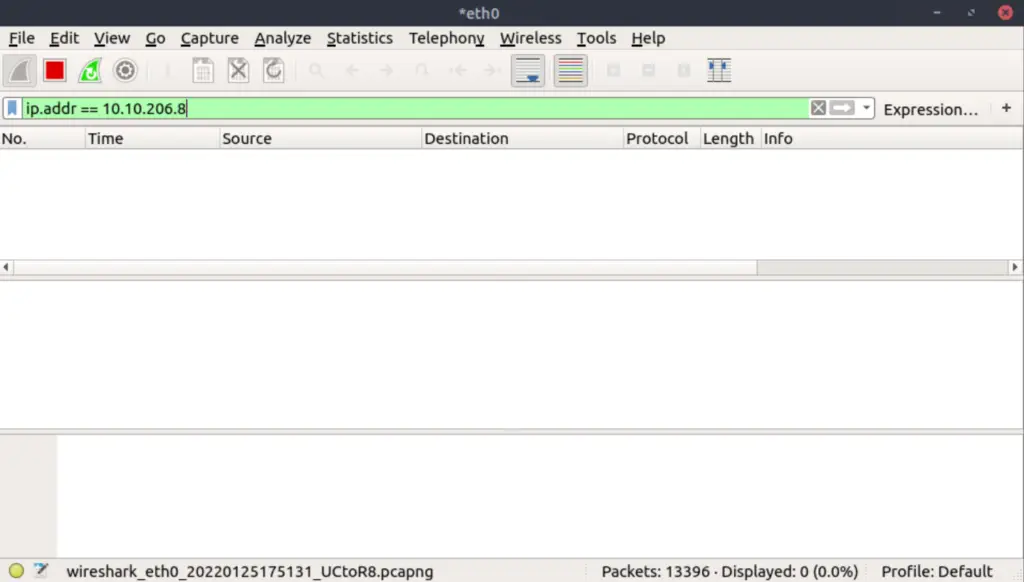
Open Wireshark (see Cryillic’s Wireshark Room for instructions) and perform a TCP Connect scan against port 80 on the target, monitoring the results. Make sure you understand what’s going on.
You can start wireshark using the GUI using the top menu (Applications -> Internet -> Wireshark).
Double-click on the ‘eth0’ interface. We need to use a filter so that we are limiting the data to the three packets exchanged with the target machine. We can do this using the ‘ip.addr=<IP>’ filter. At this point, you should not see any entries in Wireshark because we have not yet performed the scan:
Next, return to the command line and run a TCP connect scan by using the ‘-sT’ option and select port 80 using ‘-p80’:
nmap -sT -p80 <IP>
The scan should only take a moment to complete.
Returning to wireshark, we should now see four packets that have been exchanged:
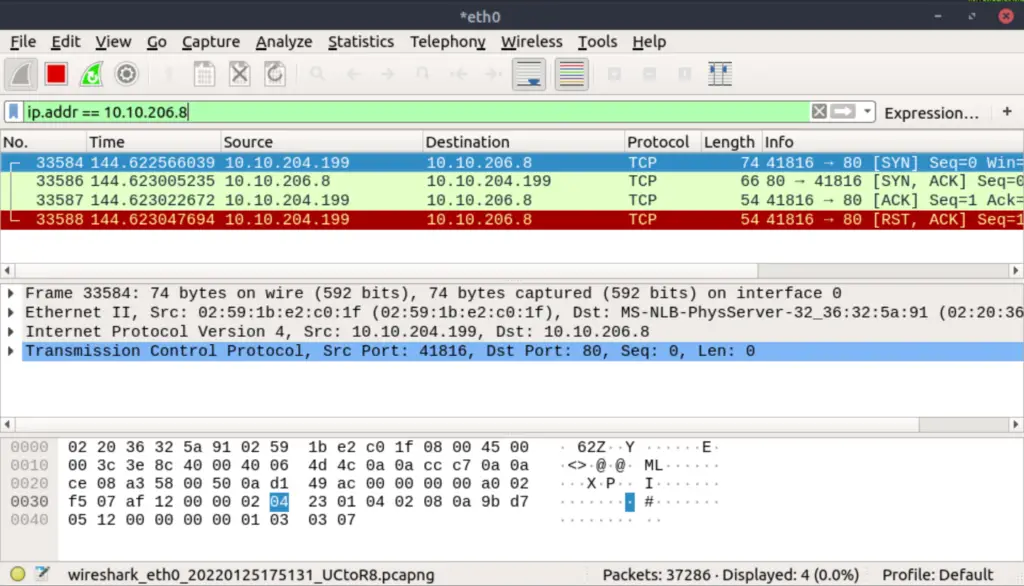
We sent the target a SYN packet to port 80, which responded with a SYN/ACK packet. Next, we completed the connection per the TCP Connect scan by sending the target an ACK packet. Finally, we terminated the connection using a RST/ACK packet.
Wireshark is an incredibly useful tool and there’s a lot more exploring we can do at this point. For example, we can see the contents of the data corresponding to each layer of the TCP/IP model for each packet. There is so much that we can do with Wireshark but this is beyond the scope of this room. Feel free to play around with it as much as you’d like.
Answer:
(Highlight below to see answer):
No answer needed
Question 6
Deploy the ftp-anon script against the box. Can Nmap login successfully to the FTP server on port 21? (Y/N)
The ftp-anon script checks if we are allowed to anonymously login to the target using ftp. You will definitely see this in CTFs and although access to the file system is typically restricted, we can sometimes find a flag or other useful information that would allow us to elevate our privileges.
You can run the script using the following command:
nmap –script=ftp-anon
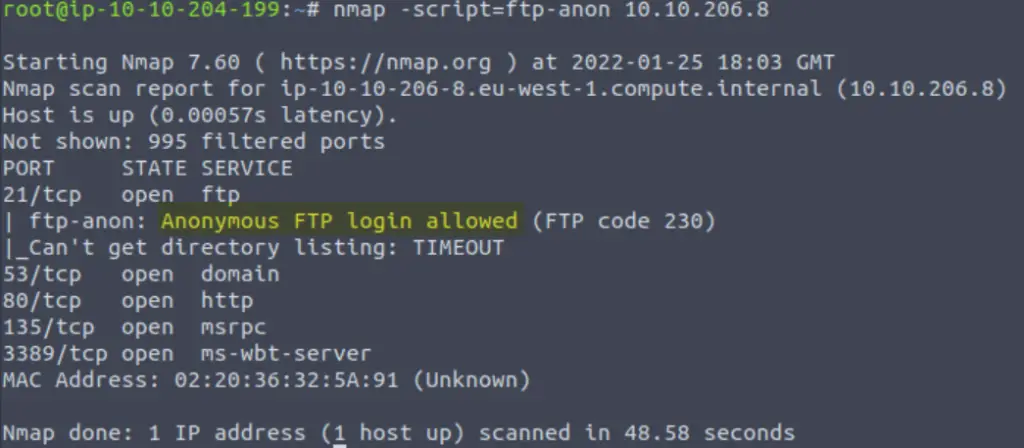
Answer:
(Highlight below to see answer):
Y
Conclusion
This room is an excellent resource for learning about and tinkering with nmap. Nmap is a daily use utility for many hackers and penetration testers. More advanced hackers often integrate nmap scans into more comprehensive scripts but virtually everyone uses nmap in some form. Luckily it is also relatively easy to use and thanks to TryHackMe can be learned in a super fun and secure environment.
A huge thanks to DarkStar7471 and MuirlandOracle for putting this room together!