TryHackMe – Windows Fundamentals 2 – Complete Walkthrough

The Windows Fundamentals 2 room at TryHackMe is the second in a three-part series on Windows and covers a lot of basics about the Windows OS. Topics include an introduction to System Configuration and using it to access a variety of tools including UAC management, Computer Management, System Information, Resource Monitor, Command Prompt, and Registry Editor.
About This Walkthrough:
In my walkthroughs I try to provide a unique perspective into the topics covered by the room. I don’t just give you the answers or copy what is already on TryHackMe. Sometimes I will also review a topic that isn’t covered in the TryHackMe room because I feel it may be a useful supplement.
I try to prevent spoilers by making finding the solutions a manual action, similar to how you might watch a video of a walkthrough; they can be found in the walkthrough but require an intentional action to obtain. Always try to work as hard as you can through every problem and only use the solutions as a last resort.
This room can be found at: https://tryhackme.com/room/windowsfundamentals2x0x
Walkthrough
Task 1 – Introduction
Launch the virtual machine (VM) at the top of the Task using the green ‘Start Machine’ button. Note that this is the Windows VM needed to follow along with the tasks in the room; if you launch the AttackBox (from the blue button at the top of the page), you will access a Linux machine instead.
Question 1
Read above and start the virtual machine.
Answer:
No answer needed
Task 2 – System Configuration
Windows has a System Configuration utility called MSConfig that can be very useful for troubleshooting as well as navigating other Windows utilities if you’re having trouble finding the right one.
The easiest way to access it is to start typing ‘MSConfig’ or ‘System Configuration’ into the Start Menu search function.
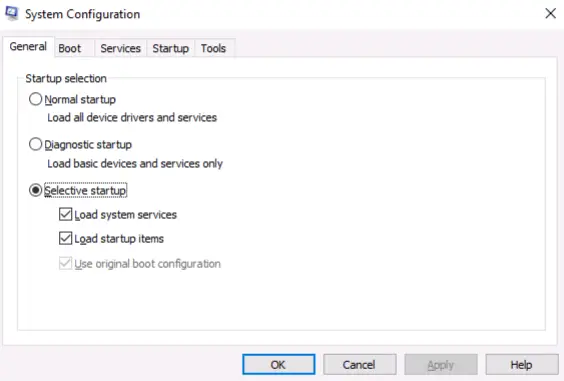
There are five tabs in MSConfig: General, Boot, Services, Startup, and Tools.
General: gives a variety of startup options.
Boot: has different options for booting the OS.
Services: shows us all services and allows us to enable or disable them.
Startup: directs the user to the Task Manager in order to manage startup items. This will take you to the ‘Startup’ tab in the Task Manager.
Tools: contains a list of utilities that can be helpful in further configuring the OS.
Question 1
What is the name of the service that lists Systems Internals as the manufacturer?
Walkthrough:
Navigate to the Services tab and click ‘Manufacturer’ to sort alphabetically by the service manufacturer. Look for the service manufactured by ‘Systems Internals’.
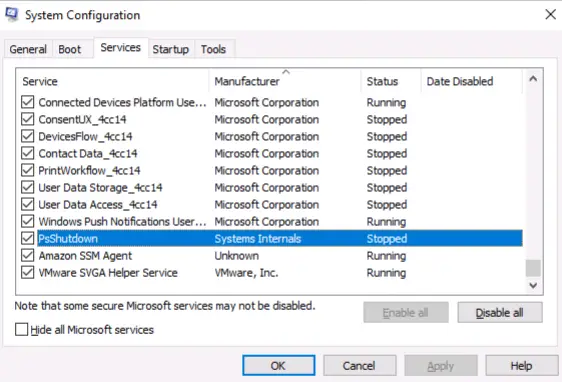
Answer:
(Highlight below to see the answer):
PsShutdown
Question 2
Whom is the Windows license registered to?
Walkthrough:
Navigate to the Tools tab and select the ‘About Windows’ tool.
Click the ‘Launch’ button to start the tool. You will see information about the OS including who the license is registered to.
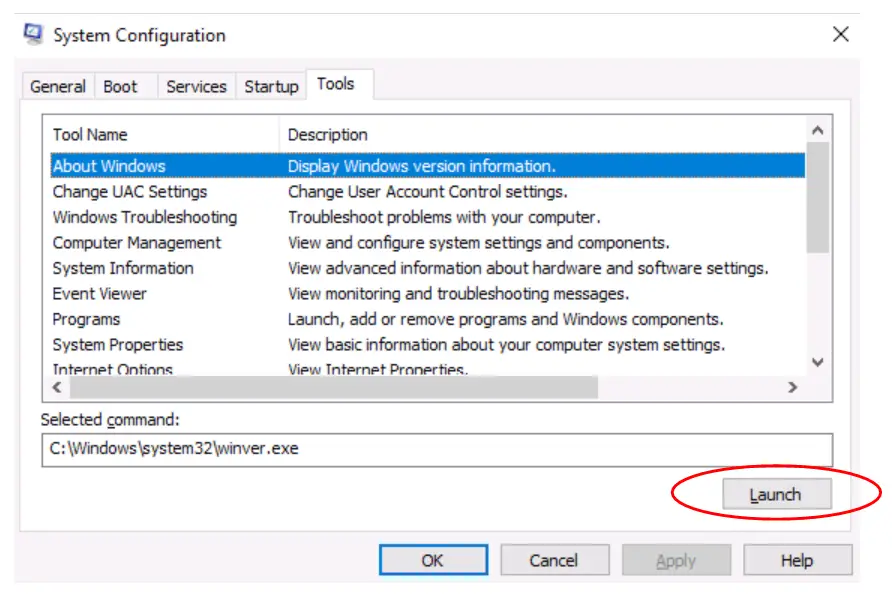
Answer:
Windows User
Question 3
What is the command for Windows Troubleshooting?
Walkthrough:
Stay in the Tools tab (we’ll be working quite a bit in this tab).
Select the Windows Troubleshooting tool. Notice the
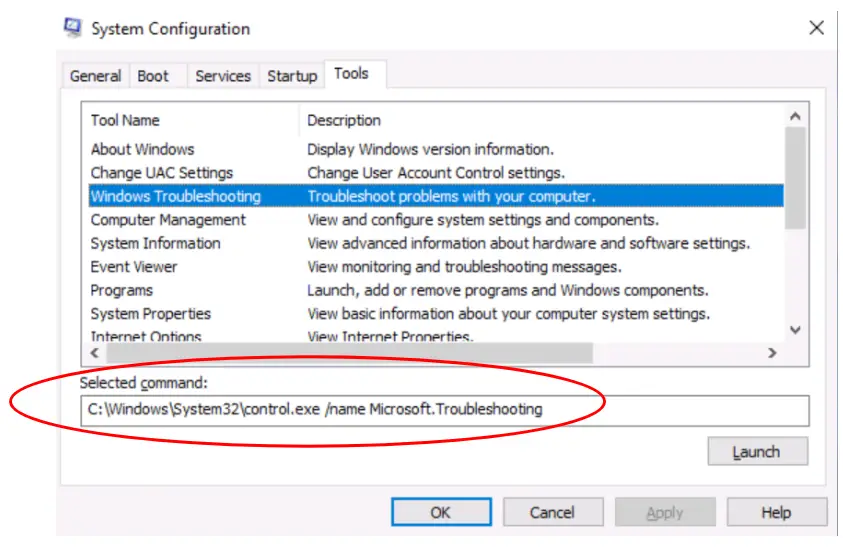
Notice the section immediately below called ‘Selected command’. This is an alternate way of launching the tool. You can use this command in the Windows command prompt (cmd.exe) or Powershell, or even just paste it into the Start Menu search box.
Answer:
C:\Windows\System32\control.exe /name Microsoft.Troubleshooting
Question 4
What command will open the Control Panel? (The answer is the name of .exe, not the full path)
Walkthrough:
This one isn’t quite as obvious, but we can see that multiple tools reference the same .exe file. These include System Properties as well as Windows Troubleshooting. What is the .exe file used by both of these?
Answer:
control.exe
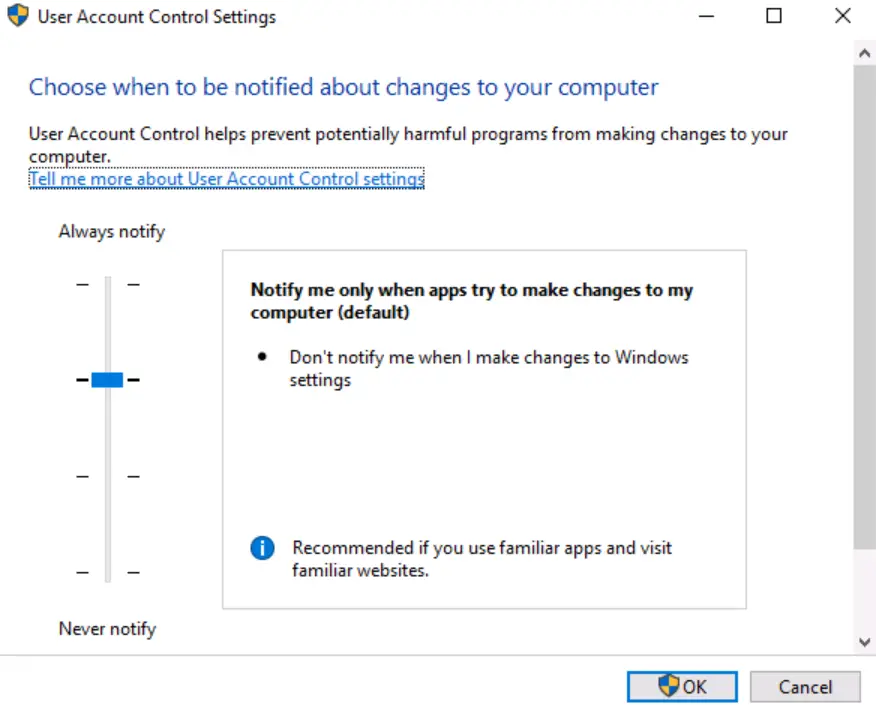
Task 3 – Change UAC Settings
User Account Control (UAC) was covered in Windows Fundamentals 1. In essence, it maintains a lower level of privilege for user accounts with administrative access during daily use and temporary elevates the privilege level when admin access is actually needed.
UAC settings can be changed via the Tools tab in the MSConfig System Configuration utility.
There are four options that can be accessed using a slider:
Question 1
What is the command to open User Account Control Settings? (The answer is the name of the .exe file, not the full path)
Walkthrough:
Click the ‘Change UAC Settings’ tool in the Tools tab of MSConfig. The answer can be found in the ‘Selected command’ section.
Answer:
UserAccountControlSettings.exe
Task 4 – Computer Management
This Task covers the Computer Management tool that is accessible via the ‘Tools’ tab in the System Configuration utility.
Computer Management has three main sections: System Tools, Storage, and Services and Applications.
System Tools: Contains Task Scheduler, Event Viewer, Shared Folders, Performance, and Device Manager
Storage: Contains Windows Server Backup (on servers) and Disk Management.
Services and Applications: Contains Routing and Remote Access, Services, and Windows Management Instrumentation (WMI) Control.
Question 1
What is the command to open Computer Management? (The answer is the name of the .msc file, not the full path)
Walkthrough:
Click the ‘Computer Management’ tool in the Tools tab of MSConfig. The answer can be found in the ‘Selected command’ section.
Answer:
compmgmt.msc
Question 2
At what time every day is the GoogleUpdateTaskMachineUA task configured to run?
Walkthrough:
Launch the Computer Management tool and navigate to the ‘Task Scheduler’ utility:
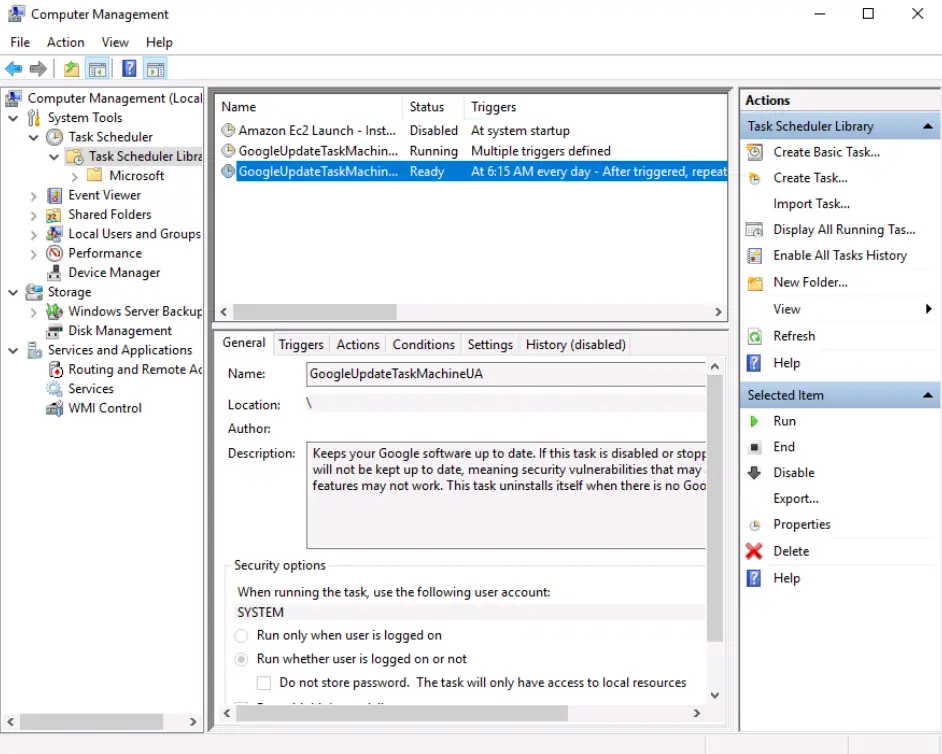
In the list of scheduled tasks, you will see ‘GoogleUpdateTaskMachineUA’. The timing can be found under the ‘Triggers’ column.
Answer:
6:15 AM
Question 3
What is the name of the hidden share?
Walkthrough:
To answer this question, we’ll need to navigate to the ‘Shared Folders’ utility under System Tools.
Open the folder containing the Shares. There is one share that should stand out to you.
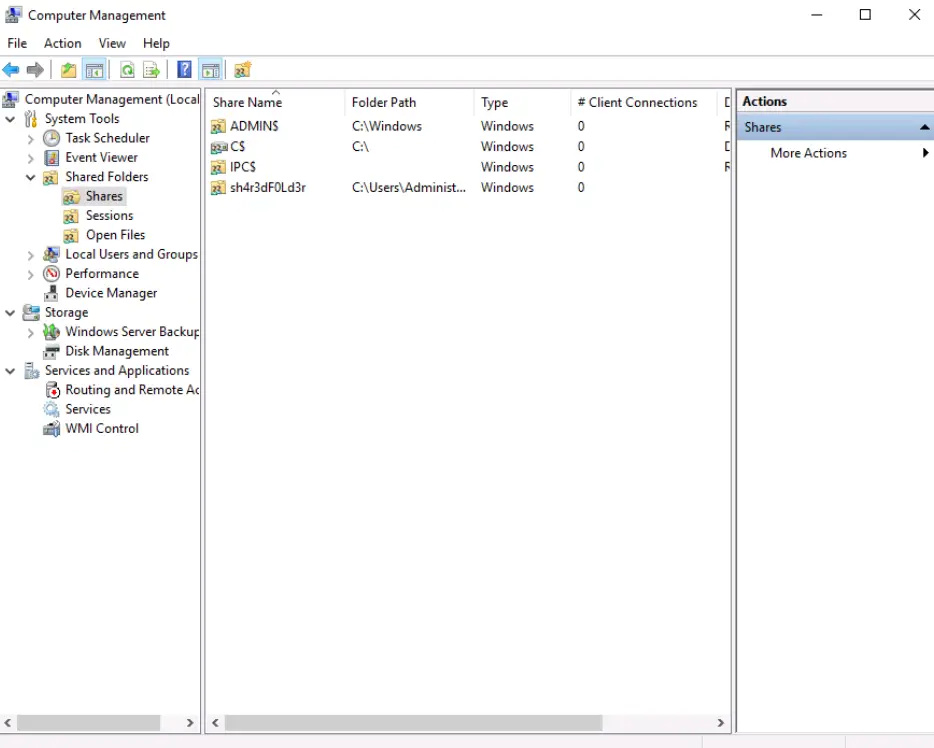
Answer:
sh4r3dF0Ld3r
Task 5 – System Information
This Task covers the System Information tool that is accessible via the ‘Tools’ tab in the System Configuration utility. Noticing a pattern here? THM is trying to signify to us how System Configuration (MSConfig) can be used as a springboard for all of these other useful tools.
So, what’s System Information?
Basically, it’s a tool that shows lots of information about the system’s hardware, components, and software.
The main window is the System Summary, which provides lots of information about the operating system, system, processor, BIOS, memory, etc.
In addition to the System Summary there are three primary categories: Hardware Resources, Components, and Software Environment.
Hardware Resources: Advanced information about the system’s hardware. You probably won’t use this much.
Components: Information about the different devices installed on the computer, like storage, display, keyboard, mouse, printer, etc.
Software Environment: Provides detailed information about software installed on the system including drivers, services, tasks, and startup programs. There’s also a section called Environment Variables, which are used to store details about the OS. We saw these in Windows Fundamentals 1.
Question 1
What is the command to open System Information? (The answer is the name of the .exe file, not the full path)
Walkthrough:
Click the ‘System Information’ tool in the Tools tab of MSConfig. The answer can be found in the ‘Selected command’ section.
Answer:
msinfo32.exe
Question 2
What is listed under System Name?
Walkthrough:
Launch the System Information tool. The tool should open to the ‘System Summary’. Look for the ‘System Name’ entry.
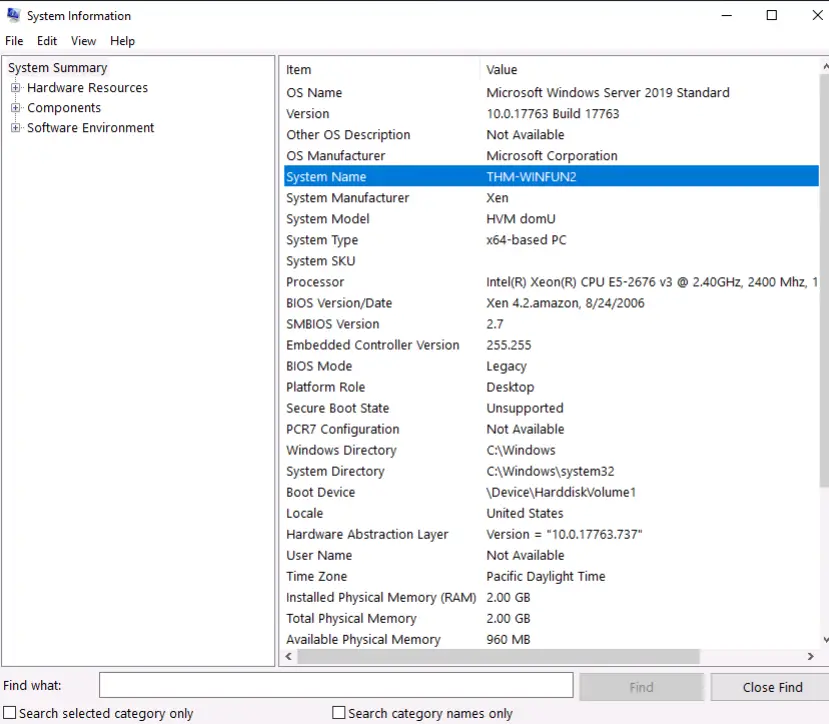
Answer:
THM-WINFUN2
Question 3
Under Environment Variables, what is the value for ComSpec?
Walkthrough:
The ComSpec environment variable points to the command line interpreter, which is cmd.exe.
Navigate to the Environment Variables page, which is in the ‘Software Environment’ category.
Find the ComSpec entry and corresponding environment variable.
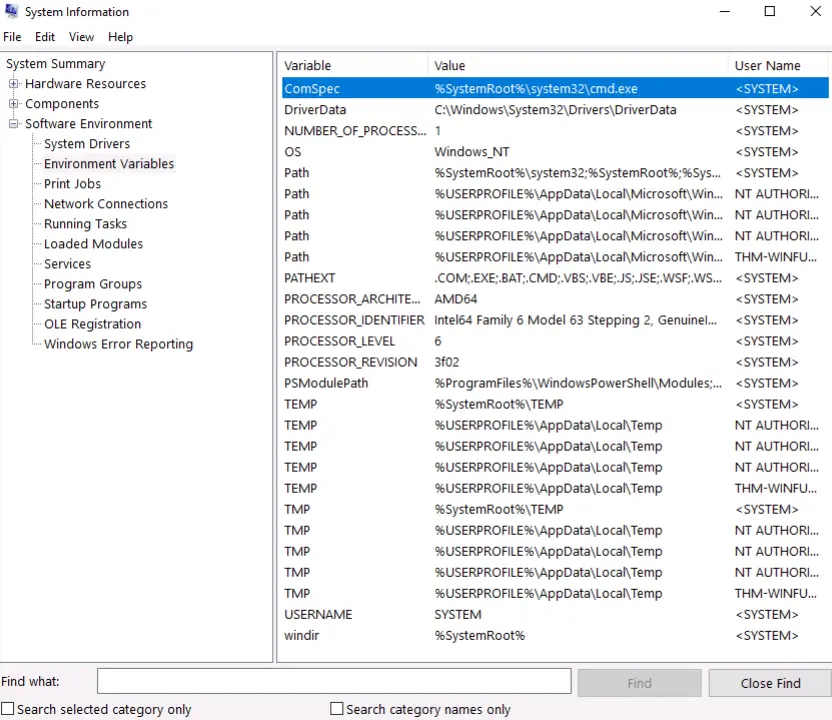
Answer:
(Highlight below to see the answer):
%SystemRoot%\system32\cmd.exe
Task 6 – Resource Monitor
This task goes over the Resource Monitor tool, which is similar to the ‘Performance’ tab in Task Manager but goes into more detail.
In the Resource Monitor, you’ll see individual sections for CPU, Disk, Network, and Memory, as well as plots for each.
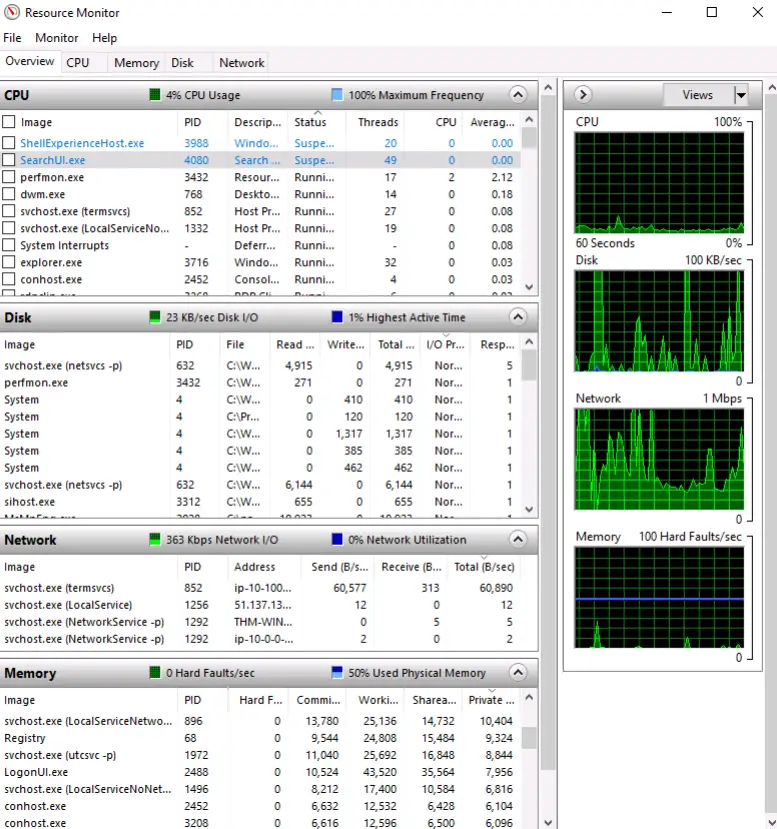
CPU: Shows processes using CPU resources, the Process ID (PID), how many threads are being used, and CPU resource consumption.
Disk: Also shows processes, but looks at disk utilization rather than CPU. Displays the process name and PID, whether a process is reading or writing data and response time in milliseconds.
Network: Covers processes from the perspective of network utilization. In addition to process name and PID it also shows the address that the process is connected to as well as data being send and received in bytes per second (B/sec).
Memory: Details the memory utilization of running processes. Includes the amount of ‘committed’ memory that has been dedicated to the process, how much memory the process is actually using (called ‘working set’), how much memory can be shared with other processes and how much can’t be shared.
Note that while Resource Monitor goes into much more detail, the ‘Performance’ tab in Task Manager splits up the Network utilization into Ethernet and Wifi and also has an additional GPU utilization section. Note that a good GPU can speed up tasks like password cracking, so this is something to keep in mind when assessing performance for ethical hacking.
Question 1
What is the command to open Resource Monitor? (The answer is the name of the .exe file, not the full path)
Walkthrough:
Click the ‘Resource Monitor’ tool in the Tools tab of MSConfig. The answer can be found in the ‘Selected command’ section.
Answer:
resmon.exe
Task 7 – Command Prompt
Like Linux, Windows also has a command prompt that we can interact to perform commands. Even though the command prompt might seem daunting at first, it can be an ally and we can easily learn to do some cool things with it. For many tasks, the command prompt is actually easier and faster to use than it would be to use the graphical user interface (GUI).
Before going further, I will point out that cmd.exe is technically deprecated and has been largely replaced by Windows Powershell. Powershell is much more powerful and includes support for piping commands (like Linux), scripting, and even supports Linux commands. The basic Windows command prompt may not do these things but Microsoft will continue to support it for the time being (its’ included in Windows 11).
There are two ways to get help in the Windows command prompt. One is to type the name of a command followed by ‘help’, i.e.:
<command> help
The other is to type /? after the command:
<command> /?
Sometimes the /? option won’t work so try both.
Here are some common commands:
whoami – outputs the name of the user.
hostname – outputs the name of the host.
ipconfig – provides network information like IP address, subnet mask, and gateway.
cls – clears the screen.
netstat – shows protocol stats and TCP/IP connections.
net – allows management of network resources.
Question 1
In System Configuration, what is the full command for Internet Protocol Configuration?
Walkthrough:
Click the ‘Internet Protocol Configuration’ tool in the Tools tab of MSConfig. The answer can be found in the ‘Selected command’ section.
If we launch the tool, we will see that it actually executes in the Windows command prompt. In other words, the outcome is the same as typing ‘ipconfig’ into the command prompt.
Answer:
C:\Windows\System32\cmd.exe /k %windir%\system32\ipconfig.exe
Question 2
For the ipconfig command, how do you show detailed information?
Walkthrough:
We should check for help anytime we’re unsure of how to use a command.
In this case, we can use:
ipconfig help
or
ipconfig /?
Inside the help manual, we are given the following helpful options:
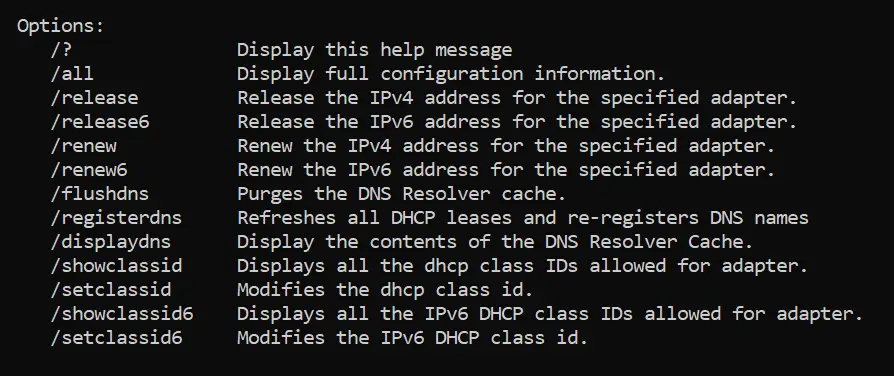
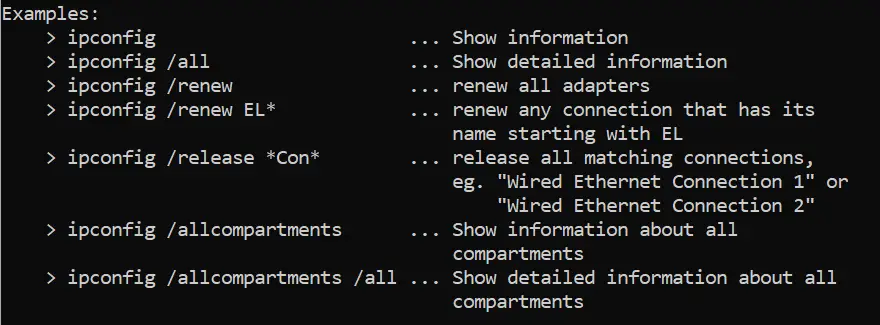
Look through this list and try to determine which option will display detailed information. If we continue reading the help manual, we will also see examples:
Answer:
ipconfig /all
Task 8 – Registry Editor
The Windows Registry is a database where low-level settings for the Windows OS and applications are stored. Basically, the Registry stores a lot of critical information and should only be edited with care.
When we do need to edit the Registry, we can use the Registry Editor (regedit).
Question 1
What is the command to open the Registry Editor? (The answer is the name of the .exe file, not the full path)
Walkthrough:
Click the ‘Internet Protocol Configuration’ tool in the Tools tab of MSConfig. The answer can be found in the ‘Selected command’ section.
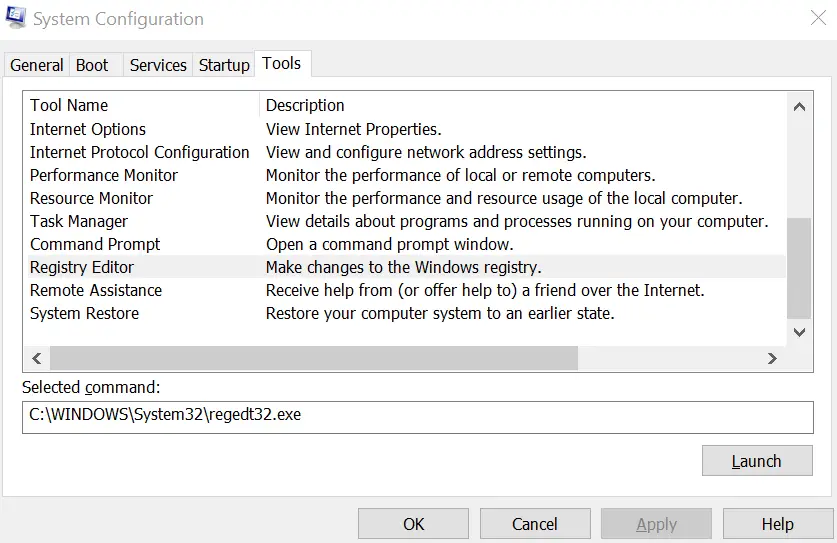
Answer:
regedt32.exe
Task 9 – Conclusion
This room has explored some of the tools that can be launched from the System Configuration (MSConfig) utility. MSConfig is great to use as a launching point for all of these different tools; instead of remembering each tool individually, you can just remember MSConfig instead.
Question 1
Read above.
Answer:
No answer needed
Conclusion
This room dives deep into MSConfig and some of the many tools that can be accessed with it. We covered UAC, Computer Management (compmgmt), System Information (msinfo32), Resource Monitor (resmon), Command Prompt (cmd), and Registry Editor (regedit).
While this room has less interactive components than many other rooms on THM, it does include a lot of helpful information for the Windows OS. It’s a good accompaniment to Windows Fundamentals 1 lesson although you may leave the room itching for some action.
Overall, I enjoyed this room and found it to be helpful and informative. A huge thanks to tryhackme and heavenraiza for putting this room together!