TryHackMe – Linux Fundamentals Part 3 – Complete Walkthrough

This Room is the third and final installment of the Linux Fundamentals series. It covers several important topics like terminal based text editors, transferring files to and from remote computers, processes, automation, package management, and logs.
There’s enough information here that I recommend not doing the whole room in a single sitting if it’s your first time being exposed to these topics. Each task is important enough to warrant a good deal of practice with the AttackBox and deployed machine.
About This Walkthrough:
In my walkthroughs, I try to provide a unique perspective into the topics covered by the room. I don’t just give you the answers or copy what is already on TryHackMe. Sometimes I will also review a topic that isn’t covered in the TryHackMe room because I feel that it may be a useful supplement.
I try to prevent spoilers by making finding the solutions a manual action, similar to how you might watch a video of a walkthrough; they can be found in the walkthrough but require an intentional action to obtain. Always try to work as hard as you can through every problem and only use the solutions as a last resort.
This room can be found at: https://tryhackme.com/room/linuxfundamentalspart3
- TryHackMe – Linux Fundamentals Part 3 – Complete Walkthrough
- Task 1 – Introduction
- Task 2 – Deploy Your Linux Machine
- Task 3 – Terminal Text Editors
- Task 4 – General/Useful Utilities
- Task 5 – Processes 101
- Task 6 – Maintaining Your System: Automation
- Task 7 – Maintaining Your System: Package Management
- Task 8 – Maintaining Your System: Logs
- Task 9 – Conclusions & Summaries
Walkthrough
Task 1 – Introduction
There isn’t much more to this task, so continue on and deploy the Linux machine(s).
Question 1
Let’s proceed!
Walkthrough:
Freebie question…
Answer:
No answer needed
Task 2 – Deploy Your Linux Machine
Just like in the Linux Fundamentals Part 2 room, Task 2, this Task is just launching both machines.
You’ll launch the ‘deployed machine’ from inside the task via the green ‘Start Machine’ button at the top of the task, and separately launch the AttackBox using the blue ‘Start AttackBox’ button at the top of the page.
Question 1
I’ve logged into the Linux Fundamentals Part 3 machine using SSH and have deployed the AttackBox successfully!
Answer:
No answer needed
Task 3 – Terminal Text Editors
In the first part of the series, we saw that we can use the command ‘echo’ combined with the > or >> operators to write to a file.
In addition, we’ve used the ‘cat’ command multiple times to read the contents of files and obtain flags.
But these methods aren’t optimal ways of reading or writing text to a file. This Task introduces two new methods of creating and editing files using text editors in the terminal.
Nano
Nano is a great text editor that is included in almost every installation of Linux. It’s super easy to use; just type in the command:
nano <filename>
You will be taken immediately into a text editor with features like searching, copying, and pasting. This allows you to read, write, and search through text in a much friendlier environment.
VIM
VIM is an even more advanced, highly customizable editor that is a common choice for software developers. VIM stands for ‘Vi Improved’, and it’s predecessor Vi (Visual editor) is a much-beloved software developed in the 1970’s.
It can be intimidating at first, but there’s a lot of documentation and many developers choose VIM for daily use.
Question 1
Create a file using Nano
Walkthrough:
The command to create a file using Nano is the same as the command to edit an existing file:
nano <filename>
For example if you wanted to create a new file called ‘mynewfile’, you would use the command ‘nano mynewfile’.
You will be taken into the nano editor, where you can add any text that you like. You’ll need to save it by using the ‘Write Out’ command (ctrl-o, represented as ^O in Linux).
You will be asked to confirm the name of the file, and can exit nano using ctrl-x (^X).
Answer:
No answer needed
Question 2
Edit “task3” located in “tryhackme”‘s home directory using Nano. What is the flag?
Walkthrough:
This question requires that you’re logged in to the deployed machine (from Task 2) using SSH from the AttackBox terminal.
Once you’ve done so, you can use the same command we used in the last question (i.e. ‘nano <filename>’) to open the file using nano and obtain the flag.
Answer:
(Highlight below to find the answer):
THM{TEXT_EDITORS}
Task 4 – General/Useful Utilities
This task covers two ways of transferring files from one computer to another.
The first method uses ‘scp‘ to securely copy a file to or from a remote computer without being logged in to that computer.
The second uses ‘wget‘ to transfer a file using http. You must be logged into the remote computer and run a server module to use this method.
We’ll cover both, but the questions to complete this task only require you to use the ‘wget‘ method.
Transferring Files Using scp
The ‘scp’ command allows us to either send or receive files from a remote computer; you actually provide log in credentials with the command itself (you’re asked to enter a password immediately after executing the command).
Sending a file with scp:
To send a file using scp, you must have a username and password for the system you are trying to remotely copy to. In this example we will be sending myAttackBoxFile from the AttackBox to the deployed machine linuxfundpt3.
Using our deployed machine with a username of ‘tryhackme’, password of ‘tryhackme’, and IP address of <IP>, we would use the command:
scp myAttackBoxFile tryhackme@<IP>:/home/tryhackme
We are prompted to enter user tryhackme’s password, and the transfer will complete. It’s good practice to verify the transfer using an SSH connection.
Note that we are putting the file ‘myAttackBoxFile’ into the folder /home/tryhackme on the deployed machine (linuxfundpt3).
Retrieving a file using scp:
The process of retrieving a file from a remote machine is very similar; the syntax is basically just reversed. Using the same credentials, let’s retrieve a file from the deployed machine, named ‘myRemoteFile’.
In this case we do need to specify a new filename, which we’ll change to ‘myCopiedRemoteFile’. The command is:
scp tryhackme@<IP>:/home/tryhackme/myRemoteFile myCopiedRemoteFile
Again, it’s good practice to verify the file transfer by using the ‘ls’ command in the home directory (/root) of the AttackBox.
Transferring Files Using wget
There are two parts required to transfer a file using wget:
(1) Login to remote computer using SSH and serve files by running HTTPServer (http.server).
(2) Perform wget command to download files from server.
I’ll assume that we’ve already logged in to the deployed machine ‘linuxfundpt3’ using SSH. In order to start the server program, we use the command:
python3 -m http.server
We need to keep this terminal running for the server to stay up, so open another terminal window.
Now we’ll download the file myRemoteFile from our remote server using the command:
wget http://<IP>:8000/myRemoteFile
Remember to substitute the actual IP address for ‘<IP>’.
Question 1
Ensure you are connected to the deployed instance
Walkthrough:
Connect to the machine deployed in Task 2 using SSH:
ssh tryhackme@<IP>
Password: tryhackme
Answer:
No answer needed
Question 2
Now, use Python 3’s “HTTPServer” module to start a web server in the home directory of the “tryhackme” user on the deployed instance.
Walkthrough:
While logged in to the remote machine, use the following command to deploy a web server:
python3 -m http.server
Answer:
No answer needed
Question 3
Download the file http://<IP>/.flag.txt onto the TryHackMe AttackBox. What are the contents?
Walkthrough:
The server requires us to keep the current terminal window open. Open a new terminal window and use the ‘wget’ command to download the file. Note that it is a hidden file, which is denoted by the dot ‘.’ in front of the name ‘.flag.txt’. Don’t forget the dot:
wget http://<IP>:8000/.flag.txt
Substitute the IP address of the deployed machine, replacing ‘<IP>’. The ‘:8000’ after the IP address denotes the TCP port we are trying to connect to. This corresponds with our server, which is using port 8000:

On the following line, we can also see that we have requested .flag.txt using an http GET request.
Let’s go back to our AttackBox terminal. To see our downloaded file in the home directory, use the ‘ls -a’ command to show all files and directories including those that are hidden.
We’ve learned a few ways to read files, including cat and nano. For this task, I went with the simpler ‘cat’ command:
cat .flag.txt
Answer:
(Highlight below to find the answer):
THM{WGET_WEBSERVER}
Question 4
Create and download files to further apply your learning — see how you can read the documentation on Python3’s “HTTPServer” module. Use Ctrl + C to stop the Python3 HTTPServer module once you are finished.
Walkthrough:
The questions only have us use the http.server/wget method, but it’s just as simple using scp using the method described above. I highly recommend practicing; do it just a few times and you’ll be comfortable sending and retrieving files.
Answer:
No answer needed
Task 5 – Processes 101
This Task covers processes, which is a huge topic in its’ own right. A process is an instance of an executed program. You may be familiar with processes on a Windows machine, which can be seen in the GUI by accessing the Task Manager (ctrl+shift+esc).
Processes are more granular than programs; whenever you have more than one tab of a web browser open, you are running a different process for each browser even though they are instances of the same browser program.
In Linux, processes are given an ID number called a Process ID (PID). This is a unique number that allows us to reference a process so that we can work with it.
To see process data, we can use the ‘ps‘ command. When you run the command, you will something like the following:
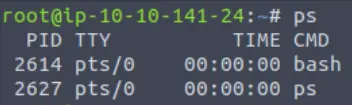
On the right (fourth column) is the name of the process. The first column is the PID, and the second column (TTY) is the terminal that executed the process. In this case, ‘pts’ stands for ‘pseudo terminal slave’ (this is beyond the scope of this room but you can look it up for more info).
The third column is the total accumulated CPU utilization time for the process.
In this case, we see two processes: bash and ps. The bash process is the Bourne Again Shell, and is the default shell for most Linux distributions. The name ‘bash’ references the original Bourne shell on which it is based. The ps process is the ‘ps’ command we just executed. Even though it only runs for a moment, at that moment it itself is a running process so it is included in its’ own list.
We can also use the aux option for the ps command, i.e.:
ps aux
This will give us a list of all processes including system processes and processes run by other users. It also gives us more details including CPU and memory utilization for each process.
The ‘top‘ command is another way of viewing processes; instead of outputting static content, top will continue to run in the terminal, updating every 10 seconds until it is killed (you can use ctrl+c to stop ‘top’).
Process Management Using kill
Processes can be managed using the ‘kill‘ command with the PID, i.e.:
kill <PID>
This will kill the process while allowing the system to perform cleanup, i.e. killing the process cleanly. This is also known as SIGTERM.
If we want to kill the process without cleanup (i.e. immediately), we can use:
kill -KILL <PID>
This is called SIGKILL.
A process can also be suspended using:
kill -TSTP <PID>
Which is also called SIGSTOP.
A suspended process can be continued using:
kill -CONT <PID>
About Processes
In order to effectively manage processes, computers carve up system resources using namespaces. Processes are lumped together within namespaces, meaning that they have to share the resources allocated to that namespace. Namespaces also provide security, as one process can only see the other processes that are in the same namespace.
When a system first boots up, it starts an init (initialization) process with a PID of 0. Ubuntu uses a process called systemd to perform init functions and manage other processes. The act of one init process starting the other necessary processes during boot is called bootstrapping. All of the processes that are started by systemd are called child processes of systemd.
Starting Services on Boot
A service is a type of process that runs in the background and does not interact directly with the desktop.
We can manage services that start during system boot by interacting with systemd using the ‘systemctl‘ command.
We need to provide ‘systemctl’ with an action to perform as well as a service to perform the action on using the following syntax:
systemctl [action] [service]
For example if we want the apache2 service to start on boot, we can use the command:
systemctl start apache2
There are four actions that we can tell ‘systemctl’ we want to execute: start, stop, enable, and disable.
Start and stop allow us to perform an immediate action on a command, while enable and disable tell systemd to start a service during boot, or to disable this feature.
Backgrounding and Foregrounding
Processes can run in the background or in the foreground. We saw this in Linux Fundamentals Part 1 when we learned about the ‘&’ operator.
Running a process in the background can be useful when we want our system to execute a command while we do other things with the terminal. An example might be transferring a large file while we continue to work on other things.
Scripts can also be backgrounded by using ‘ctrl+z’ while the script is running.
A backgrounded process can be brought to the foreground using the ‘fg‘ (foreground) command.
Question 1
Read me!
Answer:
No answer needed
Question 2
If we were to launch a process where the previous ID was “300”, what would the ID of this new process be?
Walkthrough:
PIDs are incremented; that is, new processes are given a PID 1 number higher than the process with the last highest PID.
Answer:
(Highlight below to find the answer):
301
Question 3
If we wanted to cleanly kill a process, what signal would we send it?
Walkthrough:
Remember, the signals are different from the commands. Signals include SIGTERM, SIGKILL, and SIGSTOP. The signal that corresponds to killing a process cleanly uses the ‘kill’ command with no further options.
Answer:
(Highlight below to find the answer):
SIGTERM
Question 4
Locate the process that is running on the deployed instance (10.10.252.107). What flag is given?
Walkthrough:
To complete this task, we have to be logged in to the deployed machine from Task 3 using SSH.
While logged in, use the ‘ps aux’ command to view all of the processes.
One of the processes has a name that is in the form of a TryHackMe flag, i.e. THM{<FLAG>}
I needed a wide screen view to clearly read the names of all of the processes, so I opened the machine in a new window to make the flag process easy to spot.
Answer:
(Highlight below to find the answer):
THM{PROCESSES}
Question 5
What command would we use to stop the service “myservice”?
Walkthrough:
This question is asking about a service, so we should be thinking about the command ‘systemctl’.
The ‘systemctl’ command can be used to perform an action on a service using the syntax:
systemctl <action> <service>
Answer:
(Highlight below to find the answer):
systemctl stop myservice
Question 6
What command would we use to start the same service on the boot-up of the system?
Walkthrough:
We’ll use the systemctl command again here, but this time we want to enable the feature telling systemd to start myservice on boot.
Answer:
(Highlight below to find the answer):
systemctl enable myservice
Question 7
What command would we use to bring a previously backgrounded process back to the foreground?
Walkthrough:
This is one of those commands that is aptly named since its function is to foreground a process.
Answer:
(Highlight below to find the answer):
fg
Task 6 – Maintaining Your System: Automation
Automating tasks is one of the most useful features of computing systems because we can do work just once instead of having to repeat the same tasks repeatedly. Common examples include updates and backups.
In Linux, the cron utility (also called ‘cron job’) is used to schedule automated tasks.
We use the command ‘crontabs‘ to add, edit, or delete automated tasks.
Question 1
Ensure you are connected to the deployed instance and look at the running crontabs.
Walkthrough:
We can look at the currently running crontabs by using the ‘crontabs’ command with the ‘edit’ (-e) flag set.
crontabs -e
This allows us to edit crontabs using the nano editor.
Answer:
No answer needed
Question 2
When will the crontab on the deployed instance (10.10.252.107) run?
Walkthrough:
There is one scheduled task listed in the crontabs nano editor. The entry begins with the timing for when the crontab should run.
Answer:
(Highlight below to see answer):
@reboot
Task 7 – Maintaining Your System: Package Management
This task gives an overview of managing packages in Linux. The apt package management software is the most common way of doing this. apt contains many tools that can be used to install, update, remove, and manage software packages in general.
When software developers release their products, they do so by submitting them to an apt repository. You can add repositories to your system in order to access different software packages using the ‘add-apt-repository’ command.
Question 1
Since TryHackMe instances do not have an internet connection…this task only requires you to read through the material.
Answer:
No answer needed
Task 8 – Maintaining Your System: Logs
Linux computers use logs stored in the ‘/var/log’ directory to document activities and updates for applications and services.
To see the list of logs, simply list the contents of the ‘/var/log’ directory. Individual logs can then be read or searched using the commands we’ve covered, i.e. nano, grep, etc.
Question 1
Look for the apache2 logs on the deployable Linux machine
Walkthrough:
As with the other questions in this Room, we must be logged into the deployed machine (Task 2) using SSH.
Navigate to the /var/log folder and use the ls command:
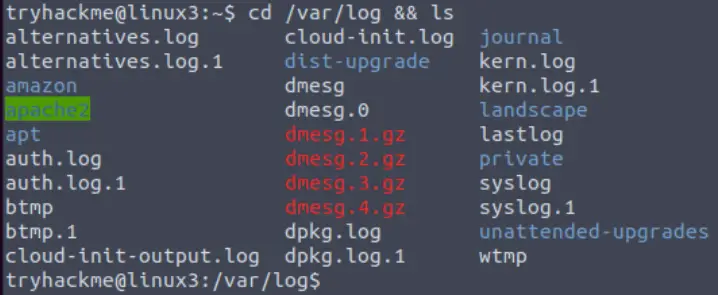
You should see a directory named apache2. Navigate to this directory to find the logs for the apache2 server.
Answer:
No answer needed
Question 2
What is the IP address of the user who visited the site?
Walkthrough:
Start by listing the contents of the /var/log/apache2 directory:

In the directory, we see a number of files including access and error logs. For this question, we are asked to identify the user who visited the site, so we’ll look in access.log.1
Use either cat or nano to read the contents of the file. Inside, you will find a single entry that can be used to answer the next two questions.
Answer:
(Highlight below to find the answer):
10.9.232.111
Question 3
What file did they access?
Answer:
In the access.log.1 file, you should see that the visitor accessed a file using an HTTP GET request.
catsanddogs.jpg
Task 9 – Conclusions & Summaries
This task recaps everything we learned. It also gives suggestions for further learning.
Question 1
Terminate the machine deployed in this room from task 2.
Answer:
No answer needed
Question 2
Continue your learning in other Linux-dedicated rooms
Answer:
No answer needed
Conclusion
This room covers a huge amount of topics, building on the lessons from Linux Fundamentals Parts 1 and 2. It covers terminal based text editors, transferring files to and from remote computers, processes, automation, package management, and logs. While some of this material can seem dry at times, these topics are essential for using and managing Linux systems.
Overall, I really enjoyed this room. A huge thanks to tryhackme and cmnatic for putting this room together!