TryHackMe – How Websites Work – Complete Walkthrough
This page contains a walkthrough of the ‘How Websites Work’ room at TryHackMe. The room covers html and javascript basics, and also introduces sensitive data exposure and html injection.
This room can be found at: https://tryhackme.com/room/howwebsiteswork
Walkthrough
Task 1 – How Websites Work
The website experience typically starts with a browser, which is probably what you’re using to read this right now.
When you visit a website, your browser initiates a complex sequence of actions that requests the website data from a server that could be on the other side of the planet. A web server is just a computer that is using software to provide data to clients.
Websites have two ‘ends’: a front end and a back end.
The front end, also called the client side, is the part of the website that is experienced by clients. When you view a website in your browser, you are seeing the front end of that site.
The back end, or the server side, is everything else connected to the website that you can’t see.
Question 1
What term best describes the side your browser renders a website?
Walkthrough:
The client side (front end) of the site is the site that you experience as a client, and the server side (back end) is all the stuff that you can’t see.
Answer:
(Highlight below to find the answer):
Client side
Task 2 – HTML
There are three elements to modern websites: html, css, and javascript.
HTML: HyperText Markup Language is the primary language that websites are written in. Web developers use HTML to create the structure of a page as well as its’ content.
CSS: Cascading Style Sheets are used to style and customize the HTML elements on a website, adding colors, changing typography or layout, etc.
Javascript: Javascript (JS) is a programming language (unlike HTML, which is a markup language) that is used to add interactive features to a website. An example is a hover feature that changes the color or size of a button when your mouse hovers over it.
HTML in Detail
The first step in creating a webpage is using HTML to make a basic structure for the page.
HTML uses elements, or tags, to add things like page title, headings, text, or images.
Here is a basic structure for a webpage. Note the comments on each line that allow us to add text that won’t interfere with the code:
<!DOCTYPE html> <!– This tells our browser to expect html –>
<html> <!– The root element of the page. All other elements are contained within –>
<head> <!– The head element contains information about the page –>
<title>My Webpage Title</title> <!–The title of the webpage –>
</head> <!– End of the head element –>
<body> <!– The body element contains most of what’s displayed on the page –>
<h1>I am an H1 heading <h1> <!– An H1 heading is used only for the most important text –>
<p></p> <!–Most of the text uses the paragraph ‘p’ element –>
<img src=’img/mycatphoto.jpg’> <!– Adds mycatphoto.jpg image –>
</body> <!– End of the body element –>
</html> <!–End of the root html element –>
Question 1
Let’s play with some HTML! On the right-hand side, you should see a box that renders HTML – If you enter some HTML into the box and click the green “Render HTML Code” button, it will render your HTML on the page; you should see an image of some cats.
Walkthrough:
Click the green ‘View Site’ button at the top of the task. This will open an html editor/browser simulation.
This question is freebie; you can fiddle around with the html, add some tags, etc.
Answer:
(Highlight below to find the answer):
No answer needed
Question 2
One of the images on the cat website is broken – fix it, and the image will reveal the hidden text answer!
Walkthrough:
Compare the code for the two cat images. One is:
<img src=’img/cat-1.jpg’>
The other is:
<img src=’img/cat-2′>
What is different about these two? When you find the issue, click the green button in the simulation to render the html code.
The flag can be seen on the second cat image.
Answer:
(Highlight below to find the answer):
HTMLHERO
Question 3
Add a dog image to the page by adding another img tag (<img>) on line 11. The dog image location is img/dog-1.png
Walkthrough:
Right below the second cat image, start adding a new element for an image of a dog. The code should include the <img> tag and have a source of ‘src=’img/dog-1.png’.
Again, the flag can be seen on the image itself.
Answer:
(Highlight below to find the answer):
DOGHTML
Task 3 – Javascript
Javascript is one of the most popular programming languages, and is used to add interactivity to websites.
There are two ways to add Javascript to a webpage using the <script> tag:
(1) You can add a <script> tag and put all of the code within the opening (<script>) and closing (</script>) tags.
(2) You can add <script> tag with a source attribute, thereby loading the actual Javascript code from a remote location.
Javascript can be used to target elements with an ‘id’ attribute. This allows you to apply javascript code to any element with that id attribute, without having to rewrite the javascript code for each element.
Question 1
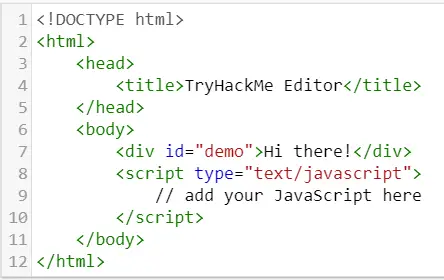
Click the “View Site” button on this task. On the right-hand side, add JavaScript that changes the demo element’s content to “Hack the Planet”
Walkthrough:
In this example, we are going to target the <div> element with an id of ‘demo’. The <div> element defines a section, or ‘division’ of the page. These can be added at will.
While we could change the text manually, in this example we will instead use JS to target elements with an id of ‘demo’, which includes the <div> element that we want to change.
The solution is actually given in the write-up for this Task. All we need to do is paste the following code into the correct place:
document.getElementById(“demo”).innerHTML = “Hack the Planet”;
When we render the code, we will see that the text has changed and we are given the flag in a popup dialog.
Answer:
(Highlight below to find the answer):
JSISFUN
Question 2
Add the button HTML from this task that changes the element’s text to “Button Clicked” on the editor on the right, update the code by clicking the “Render HTML+JS Code” button and then click the button.
Walkthrough:
We’ve mentioned that Javascript can be used to add interactivity to HTML elements.
In this example, we have an html <button> tag. We will use Javascript to tell the button what to do when it is clicked. Note that we are differentiating between the two; <button> is HTML but we are using Javascript to give it functionality.
The code for this example is given in THM’s Task writeup:
<button onclick=’document.getElementById(“demo”).innerHTML = “Button Clicked”;’>Click Me!</button>
We can actually read this code. On the left we have the <button> tag, followed by an ‘onclick’ even attribute; we want it to do something when it is clicked.
Next we have a ‘document.getElementById’ section that tells us that when the button is clicked, we want something to happen to elements with an id of ‘demo’. This includes our <div> element that we changed earlier using JS.
We have the text “Button Clicked”, which means that when we click the button, we want elements with an id of ‘demo’ to change their text to ‘Button Clicked’.
The opening tag of the <button> element is closed, and we use HTML to specify the text on the button itself as ‘Click Me!’. This is followed by the closing </button> tag.
Play around with this to see if you can follow the code and the actual performance on the page.
Answer:
(Highlight below to find the answer):
No answer needed
Task 4 – Sensitive Data Exposure
Sometimes when a web developer is coding a website, they include vulnerable code that they intend to be temporary and later forget that its there.
One example is temporary login credentials that could provide an easy way to secure user access to a web application.
This is why one of the first things to do when assessing a web app for vulnerability, is to view the page source. This can easily be done by right clicking on the page and selecting ‘View Page Source’.
Question 1
View the website on this task. What is the password hidden in the source code?
Walkthrough:
Click the green ‘View Site’ button at the top of the Task. You should see a simulated web page pop up on the right side of the screen.
In this case, we want to see the source code for the frame that contains our simulated web page.
Right click on the webpage and select ‘View Frame Source‘. Depending on the browser, your instructions to view the frame source might be slightly different. Check out this short guide from IU: https://kb.iu.edu/d/agao
Once you have the source code opened, you should see a multi-line comment near the end of the <body> element with the login information. You can confirm that you have the answer by entering the credentials into the website login.
Answer:
(Highlight below to find the answer):
testpasswd
Task 5 – HTML Injection
HTML injection is a technique that takes advantage of unsanitized input.
Basically, whenever input from a client uses JS to produce an output, that input must be sanitized. If it isn’t sanitized, then we can input our own code and the webpage will execute our code as though it is part of the original code.
This Task contains a webpage simulation that looks like the image below.
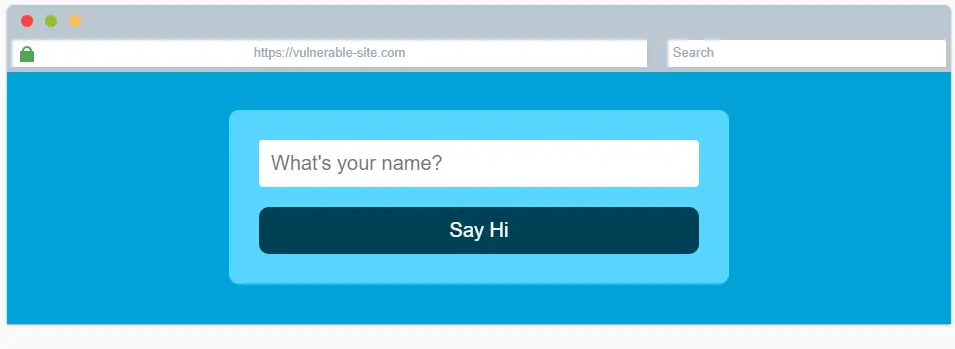
This page contains an input text field asking for our name. Depending on how this is coded, we might be able to exploit it.
If we view the source code of the simulation, we find the following JS for an input field:

We can see that this code creates a function ‘sayHi’ that takes our name and outputs the text ‘Welcome’, followed by our name.
The input is not sanitized, so we know that we can take advantage of this situation.
Question 1
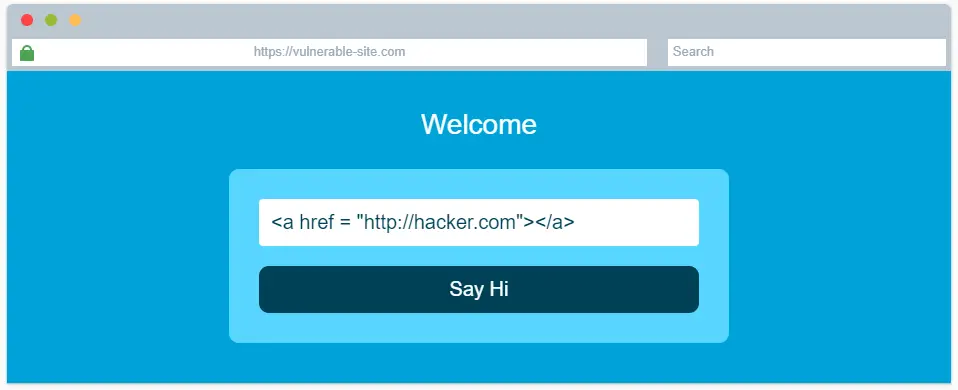
View the website on this task and inject HTML so that a malicious link to http://hacker.com is shown.
Walkthrough:
Our instructions are to have the website display a link to http://hacker.com.
To do this, we can use the text input field to inject the html code for the link we want to create.
This hasn’t been covered yet, but html links use the <a> tag with the following syntax:
<a href=”url“>link text</a>
In this case, we don’t require any link text so this field will be left blank.
Input the html code into the text box and click the ‘Say Hi’ button to obtain the flag for this question. See the image below (Spoiler warning!).
Answer:
(Highlight below to find the answer):
HTML_INJ3CTI0N
Conclusion
This is one of my favorite rooms in the ‘Pre Security’ path. I found it be enjoyable and informative, although my experience with html may have played a role.
In general, this room does a great job of introducing the concepts of html, css, and javascript. My only suggestion for improvement is that it doesn’t cover css at all, so a newbie would probably still be confused about what css even is.
I really enjoyed the last three tasks and thought that they were a great way to get a bit more comfortable with JS and introduce the topics of sensitive data exposure as well as html injection.
Overall, I really enjoyed this room. A huge thanks to tryhackme for putting this room together!