Day 7 – Migration Without Security
Day 7 is all about NoSQL databases.
Let’s start with the basics: a database is an organized collection of data that can be accessed from a computer system. We interact with and manage a database using a DBMS (DataBase Management System).
There are two types of database: relational and non-relational databases.
Relational databases store data in tables, and data from different tables can be linked to each other through the use of keys. They are optimized for storing and retrieving information where it makes sense to have linked data in different tables. An example is a database containing three tables: Customers, Products, and Sales. It would be super useful to be able to do things like querying how customers’ geographical location (which would logically be stored in the ‘Customers’ table relates to what products they purchase, and the seasonality of those purchases. This is where relational databases excel.
Non-relational databases don’t have the ability to relate information from one group of data (called collections in non-relational databases) to another. Instead, they are optimized for storing and querying specific data formats. They scale much more easily than relational databases, which enables them to grow larger while maintaining high speeds. They just can’t do the ‘relational’ stuff that their cousins are optimized for.
Relational databases are managed with SQL, which stands for Structured Query Language. This means that a RDBMS (Relational Database Management System) utilizes SQL to store, retrieve, and manage relational databases.
Non-relational databases are managed with NoSQL, which stands for ‘Non SQL’ or ‘Not Only SQL’.
Question 1
Interact with the MongoDB server to find the flag. What is the flag?
Start the AttackBox and target VM for Day 7.
Open a terminal window and SSH into the target machine:
ssh [email protected] -p 2222
Remember to substitute your target machine’s IP for the IP address above (10.10.10.10)
SSH (Secure Shell) is a tool for securely opening a shell on another computer using an unsecured connection. SSH allows us to access a command line on the target machine. Here, we are trying to login with username ‘thm’. When prompted, enter password ‘tryhackme’.
Username: thm
Password: tryhackme
You should see a new command prompt that looks like the following:
thm@mongo-server:~$ mongo
Type in ‘mongo’ as shown above to access the MongoDB DBMS.
Use the ‘show databases’ command to pull up the list of databases that are currently being managed by Mongo:

We can see there are currently four databases: admin, config, flagdb, and local.
The database ‘flagdb’ sounds like it might contain the flag we need to answer the first question. Let’s connect to it using the ‘use’ command. Then we’ll use the db.GetcollectionNames() function to print the collections within the ‘flagdb’ database:

So flagdb contains only one collection, which is named ‘flagColl’. Let’s see what’s inside flagColl using ‘db.flagColl.find()’:

Looks like we found our flag!
Answer:
(Highlight below to see answer):
THM{8814a5e6662a9763f7df23ee59d944f9}
***Bonus Practice in MongoDB*** – Not needed to complete room.
The ‘use’ command creates a new database if one of the same name doesn’t already exist:

Next, we’ll create two collections in the AoC3 database, users and roles:

Now let’s create (‘insert’) two new users into the users collection:

Now let’s change the username of ‘user’ to ‘tryhackme’ by using the update function:

***End of Bonus Practice***
Question 2
We discussed how to bypass login pages as an admin. Can you log into the application that Grinch Enterprise controls as admin and retrieve the flag?
Use the knowledge given in AoC3 day 4 to setup and run Burp Suite proxy to intercept the HTTP request for the login page. Then modify the POST parameter.
First, let’s navigate to http://<target machine IP>:

There’s a login form that we want to try exploiting.
Open up Burp suite and try logging in as admin and a password of your choosing (I’ll use ‘password’ for the example).
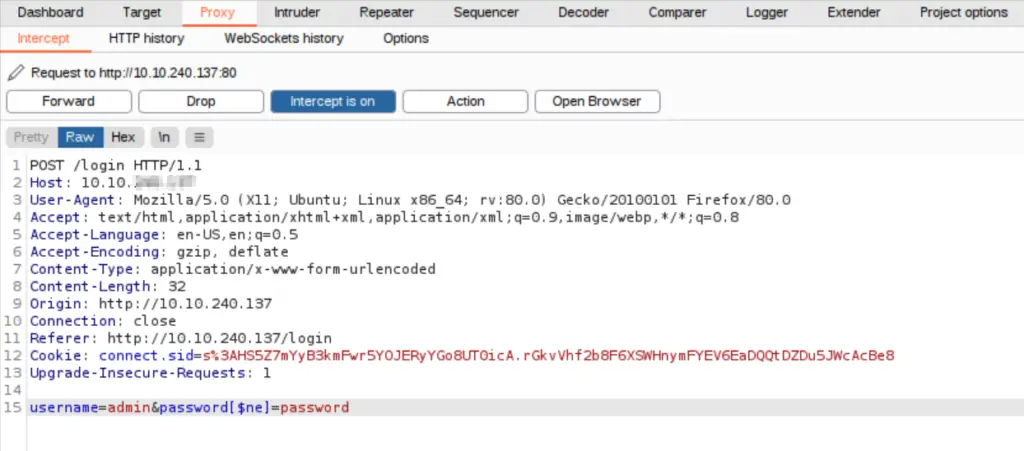
Look for the POST request on Burp suite’s intercept tab. The last line will contain username and password details. Change the ‘password’ parameter to ‘password[$ne]’:

What this does is that it queries the database for a username ‘admin’ where the password does not equal ‘password’.
Forward the request and turn the Burp suite proxy off. Navigate back to Firefox and you should be logged in as admin:

We’ve gained access! Navigate to the ‘Flag!’ page to obtain the flag for this question.
Answer:
(Highlight below to see answer):
THM{b6b304f5d5834a4d089b570840b467a8}
Question 3
Once you are logged in, use the gift search page to list all usernames that have guest roles. What is the flag?
Navigate to the ‘Search’ page.
Turn Burp suite proxy back on and then return to the browser. Enter username ‘admin’ into the Search box and press ‘Search’.
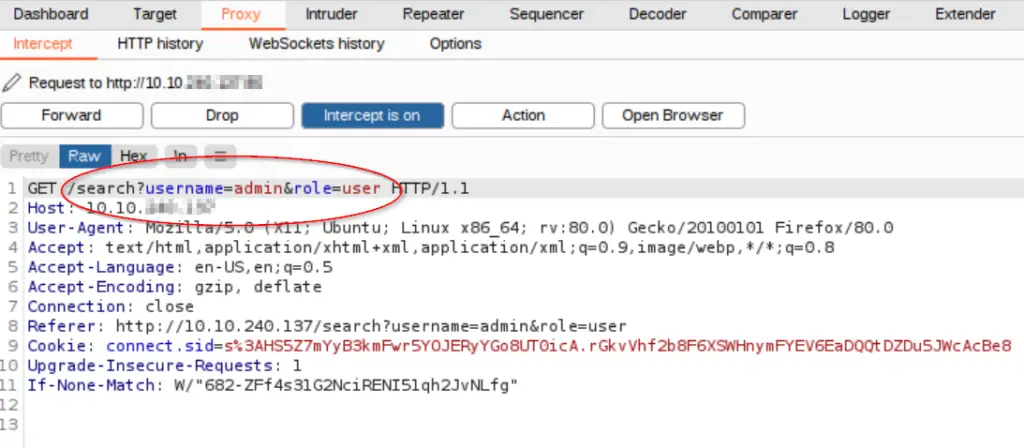
Returning to Burp suite, we should see the GET request that has been intercepted. The top line shows the username and role; since we entered username of admin, we should see the following:

We have a username of ‘admin’ and role of ‘user’. We’re trying to find usernames that have guest roles. Can you see what we need to change in this GET request to accomplish this?
First, we need to change the ‘username’ parameter so that we are looking for all usernames that are *not* ‘admin’. Next, we need to change the value of the ‘role’ parameter so that we are looking for users with a ‘guest’ role. In other words,

Forward this request and turn intercept off; when you return to the browser, you should find the flag (it was at the bottom of my page):

Answer:
(Highlight below to see answer):
THM{2ec099f2d602cc4968c5267970be1326}
Question 4
Use the gift search page to perform NoSQL injection and retrieve the mcskidy record. What is the details record?
There are several ways to do this, including using Burp suite as we did in the last question (change username to ‘mcskidy’ and role to ‘admin’ in the GET request).
This time we’ll manipulate the URL in the browser window for practice. Enter ‘mcskidy’ in the search bar on the page and look at the URL. It should look like this:
http://10.10.240.137/search?username=mcskidy&role=user
On the page itself, we are getting an error – the same error we received when trying to login as admin earlier.
Since we know the username has to be ‘mcskidy’, this must mean that his role is not ‘user’. Let’s change the URL using the NoSQL trick we learned:
http://10.10.240.137/search?username=mcskidy&role[$ne]=user
Reload the page and you should see McSkidy’s information!
Answer:
(Highlight below to see answer):
ID:6184f516ef6da50433f100f4:mcskidy:admin