TryHackMe – Basic Pentesting
Introduction to TryHackMe Basic Pentesting
TryHackMe’s Basic Pentesting room is a great guided CTF. It walks through several of the most essential steps used while pentesting as well as some common tools. There are two web servers to look at, directory enumeration, password cracking with hydra, SMB enumeration, and privilege escalation using a private RSA key. It is a relatively practical room in that progress relies on exploiting common attack vectors rather than completing arbitrarily difficult challenges like steganography.
Overall it provides an awesome, fun experience whether it is your first CTF or just want to practice using a relatively easy box.
About This Walkthrough:
In this walkthrough I try to provide a unique perspective into the topics covered by the room. Sometimes I will also review a topic that isn’t covered in the TryHackMe room because I feel it may be a useful supplement.
I try to prevent spoilers by making finding the solutions a manual action, similar to how you might watch a video of a walkthrough; they can be found in the walkthrough but require an intentional action to obtain. Always try to work as hard as you can through every problem and only use the solutions as a last resort.
This room can be found at: https://tryhackme.com/room/basicpentestingjt
Walkthrough for TryHackMe Basic Pentesting
Task 1 – Web App Testing and Privilege Escalation
Task 1 – Question 1
Deploy the machine and connect to our network
Deploy the target machine using the green ‘Start Machine’ button:

We’ll be attacking the target machine using another machine (an attacking machine). We can either run this directly on your computer or VM and connect to THM using OpenVPN or you can start the AttackBox using the blue button at the top of the page.
I like to ensure that I can connect to the machine using ping:

Not only does this tell us that we are properly connected, it also potentially gives us information about the target machine’s OS. The default TTL is set by the OS (it can be changed but rarely is). A TTL of 64 indicates a Linux machine; TTL of 128 indicates Windows, and TTL of 256 indicates Solaris.
Here the TTL is 64, indicating that the target is most likely running Linux.
Answer:
No answer needed
Question 2
Find the services exposed by the machine
In almost all cases we will begin our attack by enumerating the target machine. The most common tool for doing so is nmap.
We can run a quick nmap scan using the command:
nmap <IP>

This will scan the most common 1000 TCP ports, which will usually catch everything. However there are 65,535 total TCP ports so it’s always a good idea to perform a full port scan by adding the ‘-p-‘ flag to our nmap command:
nmap -p- <IP>
This may take a while, especially if you are using the AttackBox.
While this is running, let’s look more closely at the output of our nmap scan. We see a number of open ports. Nmap guesses the service running on each port based on the port number; we can also verify the service and version using a more in-depth scan. I like to use the ‘-A’ flag for this but there are other ways to do this such as the ‘-sV’ flag. Every service version can (and should) be cross-checked for potential vulnerabilities.
However, we also want to follow the path of least resistance. Web servers are of particular interest and we note a server on port 80 as well as an http-proxy on port 8080. We can visit these manually using a web browser and also perform directory enumeration using a tool like dirb or gobuster.
Answer:
No answer needed
Question 3
What is the name of the hidden directory on the web server(enter name without /)?

Our dirb scan found two pages that gave a code 200, which means ‘OK’. The others returned code 403, ‘Forbidden Response’. This indicates that this is probably a valid URI but the server will not authorize our request.
Of the two pages that returned code 200, one (index.html) is the home (landing) page for the server. We must be looking for the other.
Answer (Highlight Below):
development
Question 4
User brute-forcing to find the username & password
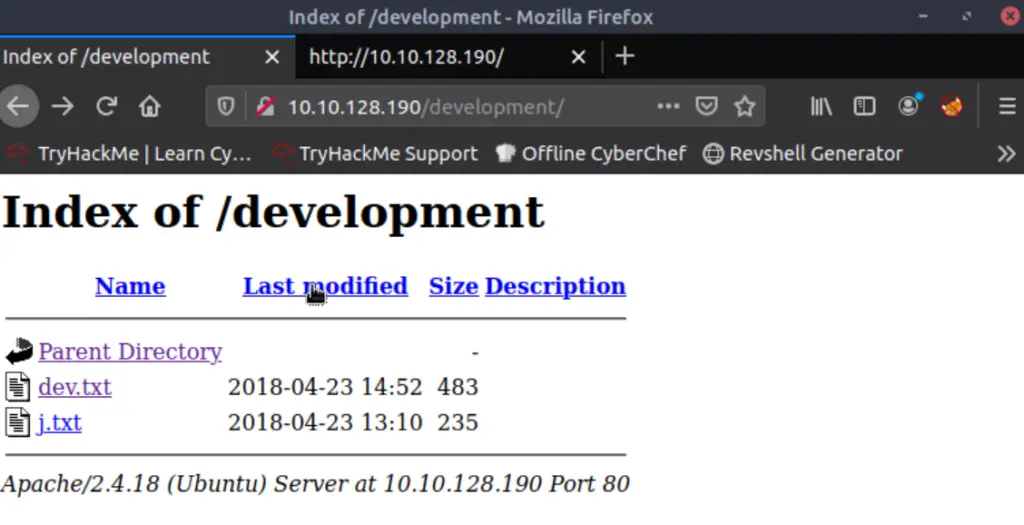
Taking a look at the /development directory:


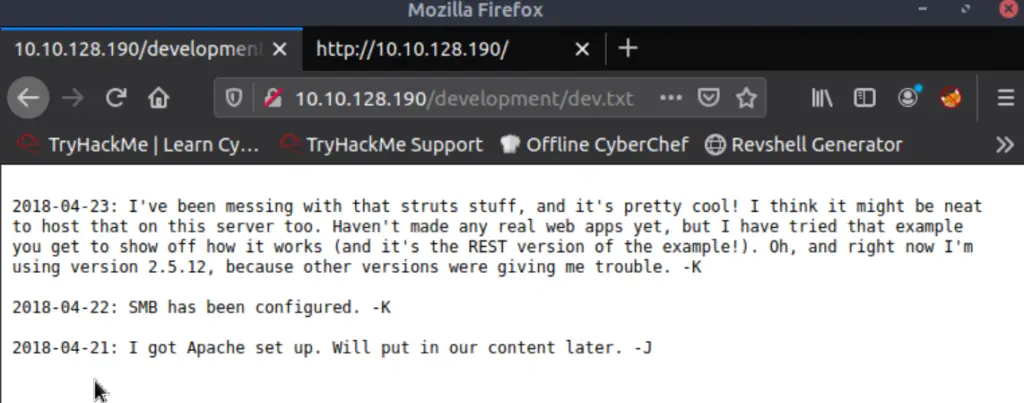
There is a lot of useful information here. We are given a service version number of 2.5.12 (although we don’t yet know what service this is). We are told that SMB has been configured. We are also told that an Apache server is running. And finally, we have the first letters of two potential usernames, ‘K’ and ‘J’.
Looking at the other file in the /development directory:

It sounds like J has a crackable password. If we can find the rest of J’s username then we might be able to gain a foothold on the machine via brute force.
Answer:
No answer needed
Question 5
What is the username?
We saw that SMB was running in our nmap scan (ports 139 and 445), and the message from K also indicated that SMB was up.
We can enumerate SMB using the ‘enum4linux’ tool:
enum4linux -a <IP>
This gives a lot of output, but is able to enumerate two users:

Remember that we are targeting J, the user with a weak password.
Answer (Highlight Below):
jan
Question 6
What is the password?
Time for some password cracking!
We saw in our nmap scan that SSH is running on port 22. We can use hydra to brute-force a weak password for many services including SSH. In this case, we will feed hydra the username jan. I chose to use the ’10k-most-common.txt’ wordlist. Here’s the syntax I used for hydra:
hydra -l jan -P /usr/share/wordlists/SecLists/Passwords/Common-Credentials/10k-most-common.txt 10.10.128.190 ssh

Answer (Highlight Below):
armando
Question 7
What service do you use to access the server(answer in abbreviation in all caps)?
Another way of asking ‘which service did we just use to crack the password’?
Answer (Highlight Below):
SSH
Question 8
Enumerate the machine to find any vectors for privilege escalation
Now that we have a username and password for SSH, we can gain a shell using the command:
ssh jan@<IP>
And entering the password (armando) when prompted.
Answer:
No answer needed
Question 9
What is the name of the other user you found(all lower case)?
After a bit of exploration, we note that there is another user whose directory we can access:

Answer (Highlight Below):
kay
Question 10
If you have found another user, what can you do with this information?
One common way of escalating privileges is by using a found private RSA key:

To do so, we need to obtain a copy of id_rsa. We can use:
scp jan@:/home/kay/.ssh/id_rsa /home/id_rsa
Or simply cat the contents and paste them in a new file on our local machine.
Once we do this, we need to change the file permissions:
chmod 600 id_rsa
Next we can try to SSH using id_rsa:
ssh -i /home/id_rsa kay@<IP>
But a passphrase is required:

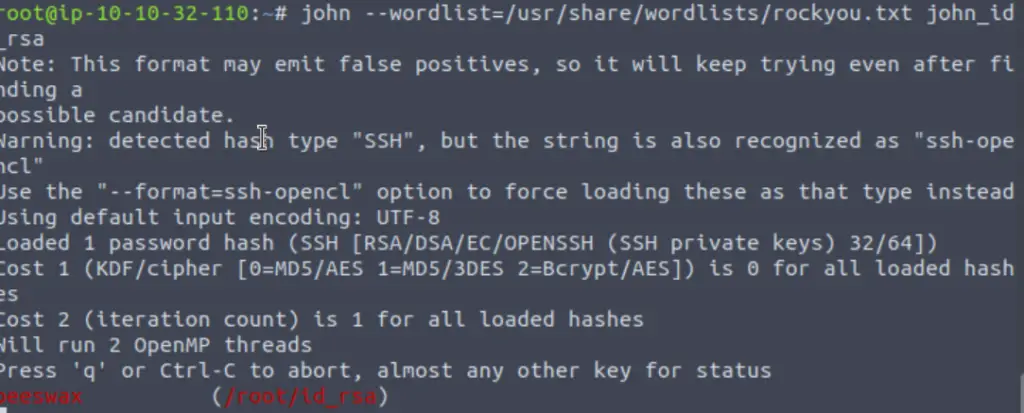
We need to crack the passphrase and can use john to do it. This is a two-step process: (1) use ssh2john to get id_rsa into a format useable to john, and (2) run john against the new file.
First, I navigated to the directory containing ssh2john and ran it using:
python3 ssh2john.py /id_rsa > <output file>

Next, I ran john against this file using the rockyou.txt wordlist:

Answer:
No answer needed
Question 11
What is the final password you obtain?
Now that we have kay’s passphrase, we can login using SSH:
ssh -i /home/id_rsa kay@<IP>
Once in kay’s home directory, we can finally read the contents of pass.bak:

Answer (Highlight Below):
heresareallystrongpasswordthatfollowsthepasswordpolicy$$
Conclusion
This room does an excellent job of walking through many essential pentesting steps and tools. I especially enjoyed the privilege escalation vector because it forces you to learn a bit about RSA keys. A huge thanks to ashu and tryhackme for this awesome room!